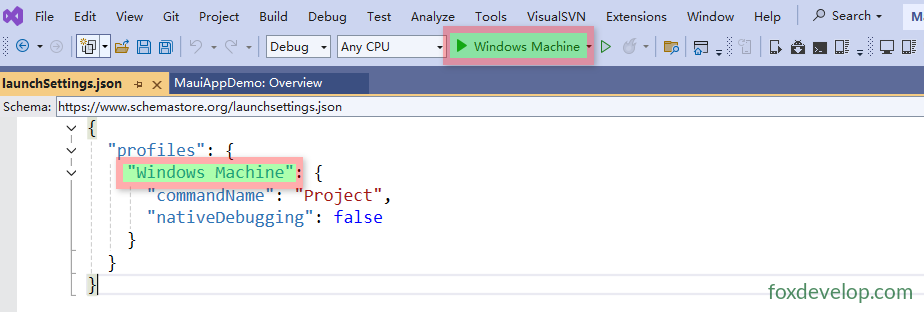
launchSettings.json 文件打开如下
{
  "profiles": {
    "Windows Machine": {
      "commandName": "Project",
      "nativeDebugging": false
    }
  }
}Code language: HTML, XML (xml)
Windows Machine 这个就是我们的运行的时候,顶部工具栏看到的名称,是和编译运行有关系的。
和平台相关的配置
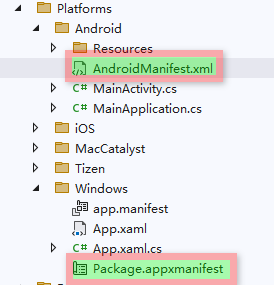
Android
MAUI是支持多平台的,一套代码可以在多个平台中生成项目,例如上面我们可以看到Android中的常用到的一个配置清单,AndroidManifest.xml文件,这个文件是配置Android很重要的一个文件,例如和发布有关的版本号,广告id等等都在这里配置。这个清单文件也不属于MAUI特有的,是谷歌android框架规定的一个文件,不管你是用原生kotlin 还是flutter nativephp 等等还是maui都会出现这个文件。
<?xml version="1.0" encoding="utf-8"?>
<manifest xmlns:android="http://schemas.android.com/apk/res/android">
	<application android:allowBackup="true" android:icon="@mipmap/appicon" android:roundIcon="@mipmap/appicon_round" android:supportsRtl="true"></application>
	<uses-permission android:name="android.permission.ACCESS_NETWORK_STATE" />
	<uses-permission android:name="android.permission.INTERNET" />
</manifest>Code language: HTML, XML (xml)
上面文件中配置了图标,申请权限等等。
Windows
这个目录是和Windows程序有关的,也就是MAUI可以发布成Windows应用的,那么和发布Windows有关的配置,就在这个目录下面。
例如上面的Package.appxmanifest 文件是和发布微软MSIX有关的配置。
<?xml version="1.0" encoding="utf-8"?>
<Package
  xmlns="http://schemas.microsoft.com/appx/manifest/foundation/windows10"
  xmlns:uap="http://schemas.microsoft.com/appx/manifest/uap/windows10"
  xmlns:mp="http://schemas.microsoft.com/appx/2014/phone/manifest"
  xmlns:rescap="http://schemas.microsoft.com/appx/manifest/foundation/windows10/restrictedcapabilities"
  IgnorableNamespaces="uap rescap">

  <Identity Name="maui-package-name-placeholder" Publisher="CN=User Name" Version="0.0.0.0" />

  <mp:PhoneIdentity PhoneProductId="03F6A51B-9B33-4897-9137-7154300CD576" PhonePublisherId="00000000-0000-0000-0000-000000000000"/>

  <Properties>
    <DisplayName>$placeholder$</DisplayName>
    <PublisherDisplayName>User Name</PublisherDisplayName>
    <Logo>$placeholder$.png</Logo>
  </Properties>

  <Dependencies>
    <TargetDeviceFamily Name="Windows.Universal" MinVersion="10.0.17763.0" MaxVersionTested="10.0.19041.0" />
    <TargetDeviceFamily Name="Windows.Desktop" MinVersion="10.0.17763.0" MaxVersionTested="10.0.19041.0" />
  </Dependencies>

  <Resources>
    <Resource Language="x-generate" />
  </Resources>

  <Applications>
    <Application Id="App" Executable="$targetnametoken$.exe" EntryPoint="$targetentrypoint$">
      <uap:VisualElements
        DisplayName="$placeholder$"
        Description="$placeholder$"
        Square150x150Logo="$placeholder$.png"
        Square44x44Logo="$placeholder$.png"
        BackgroundColor="transparent">
        <uap:DefaultTile Square71x71Logo="$placeholder$.png" Wide310x150Logo="$placeholder$.png" Square310x310Logo="$placeholder$.png" />
        <uap:SplashScreen Image="$placeholder$.png" />
      </uap:VisualElements>
    </Application>
  </Applications>

  <Capabilities>
    <rescap:Capability Name="runFullTrust" />
  </Capabilities>

</Package>
Code language: HTML, XML (xml)
配置 发布者信息 配置图标 用用名称等等。
资源目录
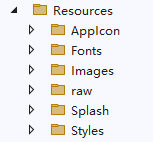
这个目录是配置程序用到的图标,字体,图片,音频,样式等等
后续我们项目中用到的时候,再讲解。
App.xaml
App文件,包含xaml和后台的xaml.cs 文件
作用:全局资源加载、应用启动、创建主窗口
App.xaml:应用根 Application,存放全局资源字典(颜色、样式)
App.xaml.cs:后台代码,重写 CreateWindow 定义初始页面(AppShell 导航框架)
AppShell 是MAUI Shell 导航框架,包括左侧栏滑动菜单,底部菜单等等。
<?xml version = "1.0" encoding = "UTF-8" ?>
<Application xmlns="http://schemas.microsoft.com/dotnet/2021/maui"
             xmlns:x="http://schemas.microsoft.com/winfx/2009/xaml"
             xmlns:local="clr-namespace:MauiAppDemo"
             x:Class="MauiAppDemo.App">
    <Application.Resources>
        <ResourceDictionary>
            <ResourceDictionary.MergedDictionaries>
                <ResourceDictionary Source="Resources/Styles/Colors.xaml" />
                <ResourceDictionary Source="Resources/Styles/Styles.xaml" />
            </ResourceDictionary.MergedDictionaries>
        </ResourceDictionary>
    </Application.Resources>
</Application>Code language: HTML, XML (xml)
App.xaml.cs
namespace MauiAppDemo
{
    public partial class App : Application
    {
        public App()
        {
            InitializeComponent();
        }

        protected override Window CreateWindow(IActivationState? activationState)
        {
            return new Window(new AppShell());
        }
    }
}Code language: C# (cs)
return new Window(new AppShell()); 这里就是调用我们的AppShell这个类,这个就算上面说的导航Shell。
AppShell.xaml
AppShell 是 MAUI Shell 导航容器,替代传统 MainPage,统一管理路由、底部 Tab、侧边抽屉、页面跳转。
不过官方的例子中,没有侧边抽屉等等,它仅注册一个路由页面 MainPage,无底部 Tab、无侧边菜单。
<?xml version="1.0" encoding="UTF-8" ?>
<Shell
    x:Class="MauiAppDemo.AppShell"
    xmlns="http://schemas.microsoft.com/dotnet/2021/maui"
    xmlns:x="http://schemas.microsoft.com/winfx/2009/xaml"
    xmlns:local="clr-namespace:MauiAppDemo"
    Title="MauiAppDemo">

    <!-- 定义页面路由,Route 是导航标识 -->
    <ShellContent
        Title="Home"
        ContentTemplate="{DataTemplate local:MainPage}"
        Route="MainPage" />

</Shell>Code language: HTML, XML (xml)
后台cs
namespace MauiAppDemo
{
    public partial class AppShell : Shell
    {
        public AppShell()
        {
            InitializeComponent();
        }
    }
}Code language: C# (cs)
ShellContent:代表一个页面入口
后续我们会学习侧边抽屉菜单等等,读者可以看后续课程。(foxDevelop.com)
GlobalXmlns.cs
MAUI 程序集级特性 XmlnsDefinition,全局统一别名,不用每个页面重复写 xmlns:local=”clr-namespace:MauiAppDemo”
using Microsoft.Maui.Controls;

[assembly: XmlnsDefinition("http://schemas.microsoft.com/dotnet/maui/global", "MauiAppDemo")]
[assembly: XmlnsDefinition("http://schemas.microsoft.com/dotnet/maui/global", "MauiAppDemo.Pages")]Code language: HTML, XML (xml)
必须放在程序集根命名空间,不能放在 class 内部;推荐新建独立 GlobalXmlns.cs
MainPage.xaml
这就是我们的窗体主页面,读者运行项目后,看到的窗体,例如图片,文字,下面的点击按钮。都
- ScrollView:内容超出屏幕可滚动
- VerticalStackLayout:垂直布局(推荐替代老旧 StackLayout)
- 图片、标题文本、计数按钮
- 点击按钮实现计数器,附带无障碍屏幕朗读 SemanticScreenReader.Announce()
<?xml version="1.0" encoding="utf-8" ?>
<ContentPage xmlns="http://schemas.microsoft.com/dotnet/2021/maui"
xmlns:x="http://schemas.microsoft.com/winfx/2009/xaml"
x:Class="MauiAppDemo.MainPage">
<ScrollView>
<VerticalStackLayout
Padding="30,0"
Spacing="25">
<Image
Source="dotnet_bot.png"
HeightRequest="185"
Aspect="AspectFit"
SemanticProperties.Description="dot net bot in a hovercraft number nine" />
<Label
Text="Hello, World!"
Style="{StaticResource Headline}"
SemanticProperties.HeadingLevel="Level1" />
<Label
Text="Welcome to .NET Multi-platform App UI"
Style="{StaticResource SubHeadline}"
SemanticProperties.HeadingLevel="Level2"
SemanticProperties.Description="Welcome to dot net Multi platform App U I" />
<Button
x:Name="CounterBtn"
Text="Click me"
SemanticProperties.Hint="Counts the number of times you click"
Clicked="OnCounterClicked"
HorizontalOptions="Fill" />
</VerticalStackLayout>
</ScrollView>
</ContentPage>
Code language: HTML, XML (xml)Image Label Button 这些就是对应窗体中的图片 文字 按钮等等。
那么点击按钮的时候,按钮上面的计数文字是如何修改的?
看后台代码
namespace MauiAppDemo
{
    public partial class MainPage : ContentPage
    {
        int count = 0;

        public MainPage()
        {
            InitializeComponent();
        }

        private void OnCounterClicked(object? sender, EventArgs e)
        {
            count++;

            if (count == 1)
                CounterBtn.Text = $"Clicked {count} time";
            else
                CounterBtn.Text = $"Clicked {count} times";

            SemanticScreenReader.Announce(CounterBtn.Text);
        }
    }
}
Code language: C# (cs)
这里的OnCounterClicked,就是对应按钮中注册的事件了 Clicked=”OnCounterClicked”
<Button
                x:Name="CounterBtn"
                Text="Click me"
                SemanticProperties.Hint="Counts the number of times you click"
                Clicked="OnCounterClicked"
                HorizontalOptions="Fill" />Code language: HTML, XML (xml)
点击的时候count++; 然后再设置 CounterBtn.Text
MauiProgram.cs
MauiProgram 是 MAUI 应用启动入口(Program Main 的替代)
- 构建 MauiAppBuilder
- 注册应用主程序 App
- 配置字体、第三方 SDK、依赖注入服务
- 启用日志
- 生成 MauiApp 实例启动程序
整个流程:CreateMauiApp() → App 构造函数 → App.CreateWindow () → Window (AppShell) → AppShell 加载 MainPage