四種基礎版面配置
版面配置是一種用來放置多個控制項的容器,可依規則調整內部控制項的位置。
藉此撰寫出美麗的介面。
版面配置內部也可以巢狀嵌入其他版面配置。
版面配置-線性版面配置 LinearLayout
線性版面配置,非常常用
如同名稱,它包含的控制項會沿線性方向依序排列。
透過 android:orientation 屬性可指定排列方向 vertical(垂直)與 horizontal(水平)
基礎語法
<?xml version="1.0" encoding="utf-8"?>
<LinearLayout
    xmlns:android="http://schemas.android.com/apk/res/android"
    android:orientation="vertical"
    android:layout_width="match_parent"
    android:layout_height="match_parent"
    >
</LinearLayout>Code language: HTML, XML (xml)
接下來我們實際體驗看看
建立一個版面配置,修改主活動並載入這個版面
<LinearLayout
    xmlns:android="http://schemas.android.com/apk/res/android"
    android:orientation="vertical"
    android:layout_width="match_parent"
    android:layout_height="match_parent"
    >
    <Button
        android:id="@+id/button1"
        android:layout_width="wrap_content"
        android:layout_height="wrap_content"
        android:text="1"
        />
    <Button
        android:id="@+id/button2"
        android:layout_width="wrap_content"
        android:layout_height="wrap_content"
        android:text="2"
        />
    <Button
        android:id="@+id/button3"
        android:layout_width="wrap_content"
        android:layout_height="wrap_content"
        android:text="3"
        />
</LinearLayout>Code language: HTML, XML (xml)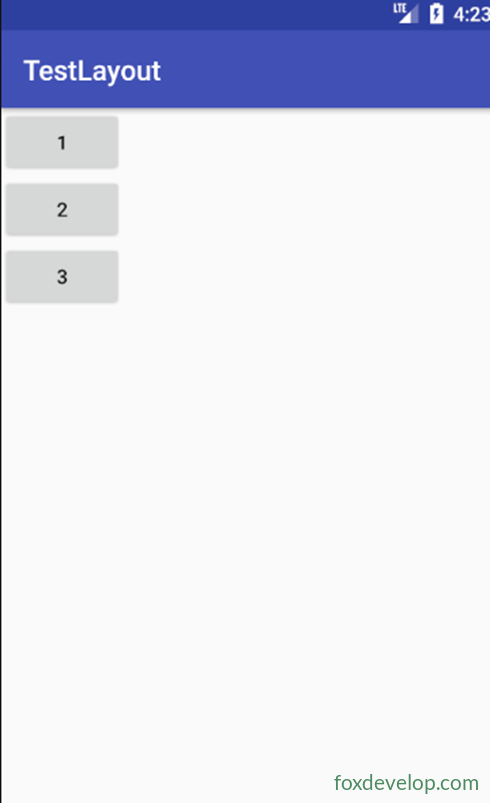
主活動載入這個版面配置
setContentView(R.layout.test_linear);
如果改成水平排列
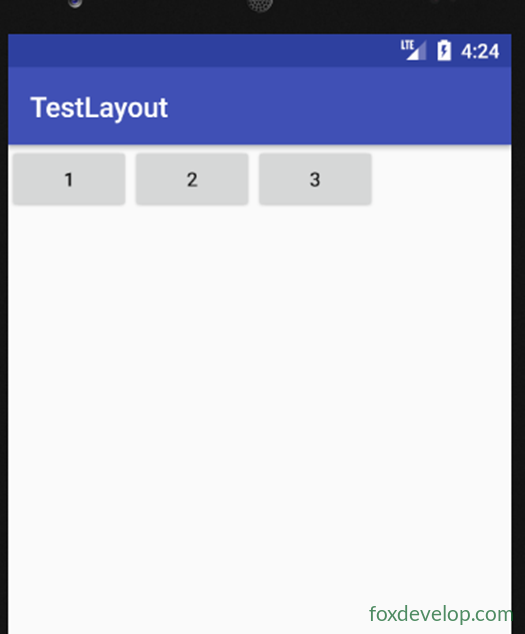
android:orientation=”horizontal”
版面配置-LinearLayout子控制項的對齊方式
透過 android:layout_gravity 設定控制項的版面對齊方式。
不過當 LinearLayout 排列方向為 horizontal 時,只有垂直方向的對齊才會生效。因為此時水平方向長度不固定。
<?xml version="1.0" encoding="utf-8"?>
<LinearLayout
    xmlns:android="http://schemas.android.com/apk/res/android"
    android:orientation="horizontal"
    android:layout_width="match_parent"
    android:layout_height="match_parent"
    >
    <Button
        android:id="@+id/button1"
        android:layout_width="wrap_content"
        android:layout_height="wrap_content"
        android:layout_gravity="top"
        android:text="1"
        />
    <Button
        android:id="@+id/button2"
        android:layout_width="wrap_content"
        android:layout_height="wrap_content"
        android:text="2"
        android:layout_gravity="center"
        />
    <Button
        android:id="@+id/button3"
        android:layout_width="wrap_content"
        android:layout_height="wrap_content"
        android:text="3"
        android:layout_gravity="bottom"
        />
</LinearLayout>Code language: HTML, XML (xml)
也就是說,版面設為水平排列時,只有上、中、下的垂直對齊才有效
版面配置-LinearLayout控制項佔畫面比例
如果把子控制項的寬度設為0dp
我們就可以透過設定
android:layout_weight=”n” 的方式來設定控制項在版面內佔據的比例
P108
另外,也可以一個控制項使用 weight
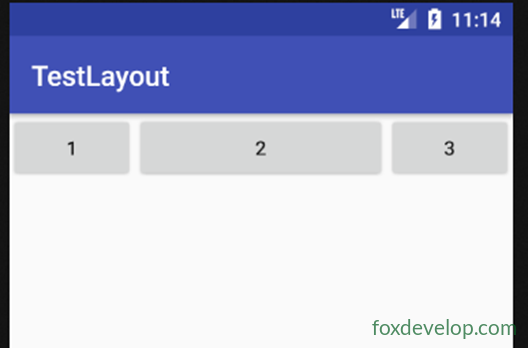
另一個不使用
這樣,另一個(例如這裡的按鈕)會維持原本寬度。這種寫法非常適合
<?xml version="1.0" encoding="utf-8"?>
<LinearLayout xmlns:android="http://schemas.android.com/apk/res/android"
    android:orientation="horizontal" android:layout_width="match_parent"
    android:layout_height="match_parent">
    <Button
        android:id="@+id/button1"
        android:layout_width="0dp"
        android:layout_weight="1"
        android:layout_height="wrap_content"
        android:text="1"        />
    <Button
        android:id="@+id/button2"
        android:layout_width="0dp"
        android:layout_weight="2"
        android:layout_height="wrap_content"
        android:text="2"        />
    <Button
        android:id="@+id/button3"
        android:layout_width="0dp"
        android:layout_weight="1"
        android:layout_height="wrap_content"
        android:text="3"        />
</LinearLayout>Code language: HTML, XML (xml)
按鈕寬度依內容自動調整,輸入框則使用剩餘空間
<?xml version="1.0" encoding="utf-8"?>
<LinearLayout xmlns:android="http://schemas.android.com/apk/res/android"
    android:orientation="horizontal" android:layout_width="match_parent"
    android:layout_height="match_parent">
    <EditText
        android:layout_width="0dp"
        android:layout_weight="2"
        android:layout_height="wrap_content" />
    <Button
        android:id="@+id/button1"
        android:layout_width="wrap_content"
        android:layout_height="wrap_content"
        android:text="1"        />
</LinearLayout>Code language: HTML, XML (xml)
版面配置-RelativeLayout相對版面配置
RelativeLayout又稱相對版面配置
它可以透過相對定位,讓控制項擺放在版面任意位置。
也因為這個特性,RelativeLayout屬性非常多。
我們可以設定控制項的
android:layout_alignParentLeft
android:layout_alignParentTop
android:layout_alignParentRight
android:layout_alignParentBottom
android:layout_centerInParent 這五個屬性設定控制項位置:左、上、右、下、置中
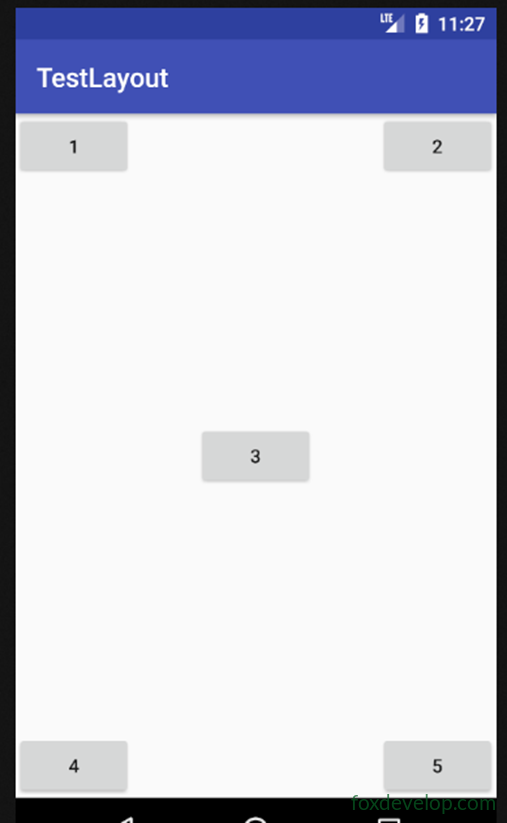
<?xml version="1.0" encoding="utf-8"?>
<RelativeLayout xmlns:android="http://schemas.android.com/apk/res/android"
    android:layout_width="match_parent" android:layout_height="match_parent">
    <Button
        android:id="@+id/button1"
        android:layout_width="wrap_content"
        android:layout_height="wrap_content"
        android:layout_alignParentLeft="true"
        android:layout_alignParentTop="true"
        android:text="1"        />
    <Button
        android:id="@+id/button2"
        android:layout_width="wrap_content"
        android:layout_height="wrap_content"
        android:layout_alignParentRight="true"
        android:layout_alignParentTop="true"
        android:text="2"        />
    <Button
        android:id="@+id/button3"
        android:layout_width="wrap_content"
        android:layout_height="wrap_content"
        android:layout_centerInParent="true"
        android:text="3"        />
    <Button
        android:id="@+id/button4"
        android:layout_width="wrap_content"
        android:layout_height="wrap_content"
        android:layout_alignParentLeft="true"
        android:layout_alignParentBottom="true"
        android:text="4"        />
    <Button
        android:id="@+id/button5"
        android:layout_width="wrap_content"
        android:layout_height="wrap_content"
        android:layout_alignParentRight="true"
        android:layout_alignParentBottom="true"
        android:text="5"        />
</RelativeLayout>Code language: HTML, XML (xml)
設定相對於其他控制項的位置
透過 android:layout_above=”@id/button3″
可以讓一個控制項放在另一個控制項的上方。
接著用 layout_below 把控制項放在另一個控制項下方
layout_toLeftOf 代表控制項位於另一個控制項左側。
layout_toRightOf 代表控制項位於另一個控制項右側。
注意:當某個控制項要參考另一個控制項定位時,被參考的控制項必須寫在它前面。
把button1放在畫面中間,寫在xml檔案開頭,其餘四個按鈕都以它作為定位參考
<?xml version="1.0" encoding="utf-8"?>
<RelativeLayout xmlns:android="http://schemas.android.com/apk/res/android"
    android:layout_width="match_parent" android:layout_height="match_parent">
    <Button
        android:id="@+id/button1"
        android:layout_width="wrap_content"
        android:layout_height="wrap_content"
        android:layout_centerInParent="true"
        android:text="1"        />
    <Button
        android:id="@+id/button2"
        android:layout_width="wrap_content"
        android:layout_height="wrap_content"
        android:layout_above="@id/button1"
        android:layout_toLeftOf="@id/button1"
        android:text="2"        />
    <Button
        android:id="@+id/button3"
        android:layout_width="wrap_content"
        android:layout_height="wrap_content"
        android:layout_above="@id/button1"
        android:layout_toRightOf="@id/button1"
        android:text="3"        />
    <Button
        android:id="@+id/button4"
        android:layout_width="wrap_content"
        android:layout_height="wrap_content"
        android:layout_below="@id/button1"
        android:layout_toRightOf="@id/button1"
        android:text="4"        />
    <Button
        android:id="@+id/button5"
        android:layout_width="wrap_content"
        android:layout_height="wrap_content"
        android:layout_below="@id/button1"
        android:layout_toLeftOf="@id/button1"
        android:text="5"        />
</RelativeLayout>Code language: HTML, XML (xml)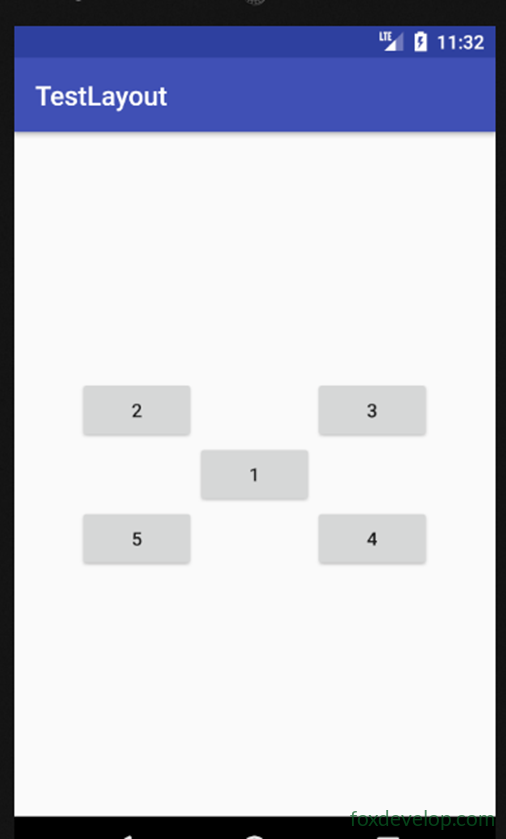
版面配置-FrameLayout畫格版面配置
比前兩種版面配置簡單
實務使用場景也比較少。
這種版面沒有方便的方位設定,所有控制項預設都會放在版面的左上角。
我們來試試,加入一個TextView與一個ImageView
可以透過 layout_gravity 屬性設定版面內的對齊方式。
<?xml version="1.0" encoding="utf-8"?>
<FrameLayout xmlns:android="http://schemas.android.com/apk/res/android"
    android:layout_width="match_parent" android:layout_height="match_parent">
    <ImageView
        android:layout_width="wrap_content"
        android:layout_height="wrap_content"
        android:src="@drawable/img1"    />
        />
    <Button
        android:layout_width="wrap_content"
        android:layout_height="wrap_content"
        android:text="foxdevelop.com"
        android:layout_gravity="right"
        />
</FrameLayout>Code language: HTML, XML (xml)
擴充版面配置-百分比版面配置
前面三種版面從Android 1.0就已經存在。
一直沿用至今。
但只有LinearLayout支援layout_weight來指定控制項大小,另外兩種版面不支援。
舉例來說,如果想用RelativeLayout實現兩個按鈕平分畫面,會比較困難。
好在Android 7.0新增了百分比版面配置。
這類版面只是在RelativeLayout與FrameLayout前面加上Percent前綴。
算是前兩種版面的擴充版本。
需要在build.gradle加入百分比版面的相依套件。
打開app/build.gradle檔案
在dependencies區塊加入
compile ‘com.android.support:percent:27.1.1’
修改build.gradle後,Gradle會自動同步,把百分比版面程式庫匯入專案,這部分不用手動處理。
接著修改版面為
<android.support.percent.PercentFrameLayout
然後給子控制項設定
app:layout_widthPercent=”50%”
app:layout_heightPercent=”50%”
同時也可以繼續設定子控制項的layout_gravity屬性
自訂控制項與匯入版面檔案
控制項與版面的繼承結構圖
我們使用的所有控制項,都直接或間接繼承自View。
所有版面配置,都直接或間接繼承自ViewGroup。
View是Android最基礎的UI元件。
它能在螢幕上繪製一塊矩形區域,並回應這個區域的各種事件。
匯入版面
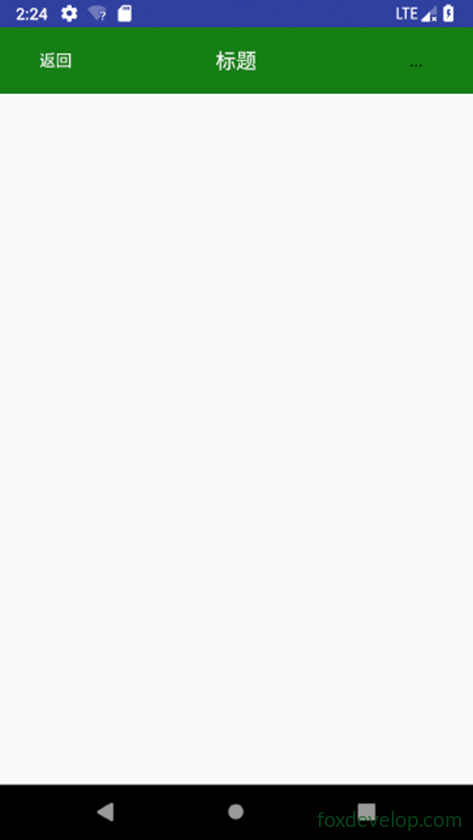
iPhone的App介面大多很像,左上角返回,右上角標題。
我們來模仿這個樣式。
對現在的我們來說,新增按鈕與TextView並不難。
但如果每個頁面都重寫一次,就會有大量重複程式碼。
我們可以用匯入版面的方式解決這個問題。
建立一個justtitle.xml
我們新建專案 TestCustom
接著新增名為justtitle.xml的版面
程式碼如下
<?xml version="1.0" encoding="utf-8"?>
<LinearLayout
    xmlns:android="http://schemas.android.com/apk/res/android"
    android:layout_width="match_parent"
    android:layout_height="wrap_content"
    android:background="#137e11"
    >
    <Button
        android:id="@+id/button1"
        android:layout_width="wrap_content"
        android:layout_height="wrap_content"
        android:layout_gravity="center"
        android:layout_margin="5dp"
        android:text="返回"
        android:textColor="#fff"
        android:background="@null"
        />
    <TextView
        android:id="@+id/textview"
        android:layout_width="0dp"
        android:layout_weight="1"
        android:layout_height="wrap_content"
        android:gravity="center"
        android:layout_gravity="center"
        android:text="標題"
        android:textSize="18dp"
        android:textColor="#fff"
        android:background="@null"
        android:layout_margin="5dp"
        />
    <Button
        android:id="@+id/button"
        android:layout_width="wrap_content"
        android:layout_height="wrap_content"
        android:layout_gravity="center"
        android:text="..."
        android:layout_margin="5dp"
        android:background="@null"
        />
</LinearLayout>Code language: HTML, XML (xml)
接著修改主活動視圖,程式碼如下
記得使用include匯入justtitle.xml
<?xml version="1.0" encoding="utf-8"?>
<LinearLayout
    xmlns:android="http://schemas.android.com/apk/res/android"
    android:layout_width="match_parent"
    android:layout_height="match_parent"
    >
    <include layout="@layout/justtitle"/>
</LinearLayout>Code language: HTML, XML (xml)
新增一個BasicActivity,覆寫onCreate
接著隱藏原本的ActionBar
package com.foxdevelop.www.testcustom;
import android.os.Bundle;
import android.support.v7.app.ActionBar;
import android.support.v7.app.AppCompatActivity;
public class BasicActivity extends AppCompatActivity {
    @Override
    protected void onCreate(Bundle savedInstanceState) {
        super.onCreate(savedInstanceState);
        ActionBar actionBar = getSupportActionBar();
        if (actionBar!=null)
        {
            actionBar.hide();
        }
    }
}Code language: JavaScript (javascript)
自訂版面控制項的使用
為了更方便實作返回功能
我們不可能在每個活動都重寫一份返回程式碼
因此我們自訂一個Layout,繼承LinearLayout
命名為TitleLayout
在自訂版面的建構子裡,可以對版面內的按鈕註冊事件監聽器
public class TitleLayout extends LinearLayout {
    public TitleLayout(Context context, AttributeSet attributes) {
        super(context,attributes);
        // 指定要載入的檢視
        LayoutInflater.from(context).inflate(R.layout.justtitle,this);
        // 註冊返回按鈕的點擊事件
        Button button1 = (Button)findViewById(R.id.button1);
        button1.setOnClickListener(new OnClickListener() {
            @Override
            public void onClick(View view) {
                ((Activity)getContext()).finish(); // 返回就是關閉目前活動
            }
        });
        // 註冊功能按鈕點擊事件
        Button button = (Button)findViewById(R.id.button);
        button.setOnClickListener(new OnClickListener() {
            @Override
            public void onClick(View view) {
                Toast.makeText(getContext(),"顯示選單",Toast.LENGTH_LONG).show();
            }
        });
    }
}Code language: JavaScript (javascript)
<?xml version="1.0" encoding="utf-8"?>
<LinearLayout
xmlns:android="http://schemas.android.com/apk/res/android"
android:layout_width="match_parent"
android:layout_height="match_parent">
<com.foxdevelop.www.testcustom.TitleLayout
android:layout_width="match_parent"
android:layout_height="wrap_content"/>
</LinearLayout>Code language: HTML, XML (xml)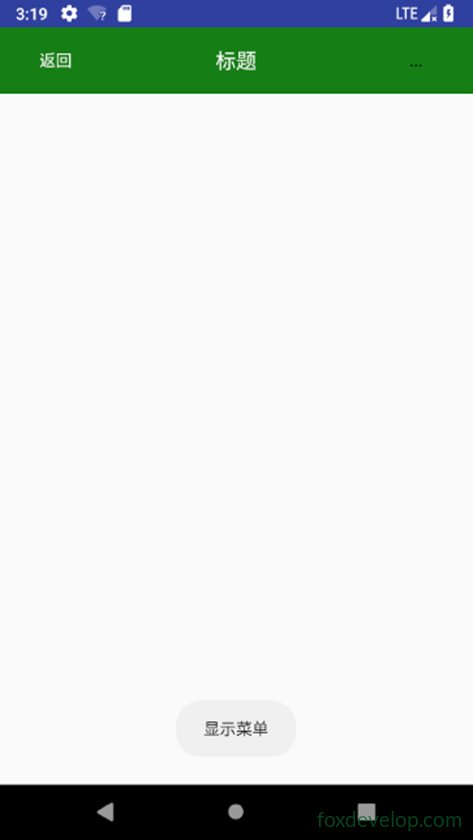
版面