네 가지 기본 레이아웃
레이아웃은 여러 컨트롤을 배치하기 위한 컨테이너로, 규칙에 따라 내부 컨트롤의 위치를 조절할 수 있습니다.
이를 통해 멋진 인터페이스를 구현할 수 있습니다.
레이아웃 내부에 또 다른 레이아웃을 중첩할 수도 있습니다.
레이아웃 – 선형 레이아웃 LinearLayout
선형 레이아웃, 매우 자주 사용됨
이름처럼 포함된 컨트롤이 선형 방향으로 순서대로 배치됩니다.
android:orientation 속성으로 배치 방향인 vertical(수직)과 horizontal(수평)을 지정할 수 있습니다.
기본 문법
<?xml version="1.0" encoding="utf-8"?>
<LinearLayout
    xmlns:android="http://schemas.android.com/apk/res/android"
    android:orientation="veritical"
    android:layout_width="match_parent"
    android:layout_height="match_parent"
    >
</LinearLayout>Code language: HTML, XML (xml)
이제 직접 살펴보겠습니다.
레이아웃을 만들고 메인 액티비티에서 이 레이아웃을 사용하도록 수정합니다.
<LinearLayout
    xmlns:android="http://schemas.android.com/apk/res/android"
    android:orientation="veritical"
    android:layout_width="match_parent"
    android:layout_height="match_parent"
    >
    <Button
        android:id="@+id/button1"
        android:layout_width="wrap_content"
        android:layout_height="wrap_content"
        android:text="1"
        />
    <Button
        android:id="@+id/button2"
        android:layout_width="wrap_content"
        android:layout_height="wrap_content"
        android:text="2"
        />
    <Button
        android:id="@+id/button3"
        android:layout_width="wrap_content"
        android:layout_height="wrap_content"
        android:text="3"
        />
</LinearLayout>Code language: HTML, XML (xml)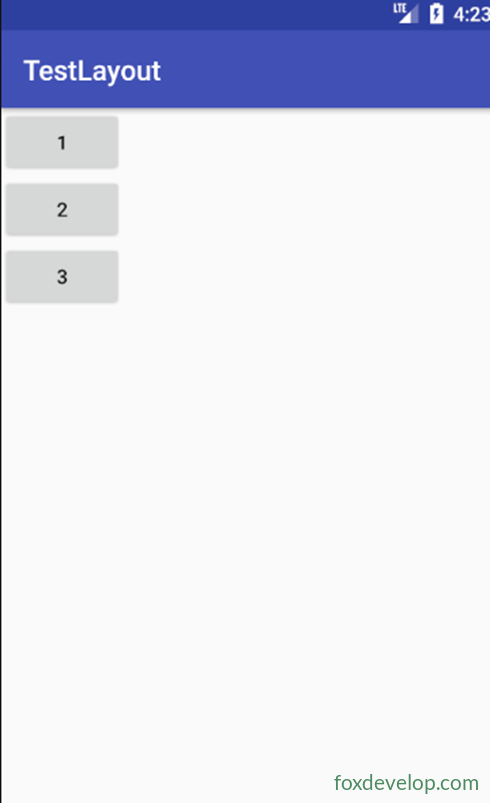
메인 액티비티에서 이 레이아웃을 불러옵니다.
setContentView(R.layout.test_linear);
수직 정렬로 변경하는 경우
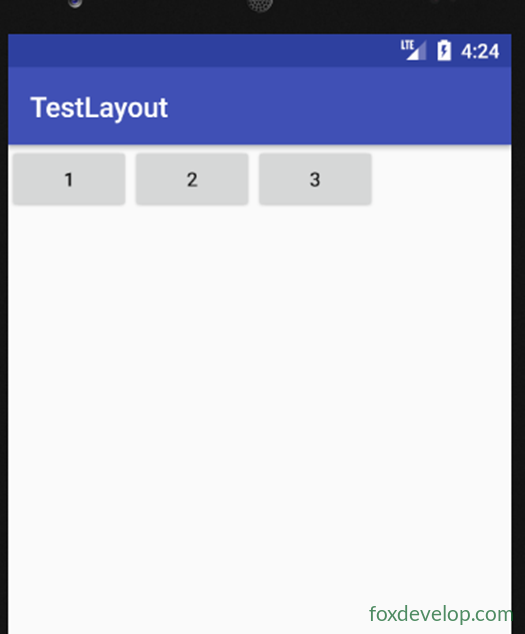
android:orientation=”horizontal”
레이아웃 – LinearLayout 하위 컨트롤 정렬 방식
android:layout_gravity를 설정해서 컨트롤의 정렬 방식을 지정할 수 있습니다.
다만 LinearLayout이 horizontal(수평)로 배치될 때는 수직 방향 정렬만 적용됩니다. 이때 가로 방향 길이가 고정되지 않기 때문입니다.
<?xml version="1.0" encoding="utf-8"?>
<LinearLayout
    xmlns:android="http://schemas.android.com/apk/res/android"
    android:orientation="horizontal"
    android:layout_width="match_parent"
    android:layout_height="match_parent"
    >
    <Button
        android:id="@+id/button1"
        android:layout_width="wrap_content"
        android:layout_height="wrap_content"
        android:layout_gravity="top"
        android:text="1"
        />
    <Button
        android:id="@+id/button2"
        android:layout_width="wrap_content"
        android:layout_height="wrap_content"
        android:text="2"
        android:layout_gravity="center"
        />
    <Button
        android:id="@+id/button3"
        android:layout_width="wrap_content"
        android:layout_height="wrap_content"
        android:text="3"
        android:layout_gravity="bottom"
        />
</LinearLayout>Code language: HTML, XML (xml)
즉 레이아웃이 수평 배치일 때 위, 중앙, 아래 정렬이 적용됩니다.
레이아웃 – LinearLayout 컨트롤 화면 비율
하위 컨트롤의 width를 0dp로 설정하면
그 다음 아래 속성을 사용해
android:layout_weight=”n” 속성으로 컨트롤이 차지하는 레이아웃 비율을 지정할 수 있습니다.
P108
또한 일부 컨트롤에만 weight를 적용할 수도 있습니다.
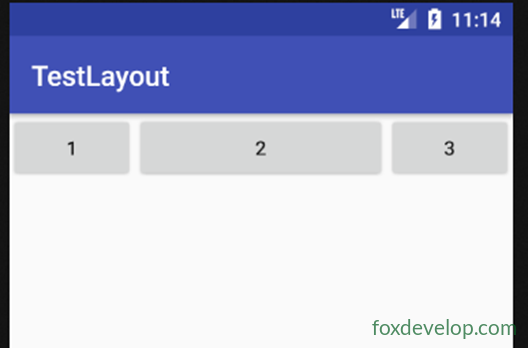
나머지 컨트롤에는 적용하지 않는 방식입니다.
이렇게 하면 여기 버튼처럼 나머지 요소는 원래 너비를 유지합니다. 이 문법은 아주 유용합니다.
<?xml version="1.0" encoding="utf-8"?>
<LinearLayout xmlns:android="http://schemas.android.com/apk/res/android"
    android:orientation="horizontal" android:layout_width="match_parent"
    android:layout_height="match_parent">
    <Button
        android:id="@+id/button1"
        android:layout_width="0dp"
        android:layout_weight="1"
        android:layout_height="wrap_content"
        android:text="1"        />
    <Button
        android:id="@+id/button2"
        android:layout_width="0dp"
        android:layout_weight="2"
        android:layout_height="wrap_content"
        android:text="2"        />
    <Button
        android:id="@+id/button3"
        android:layout_width="0dp"
        android:layout_weight="1"
        android:layout_height="wrap_content"
        android:text="3"        />
</LinearLayout>Code language: HTML, XML (xml)
버튼은 내용 크기에 맞추고, 입력창은 남은 공간을 모두 차지하는 방식입니다.
<?xml version="1.0" encoding="utf-8"?>
<LinearLayout xmlns:android="http://schemas.android.com/apk/res/android"
    android:orientation="horizontal" android:layout_width="match_parent"
    android:layout_height="match_parent">
    <EditText
        android:layout_width="0dp"
        android:layout_weight="2"
        android:layout_height="wrap_content" />
    <Button
        android:id="@+id/button1"
        android:layout_width="wrap_content"
        android:layout_height="wrap_content"
        android:text="1"        />
</LinearLayout>Code language: HTML, XML (xml)
레이아웃 – RelativeLayout 상대 레이아웃
RelativeLayout은 상대 레이아웃이라고도 부릅니다.
상대적 위치 지정 방식으로 컨트롤을 레이아웃 내 원하는 위치에 배치할 수 있습니다.
그래서 RelativeLayout에는 속성이 매우 많습니다.
컨트롤에 다음 속성을 설정할 수 있습니다.
android:layout_alignParentLeft
android:layout_alignParentTop
android:layout_alignParentRight
android:layout_alignParentBottom
android:layout_alignParentCenterInParent 이 다섯 가지 속성으로 컨트롤 위치(왼쪽, 위쪽, 오른쪽, 아래쪽, 중앙)를 설정합니다.
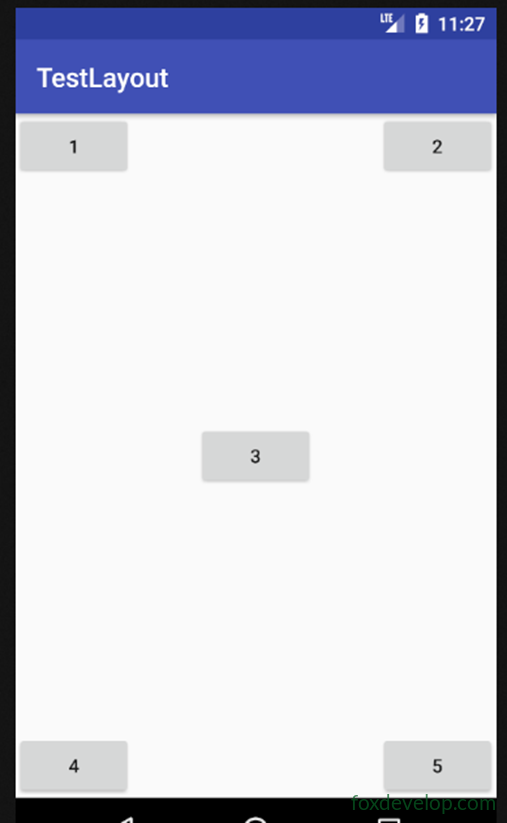
<?xml version="1.0" encoding="utf-8"?>
<RelativeLayout xmlns:android="http://schemas.android.com/apk/res/android"
    android:layout_width="match_parent" android:layout_height="match_parent">
    <Button
        android:id="@+id/button1"
        android:layout_width="wrap_content"
        android:layout_height="wrap_content"
        android:layout_alignParentLeft="true"
        android:layout_alignParentTop="true"
        android:text="1"        />
    <Button
        android:id="@+id/button2"
        android:layout_width="wrap_content"
        android:layout_height="wrap_content"
        android:layout_alignParentRight="true"
        android:layout_alignParentTop="true"
        android:text="2"        />
    <Button
        android:id="@+id/button3"
        android:layout_width="wrap_content"
        android:layout_height="wrap_content"
        android:layout_centerInParent="true"
        android:text="3"        />
    <Button
        android:id="@+id/button4"
        android:layout_width="wrap_content"
        android:layout_height="wrap_content"
        android:layout_alignParentLeft="true"
        android:layout_alignParentBottom="true"
        android:text="4"        />
    <Button
        android:id="@+id/button5"
        android:layout_width="wrap_content"
        android:layout_height="wrap_content"
        android:layout_alignParentRight="true"
        android:layout_alignParentBottom="true"
        android:text="5"        />
</RelativeLayout>Code language: HTML, XML (xml)
다른 컨트롤 기준으로 위치 설정
android:Layout_above=”@id/button3″ 를 설정하면
한 컨트롤을 다른 컨트롤 위쪽에 배치할 수 있습니다.
Layout_below 속성은 컨트롤을 대상 컨트롤 아래에 배치합니다.
Layout_toLeftOf는 컨트롤을 대상 컨트롤 왼쪽에 배치합니다.
layout_toRightOf는 컨트롤을 대상 컨트롤 오른쪽에 배치합니다.
주의: 다른 컨트롤을 기준으로 배치할 때 기준 대상 컨트롤이 먼저 선언되어야 합니다.
button1을 중앙에 배치하고 XML 상단에 작성한 뒤 나머지 네 버튼을 이 버튼 기준으로 배치합니다.
<?xml version="1.0" encoding="utf-8"?>
<RelativeLayout xmlns:android="http://schemas.android.com/apk/res/android"
    android:layout_width="match_parent" android:layout_height="match_parent">
    <Button
        android:id="@+id/button1"
        android:layout_width="wrap_content"
        android:layout_height="wrap_content"
        android:layout_centerInParent="true"
        android:text="1"        />
    <Button
        android:id="@+id/button2"
        android:layout_width="wrap_content"
        android:layout_height="wrap_content"
        android:layout_above="@id/button1"
        android:layout_toLeftOf="@id/button1"
        android:text="2"        />
    <Button
        android:id="@+id/button3"
        android:layout_width="wrap_content"
        android:layout_height="wrap_content"
        android:layout_above="@id/button1"
        android:layout_toRightOf="@id/button1"
        android:text="3"        />
    <Button
        android:id="@+id/button4"
        android:layout_width="wrap_content"
        android:layout_height="wrap_content"
        android:layout_below="@id/button1"
        android:layout_toRightOf="@id/button1"
        android:text="4"        />
    <Button
        android:id="@+id/button5"
        android:layout_width="wrap_content"
        android:layout_height="wrap_content"
        android:layout_below="@id/button1"
        android:layout_toLeftOf="@id/button1"
        android:text="5"        />
</RelativeLayout>Code language: HTML, XML (xml)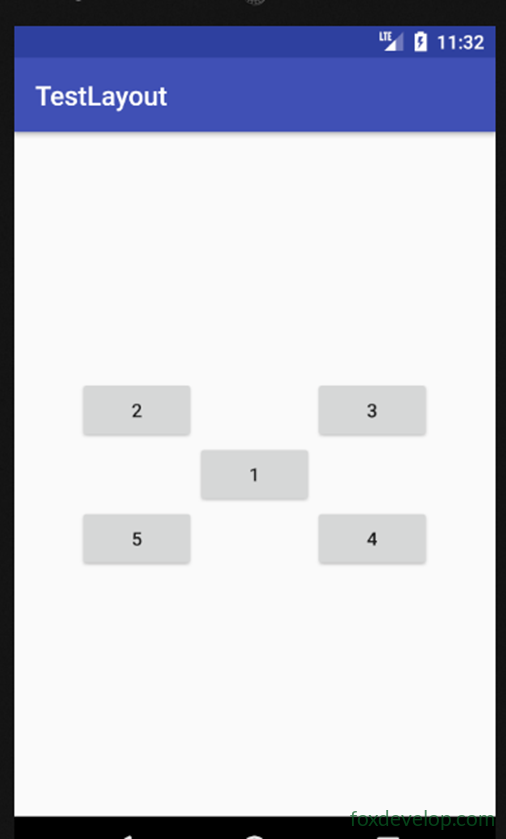
레이아웃 – FrameLayout 프레임 레이아웃
앞의 두 레이아웃보다 간단합니다.
사용 사례는 상대적으로 적습니다.
이 레이아웃에는 별도 방향 지정 방식이 없고 모든 컨트롤은 기본적으로 레이아웃 왼쪽 상단에 놓입니다.
직접 테스트해보기 위해 TextView와 ImageView를 하나 추가해보겠습니다.
layout_gravity 속성으로 레이아웃 내 정렬 방식을 지정할 수 있습니다.
<?xml version="1.0" encoding="utf-8"?>
<FrameLayout xmlns:android="http://schemas.android.com/apk/res/android"
    android:layout_width="match_parent" android:layout_height="match_parent">
    <ImageView
        android:layout_width="wrap_content"
        android:layout_height="wrap_content"
        android:src="@drawable/img1"    />
        />
    <Button
        android:layout_width="wrap_content"
        android:layout_height="wrap_content"
        android:text="foxdevelop.com"
        android:layout_gravity="right"
        />
</FrameLayout>Code language: HTML, XML (xml)
확장 레이아웃 – 백분율 레이아웃
위 세 가지 레이아웃은 Android 1.0부터 존재했습니다.
지금까지 계속 사용되고 있습니다.
하지만 layout_weight로 컨트롤 크기를 지정하는 기능은 LinearLayout만 지원합니다. 나머지 두 레이아웃은 지원하지 않습니다.
예를 들어 RelativeLayout으로 두 버튼의 너비를 균등 분할하는 것은 까다롭습니다.
다행히 Android 7.0 버전부터 백분율 레이아웃이 추가되었습니다.
이 레이아웃은 RelativeLayout과 FrameLayout 앞에 Percent 접두사를 붙인 형태입니다.
앞의 두 레이아웃을 확장한 버전이라고 보면 됩니다.
build.gradle에 백분율 레이아웃 의존성을 추가해야 합니다.
app/build.gradle 파일을 엽니다.
dependencies 항목에 아래 코드를 추가합니다.
compile ‘com.android.support:percent:27.1.1’
build.gradle을 수정하면 Gradle이 자동 동기화를 시작하고, 백분율 라이브러리를 프로젝트에 추가합니다. 별도 작업은 필요 없습니다.
그 다음 레이아웃 태그를 아래처럼 변경합니다.
<android.support.percent.PercentFrameLayout
그리고 하위 컨트롤에 속성을 설정합니다.
app:layout_widthPercent=”50%”
app:layout_heightPercent=”50%”
동시에 하위 컨트롤의 layout_gravity 속성도 계속 사용할 수 있습니다.
사용자 정의 컨트롤과 레이아웃 파일 불러오기
컨트롤 및 레이아웃 상속 구조도
사용하는 모든 컨트롤은 직접 또는 간접적으로 View 클래스를 상속받습니다.
모든 레이아웃은 직접 또는 간접적으로 ViewGroup 클래스를 상속받습니다.
View는 Android의 가장 기본적인 UI 컴포넌트입니다.
화면에 사각 영역을 그리고 해당 영역의 각종 이벤트를 처리할 수 있습니다.
레이아웃 불러오기
아이폰 앱 화면은 대체로 비슷합니다. 왼쪽 위에 뒤로가기 버튼, 오른쪽 위에 제목이 배치됩니다.
이 구조를 따라 만들어보겠습니다.
버튼 하나와 TextView 하나를 추가하는 것은 어렵지 않습니다.
하지만 모든 페이지마다 이 코드를 작성하면 중복 코드가 많아집니다.
레이아웃 불러오기 기능으로 이 문제를 해결할 수 있습니다.
justtitle.xml 파일을 새로 만듭니다.
TestCustom 프로젝트를 새로 생성합니다.
그 뒤 justtitle.xml이라는 레이아웃 파일을 추가합니다.
코드는 다음과 같습니다.
<?xml version="1.0" encoding="utf-8"?>
<LinearLayout
    xmlns:android="http://schemas.android.com/apk/res/android"
    android:layout_width="match_parent"
    android:layout_height="wrap_content"
    android:background="#137e11"
    >
    <Button
        android:id="@+id/button1"
        android:layout_width="wrap_content"
        android:layout_height="wrap_content"
        android:layout_gravity="center"
        android:layout_margin="5dp"
        android:text="뒤로가기"
        android:textColor="#fff"
        android:background="@null"
        />
    <TextView
        android:id="@+id/textview"
        android:layout_width="0dp"
        android:layout_weight="1"
        android:layout_height="wrap_content"
        android:gravity="center"
        android:layout_gravity="center"
        android:text="제목"
        android:textSize="18dp"
        android:textColor="#fff"
        android:background="@null"
        android:layout_margin="5dp"
        />
    <Button
        android:id="@+id/button"
        android:layout_width="wrap_content"
        android:layout_height="wrap_content"
        android:layout_gravity="center"
        android:text="..."
        android:layout_margin="5dp"
        android:background="@null"
        />
</LinearLayout>Code language: HTML, XML (xml)
그 다음 메인 액티비티 뷰를 수정합니다. 코드는 아래와 같습니다.
include 태그로 justtitle.xml을 불러오는 것을 잊지 마세요.
<?xml version="1.0" encoding="utf-8"?>
<LinearLayout
    xmlns:android="http://schemas.android.com/apk/res/android"
    android:layout_width="match_parent"
    android:layout_height="match_parent"
    >
    <include layout="@layout/justtitle"/>
</LinearLayout>Code language: HTML, XML (xml)
BasicActivity를 추가하고 onCreate 메서드를 재정의합니다.
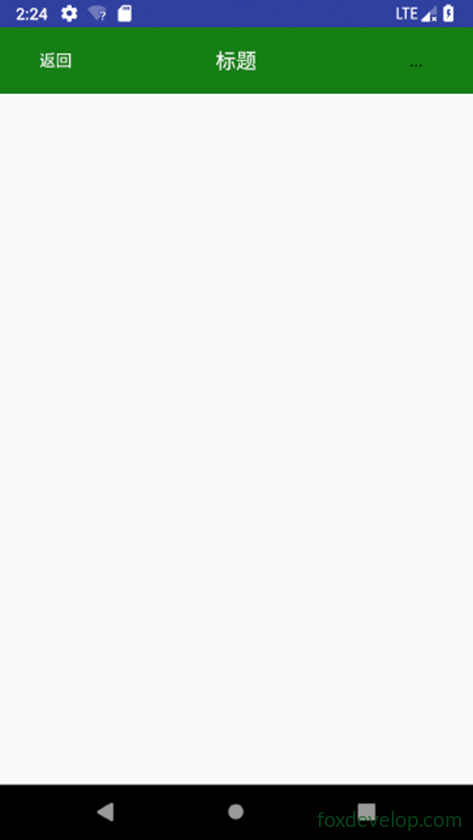
그 다음 기본 ActionBar를 숨깁니다.
package com.foxdevelop.www.testcustom;
import android.os.Bundle;
import android.support.v7.app.ActionBar;
import android.support.v7.app.AppCompatActivity;
public class BasicActivity extends AppCompatActivity {
    @Override
    protected void onCreate(Bundle savedInstanceState) {
        super.onCreate(savedInstanceState);
        ActionBar actionBar = getSupportActionBar();
        if (actionBar!=null)
        {
            actionBar.hide();
        }
    }
}Code language: JavaScript (javascript)
사용자 정의 레이아웃 컨트롤 사용
뒤로가기 기능을 더 편리하게 구현하기 위해
모든 액티비티에 뒤로가기 코드를 일일이 작성할 수는 없습니다.
편리하게 사용하기 위해 LinearLayout을 상속받는 사용자 정의 레이아웃을 만듭니다.
이 이름을 TitleLayout로 지정합니다.
사용자 정의 레이아웃의 생성자 안에서 버튼에 이벤트 리스너를 등록할 수 있습니다.
public class TitleLayout extends LinearLayout {
    public TitleLayout(Context context, AttributeSet attributes) {
        super(context,attributes);
        //사용할 뷰 지정
        LayoutInflater.from(context).inflate(R.layout.justtitle,this);
        //뒤로가기 버튼에 이벤트 등록
        Button button1 = (Button)findViewById(R.id.button1);
        button1.setOnClickListener(new OnClickListener() {
            @Override
            public void onClick(View view) {
                ((Activity)getContext()).finish(); //뒤로가기는 현재 액티비티 종료
            }
        });
        //편집 버튼에 이벤트 등록
        Button button = (Button)findViewById(R.id.button);
        button.setOnClickListener(new OnClickListener() {
            @Override
            public void onClick(View view) {
                Toast.makeText(getContext(),"메뉴 표시",Toast.LENGTH_LONG).show();
            }
        });
    }
}Code language: JavaScript (javascript)
<?xml version="1.0" encoding="utf-8"?>
<LinearLayout
xmlns:android="http://schemas.android.com/apk/res/android"
android:layout_width="match_parent"
android:layout_height="match_parent">
<com.foxdevelop.www.testcustom.TitleLayout
android:layout_width="match_parent"
android:layout_height="wrap_content"/>
</LinearLayout>Code language: HTML, XML (xml)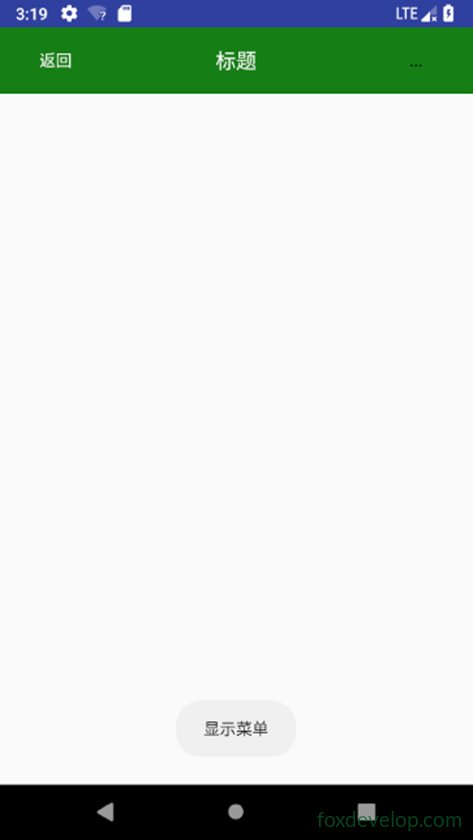
레이아웃