Les quatre types de mise en page de base
Une mise en page est un conteneur qui permet de placer de nombreux contrôles. Elle peut ajuster la position des contrôles internes selon certaines règles.
afin de concevoir des interfaces soignées.
On peut aussi imbriquer des mises en page à l’intérieur d’une mise en page.
Mise en page – LinearLayout (Mise en page linéaire)
La mise en page linéaire, très utilisée
Comme son nom l’indique, les contrôles qu’elle contient s’affichent successivement sur un axe linéaire.
L’attribut android:orientation permet de définir le sens de l’alignement : vertical ou horizontal
Syntaxe de base
<?xml version="1.0" encoding="utf-8"?>
<LinearLayout
    xmlns:android="http://schemas.android.com/apk/res/android"
    android:orientation="vertical"
    android:layout_width="match_parent"
    android:layout_height="match_parent"
    >
</LinearLayout>Langage du code : HTML, XML (xml)
Voyons maintenant un exemple pratique
Nous créons une mise en page, puis nous modifions l’activité principale pour l’utiliser
<LinearLayout
    xmlns:android="http://schemas.android.com/apk/res/android"
    android:orientation="vertical"
    android:layout_width="match_parent"
    android:layout_height="match_parent"
    >
    <Button
        android:id="@+id/button1"
        android:layout_width="wrap_content"
        android:layout_height="wrap_content"
        android:text="1"
        />
    <Button
        android:id="@+id/button2"
        android:layout_width="wrap_content"
        android:layout_height="wrap_content"
        android:text="2"
        />
    <Button
        android:id="@+id/button3"
        android:layout_width="wrap_content"
        android:layout_height="wrap_content"
        android:text="3"
        />
</LinearLayout>Langage du code : HTML, XML (xml)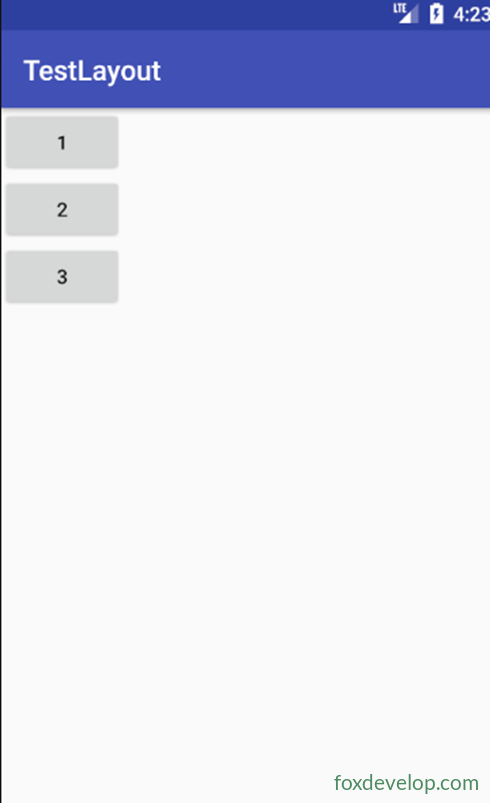
L’activité principale charge cette mise en page
setContentView(R.layout.test_linear);
Si on passe à un alignement horizontal
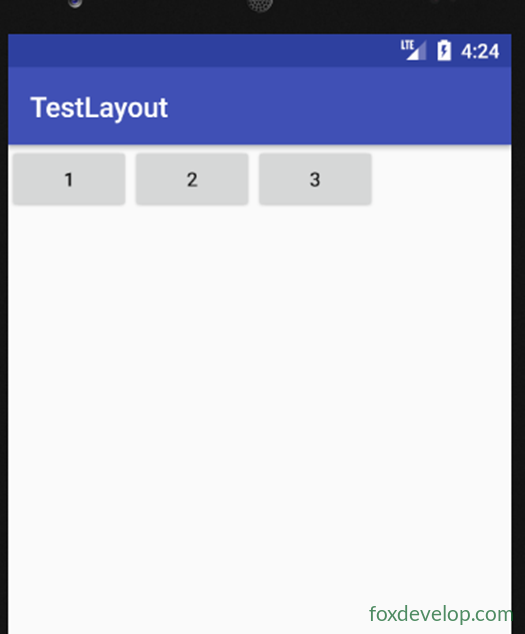
android:orientation= »horizontal »
Mise en page – Alignement des éléments enfants de LinearLayout
On définit l’alignement du contrôle avec android:layout_gravity
Cependant, quand LinearLayout est en mode horizontal, seul l’alignement vertical prend effet. Car dans ce cas, la longueur horizontale n’est pas fixe.
<?xml version="1.0" encoding="utf-8"?>
<LinearLayout
    xmlns:android="http://schemas.android.com/apk/res/android"
    android:orientation="horizontal"
    android:layout_width="match_parent"
    android:layout_height="match_parent"
    >
    <Button
        android:id="@+id/button1"
        android:layout_width="wrap_content"
        android:layout_height="wrap_content"
        android:layout_gravity="top"
        android:text="1"
        />
    <Button
        android:id="@+id/button2"
        android:layout_width="wrap_content"
        android:layout_height="wrap_content"
        android:text="2"
        android:layout_gravity="center"
        />
    <Button
        android:id="@+id/button3"
        android:layout_width="wrap_content"
        android:layout_height="wrap_content"
        android:text="3"
        android:layout_gravity="bottom"
        />
</LinearLayout>Langage du code : HTML, XML (xml)
Autrement dit, quand la mise en page est en mode horizontal, les alignements haut, milieu et bas fonctionnent.
Mise en page – Proportion des éléments dans LinearLayout
Si on définit la largeur des éléments enfants à 0dp
alors on peut utiliser
android:layout_weight= »n » pour définir la proportion occupée par chaque contrôle dans la mise en page
P108
On peut aussi mélanger un élément avec weight
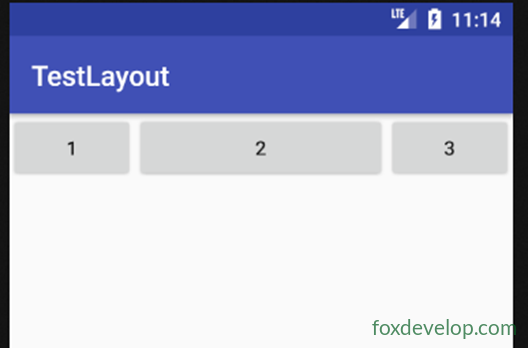
et un autre sans weight
Dans ce cas, l’autre bouton garde sa largeur d’origine. Cette syntaxe est très pratique
<?xml version="1.0" encoding="utf-8"?>
<LinearLayout xmlns:android="http://schemas.android.com/apk/res/android"
    android:orientation="horizontal" android:layout_width="match_parent"
    android:layout_height="match_parent">
    <Button
        android:id="@+id/button1"
        android:layout_width="0dp"
        android:layout_weight="1"
        android:layout_height="wrap_content"
        android:text="1"        />
    <Button
        android:id="@+id/button2"
        android:layout_width="0dp"
        android:layout_weight="2"
        android:layout_height="wrap_content"
        android:text="2"        />
    <Button
        android:id="@+id/button3"
        android:layout_width="0dp"
        android:layout_weight="1"
        android:layout_height="wrap_content"
        android:text="3"        />
</LinearLayout>Langage du code : HTML, XML (xml)
Les boutons prennent la largeur adaptée à leur contenu, et le champ de saisie occupe l’espace restant
<?xml version="1.0" encoding="utf-8"?>
<LinearLayout xmlns:android="http://schemas.android.com/apk/res/android"
    android:orientation="horizontal" android:layout_width="match_parent"
    android:layout_height="match_parent">
    <EditText
        android:layout_width="0dp"
        android:layout_weight="2"
        android:layout_height="wrap_content" />
    <Button
        android:id="@+id/button1"
        android:layout_width="wrap_content"
        android:layout_height="wrap_content"
        android:text="1"        />
</LinearLayout>Langage du code : HTML, XML (xml)
Mise en page – RelativeLayout (Mise en page relative)
RelativeLayout, aussi appelée mise en page relative
Elle permet de positionner les contrôles n’importe où dans la vue par positionnement relatif.
C’est pourquoi RelativeLayout possède beaucoup d’attributs.
On peut configurer pour un contrôle
android:layout_alignParentLeft
android:layout_alignParentTop
android:layout_alignParentRight
android:layout_alignParentBottom
android:layout_centerInParent : ces cinq attributs définissent la position du contrôle : gauche, haut, droite, bas, centre
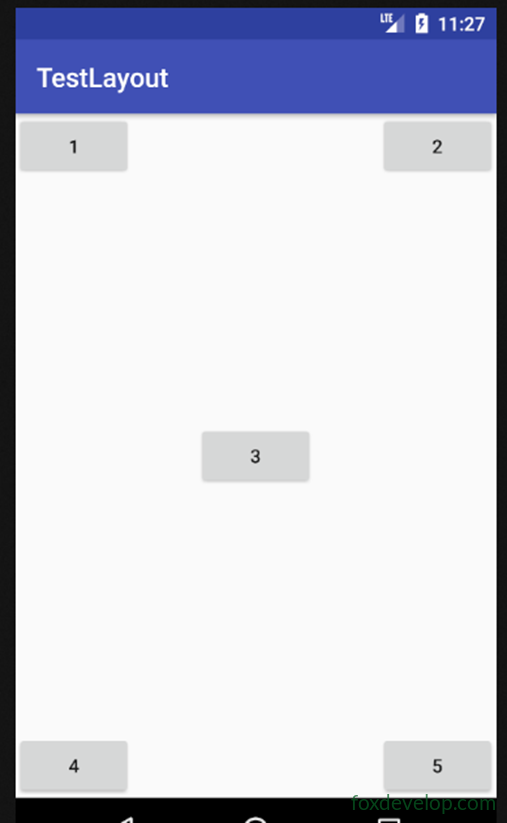
<?xml version="1.0" encoding="utf-8"?>
<RelativeLayout xmlns:android="http://schemas.android.com/apk/res/android"
    android:layout_width="match_parent" android:layout_height="match_parent">
    <Button
        android:id="@+id/button1"
        android:layout_width="wrap_content"
        android:layout_height="wrap_content"
        android:layout_alignParentLeft="true"
        android:layout_alignParentTop="true"
        android:text="1"        />
    <Button
        android:id="@+id/button2"
        android:layout_width="wrap_content"
        android:layout_height="wrap_content"
        android:layout_alignParentRight="true"
        android:layout_alignParentTop="true"
        android:text="2"        />
    <Button
        android:id="@+id/button3"
        android:layout_width="wrap_content"
        android:layout_height="wrap_content"
        android:layout_centerInParent="true"
        android:text="3"        />
    <Button
        android:id="@+id/button4"
        android:layout_width="wrap_content"
        android:layout_height="wrap_content"
        android:layout_alignParentLeft="true"
        android:layout_alignParentBottom="true"
        android:text="4"        />
    <Button
        android:id="@+id/button5"
        android:layout_width="wrap_content"
        android:layout_height="wrap_content"
        android:layout_alignParentRight="true"
        android:layout_alignParentBottom="true"
        android:text="5"        />
</RelativeLayout>Langage du code : HTML, XML (xml)
Positionnement par rapport à un autre contrôle
Avec android:layout_above= »@id/button3″
on place un contrôle au-dessus d’un autre.
layout_below permet de placer un contrôle sous un autre
layout_toLeftOf : place un contrôle à gauche d’un autre.
layout_toRightOf : place un contrôle à droite d’un autre.
Attention : quand un contrôle se positionne par rapport à un autre, la référence doit être déclarée avant lui dans le fichier XML.
Mettons button1 au centre, déclaré en premier dans le XML, puis les quatre autres contrôles se positionnent par rapport à lui
<?xml version="1.0" encoding="utf-8"?>
<RelativeLayout xmlns:android="http://schemas.android.com/apk/res/android"
    android:layout_width="match_parent" android:layout_height="match_parent">
    <Button
        android:id="@+id/button1"
        android:layout_width="wrap_content"
        android:layout_height="wrap_content"
        android:layout_centerInParent="true"
        android:text="1"        />
    <Button
        android:id="@+id/button2"
        android:layout_width="wrap_content"
        android:layout_height="wrap_content"
        android:layout_above="@id/button1"
        android:layout_toLeftOf="@id/button1"
        android:text="2"        />
    <Button
        android:id="@+id/button3"
        android:layout_width="wrap_content"
        android:layout_height="wrap_content"
        android:layout_above="@id/button1"
        android:layout_toRightOf="@id/button1"
        android:text="3"        />
    <Button
        android:id="@+id/button4"
        android:layout_width="wrap_content"
        android:layout_height="wrap_content"
        android:layout_below="@id/button1"
        android:layout_toRightOf="@id/button1"
        android:text="4"        />
    <Button
        android:id="@+id/button5"
        android:layout_width="wrap_content"
        android:layout_height="wrap_content"
        android:layout_below="@id/button1"
        android:layout_toLeftOf="@id/button1"
        android:text="5"        />
</RelativeLayout>Langage du code : HTML, XML (xml)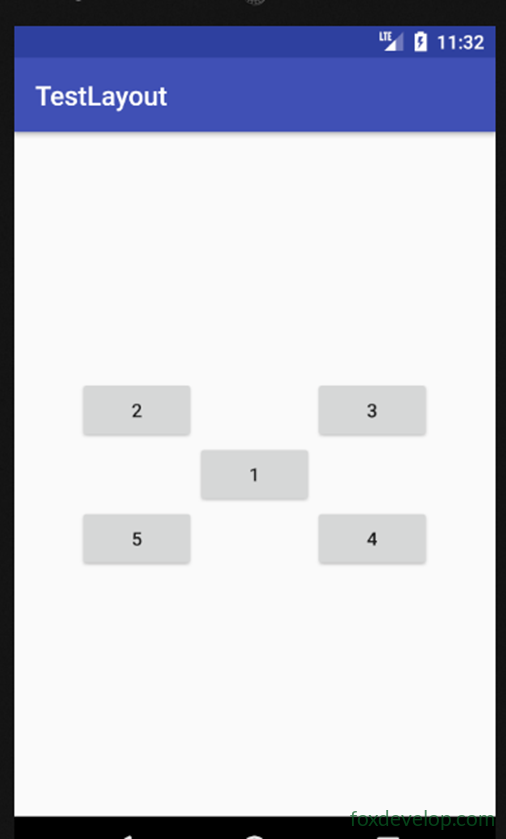
Mise en page – FrameLayout (Mise en page par cadre)
Plus simple que les deux précédentes
Elle est aussi moins utilisée en pratique.
Cette mise en page n’a pas de système de positionnement pratique. Tous les contrôles se placent par défaut dans le coin supérieur gauche.
Testons avec un TextView et une ImageView
On peut utiliser l’attribut layout_gravity pour définir l’alignement des éléments.
<?xml version="1.0" encoding="utf-8"?>
<FrameLayout xmlns:android="http://schemas.android.com/apk/res/android"
    android:layout_width="match_parent" android:layout_height="match_parent">
    <ImageView
        android:layout_width="wrap_content"
        android:layout_height="wrap_content"
        android:src="@drawable/img1"    />
    <Button
        android:layout_width="wrap_content"
        android:layout_height="wrap_content"
        android:text="foxdevelop.com"
        android:layout_gravity="right"
        />
</FrameLayout>Langage du code : HTML, XML (xml)
Mise en page étendue – Mise en page en pourcentage
Ces trois premières mises en page existent depuis Android 1.0
et sont toujours utilisées aujourd’hui.
Mais seul LinearLayout prend en charge layout_weight pour définir la taille des contrôles. Les deux autres ne le supportent pas.
Par exemple, il est compliqué de faire deux boutons de même taille avec RelativeLayout.
Heureusement, Android 7.0 a ajouté la mise en page en pourcentage.
C’est une extension de RelativeLayout et FrameLayout, dont le nom est préfixé par Percent.
Elle étend simplement les deux mises en page vues précédemment.
Il faut ajouter la dépendance de la bibliothèque de mise en page en pourcentage dans build.gradle.
Ouvrez le fichier app/build.gradle
ajoutez dans dependencies
compile ‘com.android.support:percent:27.1.1’
Après modification de build.gradle, Gradle se synchronise automatiquement pour intégrer cette bibliothèque au projet, aucune action manuelle n’est nécessaire.
Ensuite on remplace la mise en page par
<android.support.percent.PercentFrameLayout
puis on définit pour les éléments enfants
app:layout_widthPercent= »50% »
app:layout_heightPercent= »50% »
On peut aussi continuer à utiliser l’attribut layout_gravity sur les éléments enfants
Création de contrôles personnalisés et inclusion de fichiers de mise en page
Arbre d’héritage des contrôles et des mises en page
Tous les contrôles que nous utilisons héritent directement ou indirectement de View.
Toutes les mises en page héritent directement ou indirectement de ViewGroup.
View est le composant UI de base sur Android.
Il dessine une zone rectangulaire sur l’écran et réagit aux événements sur cette zone.
Inclusion d’une mise en page
Les applications iPhone ont souvent la même structure : bouton retour en haut à gauche, titre en haut au centre.
Nous allons reproduire ce modèle.
Ajouter un bouton et un TextView n’est pas difficile pour nous maintenant.
Mais si on fait ça sur chaque page, on aura beaucoup de code dupliqué.
On utilise l’inclusion de mise en page pour résoudre ce problème.
Créons un fichier justtitle.xml
Créons un nouveau projet TestCustom
puis ajoutons une mise en page nommée justtitle.xml
Voici le code
<?xml version="1.0" encoding="utf-8"?>
<LinearLayout
    xmlns:android="http://schemas.android.com/apk/res/android"
    android:layout_width="match_parent"
    android:layout_height="wrap_content"
    android:background="#137e11"
    >
    <Button
        android:id="@+id/button1"
        android:layout_width="wrap_content"
        android:layout_height="wrap_content"
        android:layout_gravity="center"
        android:layout_margin="5dp"
        android:text="Retour"
        android:textColor="#fff"
        android:background="@null"
        />
    <TextView
        android:id="@+id/textview"
        android:layout_width="0dp"
        android:layout_weight="1"
        android:layout_height="wrap_content"
        android:gravity="center"
        android:layout_gravity="center"
        android:text="Titre"
        android:textSize="18dp"
        android:textColor="#fff"
        android:background="@null"
        android:layout_margin="5dp"
        />
    <Button
        android:id="@+id/button"
        android:layout_width="wrap_content"
        android:layout_height="wrap_content"
        android:layout_gravity="center"
        android:text="..."
        android:layout_margin="5dp"
        android:background="@null"
        />
</LinearLayout>Langage du code : HTML, XML (xml)
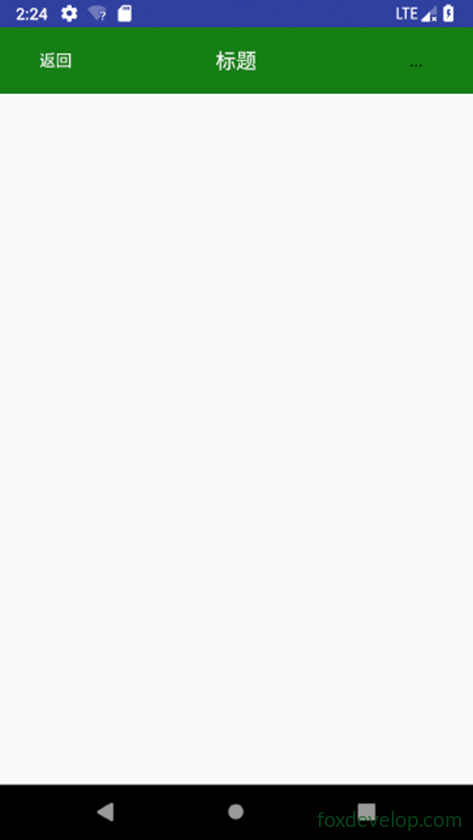
Puis modifions la vue de l’activité principale, code ci-dessous
N’oubliez pas d’utiliser include pour inclure notre fichier justtitle.xml
<?xml version="1.0" encoding="utf-8"?>
<LinearLayout
    xmlns:android="http://schemas.android.com/apk/res/android"
    android:layout_width="match_parent"
    android:layout_height="match_parent"
    >
    <include layout="@layout/justtitle"/>
</LinearLayout>Langage du code : HTML, XML (xml)
Ajoutez une BasicActivity et remplacez onCreate
Ensuite masquons l’ActionBar d’origine
package com.foxdevelop.www.testcustom;
import android.os.Bundle;
import android.support.v7.app.ActionBar;
import android.support.v7.app.AppCompatActivity;
public class BasicActivity extends AppCompatActivity {
    @Override
    protected void onCreate(Bundle savedInstanceState) {
        super.onCreate(savedInstanceState);
        ActionBar actionBar = getSupportActionBar();
        if (actionBar!=null)
        {
            actionBar.hide();
        }
    }
}Langage du code : JavaScript (javascript)
Utilisation d’un contrôle de mise en page personnalisé
Pour mieux gérer le retour
On ne peut pas écrire le code du bouton retour dans chaque activité
Pour cela, créons notre propre mise en page qui hérite de LinearLayout
Nous l’appelons TitleLayout
Dans le constructeur de ce contrôle personnalisé, on peut ajouter un écouteur d’événements sur les boutons
public class TitleLayout extends LinearLayout {
    public TitleLayout(Context context, AttributeSet attributes) {
        super(context,attributes);
        // Charger la vue associée
        LayoutInflater.from(context).inflate(R.layout.justtitle,this);
        // Ajouter l’écouteur sur le bouton retour
        Button button1 = (Button)findViewById(R.id.button1);
        button1.setOnClickListener(new OnClickListener() {
            @Override
            public void onClick(View view) {
                ((Activity)getContext()).finish(); // Le retour ferme l’activité actuelle
            }
        });
        // Ajouter l’écouteur sur le bouton de menu
        Button button = (Button)findViewById(R.id.button);
        button.setOnClickListener(new OnClickListener() {
            @Override
            public void onClick(View view) {
                Toast.makeText(getContext(),"Afficher le menu",Toast.LENGTH_LONG).show();
            }
        });
    }
}Langage du code : JavaScript (javascript)
<?xml version="1.0" encoding="utf-8"?>
<LinearLayout
xmlns:android="http://schemas.android.com/apk/res/android"
android:layout_width="match_parent"
android:layout_height="match_parent">
<com.foxdevelop.www.testcustom.TitleLayout
android:layout_width="match_parent"
android:layout_height="wrap_content"/>
</LinearLayout>Langage du code : HTML, XML (xml)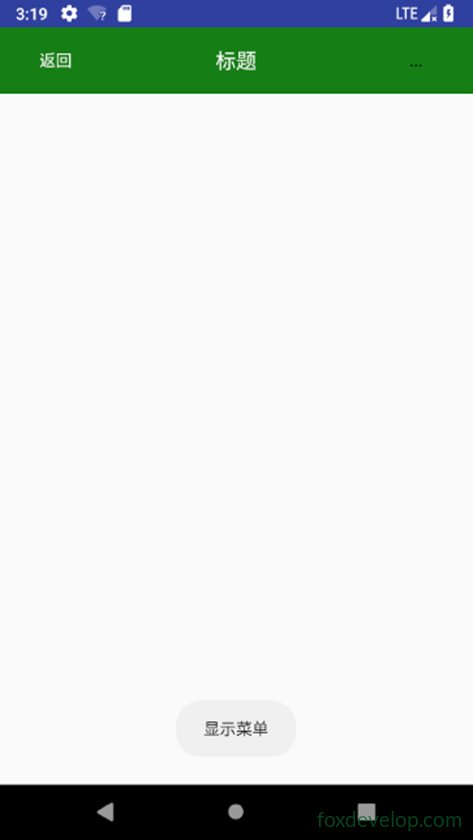
mise en page