4種類の基本レイアウト
レイアウトは多数のコントロールを配置するためのコンテナで、一定のルールに従って内部コントロールの位置を調整します。
これにより美しい画面を作成できます。
レイアウトの内部に別のレイアウトをネストすることも可能です。
レイアウト – 線形レイアウト LinearLayout
線形レイアウト、非常によく使われます
名前の通り、含まれるコントロールが直線方向に順番に並びます。
android:orientation 属性で並び方向 vertical(垂直)または horizontal(水平)を指定できます
基本構文
<?xml version="1.0" encoding="utf-8"?>
<LinearLayout
    xmlns:android="http://schemas.android.com/apk/res/android"
    android:orientation="veritical"
    android:layout_width="match_parent"
    android:layout_height="match_parent"
    >
</LinearLayout>Code language: HTML, XML (xml)
では実際に試してみましょう
レイアウトファイルを作成し、メインアクティビティにこのレイアウトを適用します
<LinearLayout
    xmlns:android="http://schemas.android.com/apk/res/android"
    android:orientation="veritical"
    android:layout_width="match_parent"
    android:layout_height="match_parent"
    >
    <Button
        android:id="@+id/button1"
        android:layout_width="wrap_content"
        android:layout_height="wrap_content"
        android:text="1"
        />
    <Button
        android:id="@+id/button2"
        android:layout_width="wrap_content"
        android:layout_height="wrap_content"
        android:text="2"
        />
    <Button
        android:id="@+id/button3"
        android:layout_width="wrap_content"
        android:layout_height="wrap_content"
        android:text="3"
        />
</LinearLayout>Code language: HTML, XML (xml)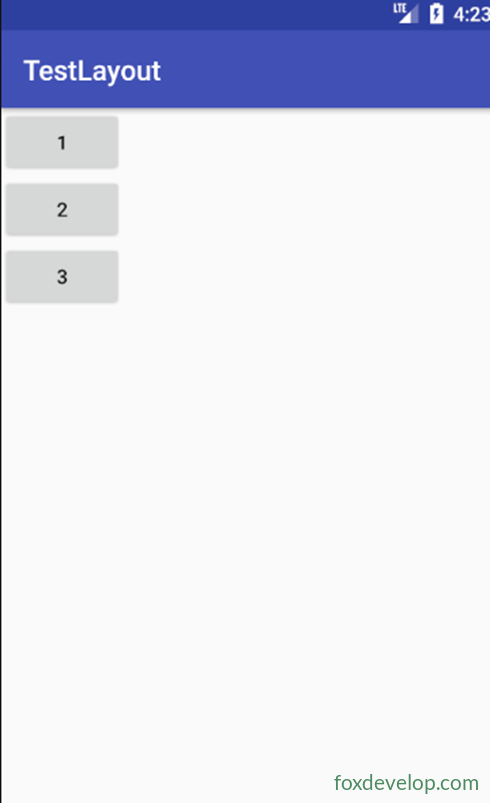
メインアクティビティでこのレイアウトを読み込む
setContentView(R.layout.test_linear);
垂直方向に並べる場合
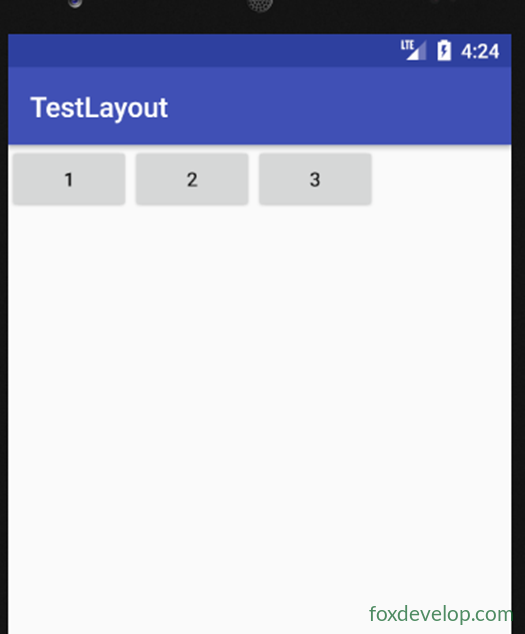
android:orientation=”horizontal”
レイアウト – LinearLayout子コントロールの配置揃え
android:layout_gravity を設定してコントロールの配置揃えを指定します。
ただしLinearLayoutをhorizontal(水平)にした場合、垂直方向の配置設定だけが有効になります。この場合、水平方向の長さは固定されないためです。
<?xml version="1.0" encoding="utf-8"?>
<LinearLayout
    xmlns:android="http://schemas.android.com/apk/res/android"
    android:orientation="horizontal"
    android:layout_width="match_parent"
    android:layout_height="match_parent"
    >
    <Button
        android:id="@+id/button1"
        android:layout_width="wrap_content"
        android:layout_height="wrap_content"
        android:layout_gravity="top"
        android:text="1"
        />
    <Button
        android:id="@+id/button2"
        android:layout_width="wrap_content"
        android:layout_height="wrap_content"
        android:text="2"
        android:layout_gravity="center"
        />
    <Button
        android:id="@+id/button3"
        android:layout_width="wrap_content"
        android:layout_height="wrap_content"
        android:text="3"
        android:layout_gravity="bottom"
        />
</LinearLayout>Code language: HTML, XML (xml)
つまり、Horizontal配置のときは上・中央・下の配置設定が効きます
レイアウト – LinearLayout コントロールの画面比率
子コントロールのwidthを0dpに設定すると
android:layout_weight=”n” でコントロールが占めるレイアウト比率を設定できます
P108
また、weightを使うコントロールと使わないコントロールを混在させることもできます
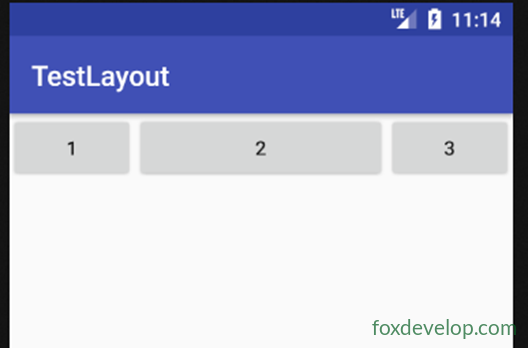
一方はweight未使用
この場合、ボタンは元の幅を保ちます。この書き方は次のような場面に便利です
<?xml version="1.0" encoding="utf-8"?>
<LinearLayout xmlns:android="http://schemas.android.com/apk/res/android"
    android:orientation="horizontal" android:layout_width="match_parent"
    android:layout_height="match_parent">
    <Button
        android:id="@+id/button1"
        android:layout_width="0dp"
        android:layout_weight="1"
        android:layout_height="wrap_content"
        android:text="1"        />
    <Button
        android:id="@+id/button2"
        android:layout_width="0dp"
        android:layout_weight="2"
        android:layout_height="wrap_content"
        android:text="2"        />
    <Button
        android:id="@+id/button3"
        android:layout_width="0dp"
        android:layout_weight="1"
        android:layout_height="wrap_content"
        android:text="3"        />
</LinearLayout>Code language: HTML, XML (xml)
ボタンは内容に合わせた幅、入力欄は残りの領域を使う場合
<?xml version="1.0" encoding="utf-8"?>
<LinearLayout xmlns:android="http://schemas.android.com/apk/res/android"
    android:orientation="horizontal" android:layout_width="match_parent"
    android:layout_height="match_parent">
    <EditText
        android:layout_width="0dp"
        android:layout_weight="2"
        android:layout_height="wrap_content" />
    <Button
        android:id="@+id/button1"
        android:layout_width="wrap_content"
        android:layout_height="wrap_content"
        android:text="1"        />
</LinearLayout>Code language: HTML, XML (xml)
レイアウト – RelativeLayout 相対レイアウト
RelativeLayoutは相対レイアウトと呼ばれます
相対位置指定により、コントロールをレイアウト内の任意の場所に配置できます。
そのためRelativeLayoutには多くの属性が存在します。
コントロールに次の属性を設定できます
android:layout_alignParentLeft
android:layout_alignParentTop
android:layout_alignParentRight
android:layout_alignParentBottom
android:layout_centerInParent この5つの属性で左・上・右・下・中央の位置を設定します
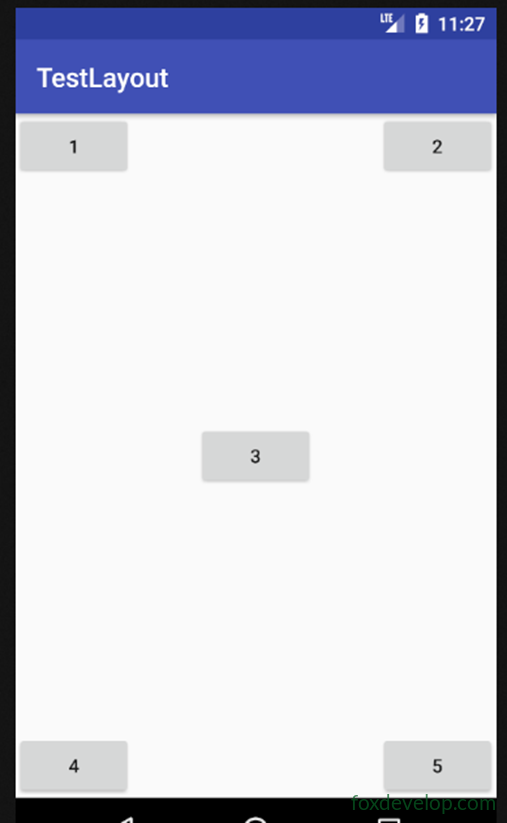
<?xml version="1.0" encoding="utf-8"?>
<RelativeLayout xmlns:android="http://schemas.android.com/apk/res/android"
    android:layout_width="match_parent" android:layout_height="match_parent">
    <Button
        android:id="@+id/button1"
        android:layout_width="wrap_content"
        android:layout_height="wrap_content"
        android:layout_alignParentLeft="true"
        android:layout_alignParentTop="true"
        android:text="1"        />
    <Button
        android:id="@+id/button2"
        android:layout_width="wrap_content"
        android:layout_height="wrap_content"
        android:layout_alignParentRight="true"
        android:layout_alignParentTop="true"
        android:text="2"        />
    <Button
        android:id="@+id/button3"
        android:layout_width="wrap_content"
        android:layout_height="wrap_content"
        android:layout_centerInParent="true"
        android:text="3"        />
    <Button
        android:id="@+id/button4"
        android:layout_width="wrap_content"
        android:layout_height="wrap_content"
        android:layout_alignParentLeft="true"
        android:layout_alignParentBottom="true"
        android:text="4"        />
    <Button
        android:id="@+id/button5"
        android:layout_width="wrap_content"
        android:layout_height="wrap_content"
        android:layout_alignParentRight="true"
        android:layout_alignParentBottom="true"
        android:text="5"        />
</RelativeLayout>Code language: HTML, XML (xml)
他コントロールを基準にした位置指定
android:layout_above=”@id/button3″ を設定すると、あるコントロールを別のコントロールの上に配置できます。
layout_below で、対象コントロールの下に配置します
layout_toLeftOf は対象コントロールの左側に配置
layout_toRightOf は対象コントロールの右側に配置
注意:あるコントロールを別のコントロールを基準に配置する場合、基準となるコントロールはXML上で先に記述する必要があります。
button1を中央に配置しXMLの先頭に書き、残り4つのボタンをbutton1を基準にレイアウトします
<?xml version="1.0" encoding="utf-8"?>
<RelativeLayout xmlns:android="http://schemas.android.com/apk/res/android"
    android:layout_width="match_parent" android:layout_height="match_parent">
    <Button
        android:id="@+id/button1"
        android:layout_width="wrap_content"
        android:layout_height="wrap_content"
        android:layout_centerInParent="true"
        android:text="1"        />
    <Button
        android:id="@+id/button2"
        android:layout_width="wrap_content"
        android:layout_height="wrap_content"
        android:layout_above="@id/button1"
        android:layout_toLeftOf="@id/button1"
        android:text="2"        />
    <Button
        android:id="@+id/button3"
        android:layout_width="wrap_content"
        android:layout_height="wrap_content"
        android:layout_above="@id/button1"
        android:layout_toRightOf="@id/button1"
        android:text="3"        />
    <Button
        android:id="@+id/button4"
        android:layout_width="wrap_content"
        android:layout_height="wrap_content"
        android:layout_below="@id/button1"
        android:layout_toRightOf="@id/button1"
        android:text="4"        />
    <Button
        android:id="@+id/button5"
        android:layout_width="wrap_content"
        android:layout_height="wrap_content"
        android:layout_below="@id/button1"
        android:layout_toLeftOf="@id/button1"
        android:text="5"        />
</RelativeLayout>Code language: HTML, XML (xml)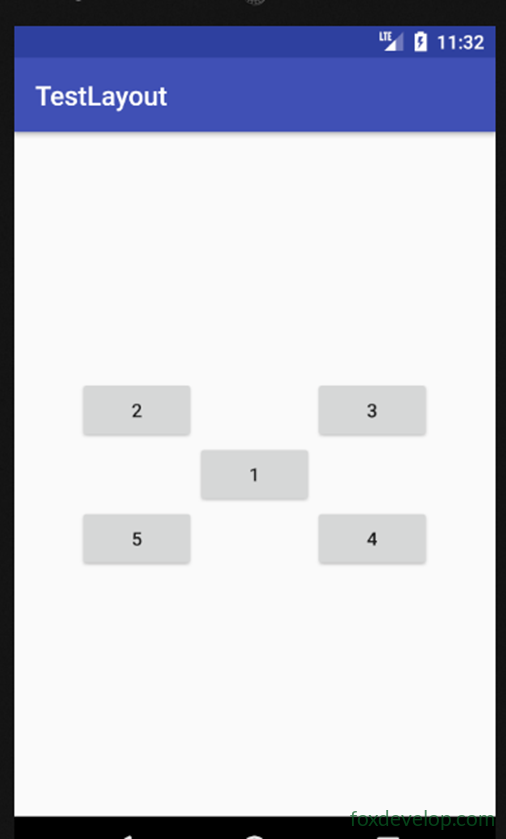
レイアウト – FrameLayout フレームレイアウト
前の2種類よりシンプルなレイアウトです
利用場面は比較的少ないです。
このレイアウトには専用の方位配置機能がなく、すべてのコントロールは既定でレイアウトの左上に配置されます。
試しにTextViewとImageViewを追加してみましょう
layout_gravity属性でレイアウト内の配置揃えを指定できます。
<?xml version="1.0" encoding="utf-8"?>
<FrameLayout xmlns:android="http://schemas.android.com/apk/res/android"
    android:layout_width="match_parent" android:layout_height="match_parent">
    <ImageView
        android:layout_width="wrap_content"
        android:layout_height="wrap_content"
        android:src="@drawable/img1"    />
        />
    <Button
        android:layout_width="wrap_content"
        android:layout_height="wrap_content"
        android:text="foxdevelop.com"
        android:layout_gravity="right"
        />
</FrameLayout>Code language: HTML, XML (xml)
拡張レイアウト – パーセントレイアウト
上記3種類のレイアウトはAndroid1.0から存在します。
現在までずっと使われ続けています。
ただしlayout_weightによるサイズ比率指定機能を使えるのはLinearLayoutだけで、残り2種類にはありません。
例えばRelativeLayoutで2つのボタンを画面半分ずつに配置するのは手間がかかります。
Android7.0からパーセントレイアウトが追加されました。
このレイアウトはRelativeLayoutとFrameLayoutにPercentという接頭辞を付けた拡張版です。
先の2種類のレイアウトを拡張したものに過ぎません。
パーセントレイアウトを使うにはbuild.gradleに依存ライブラリを追加します。
app/build.gradleファイルを開きます
dependenciesブロックに次を追加
compile ‘com.android.support:percent:27.1.1’
build.gradleを編集するとGradleが自動で同期を実行し、パーセントレイアウトライブラリをプロジェクトに取り込みます。
その後レイアウトを次のように変更
<android.support.percent.PercentFrameLayout
子コントロールに次の属性を設定
app:layout_widthPercent=”50%”
app:layout_heightPercent=”50%”
同時に子コントロールのlayout_gravityも設定可能です
カスタムコントロールとレイアウトのインクルード
コントロールとレイアウトの継承構造図
私たちが使用する全てのコントロールは直接または間接的にViewを継承しています。
全てのレイアウトは直接または間接的にViewGroupを継承しています。
ViewはAndroidの最も基礎的なUI部品です。
画面上に矩形領域を描画し、その領域の各種イベントを受け取れます。
レイアウトのインクルード
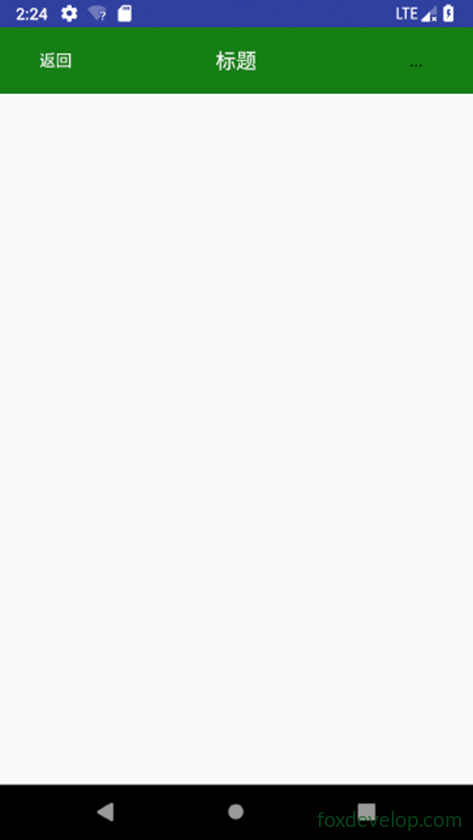
iPhoneアプリの画面は概ね共通で、左上に戻るボタン、右上にタイトルが配置されます。
このUIを再現してみましょう。
ボタンとTextViewを追加するだけなら難しくありません。
しかし全ページに同じコードを書くと重複が多くなります。
レイアウトインクルード機能でこの問題を解決できます。
justtitle.xmlを新規作成
プロジェクト TestCustom を作成
justtitle.xmlというレイアウトファイルを追加
コードは以下の通り
<?xml version="1.0" encoding="utf-8"?>
<LinearLayout
    xmlns:android="http://schemas.android.com/apk/res/android"
    android:layout_width="match_parent"
    android:layout_height="wrap_content"
    android:background="#137e11"
    >
    <Button
        android:id="@+id/button1"
        android:layout_width="wrap_content"
        android:layout_height="wrap_content"
        android:layout_gravity="center"
        android:layout_margin="5dp"
        android:text="戻る"
        android:textColor="#fff"
        android:background="@null"
        />
    <TextView
        android:id="@+id/textview"
        android:layout_width="0dp"
        android:layout_weight="1"
        android:layout_height="wrap_content"
        android:gravity="center"
        android:layout_gravity="center"
        android:text="タイトル"
        android:textSize="18dp"
        android:textColor="#fff"
        android:background="@null"
        android:layout_margin="5dp"
        />
    <Button
        android:id="@+id/button"
        android:layout_width="wrap_content"
        android:layout_height="wrap_content"
        android:layout_gravity="center"
        android:text="..."
        android:layout_margin="5dp"
        android:background="@null"
        />
</LinearLayout>Code language: HTML, XML (xml)
メインアクティビティのビューを編集、コードは下記
includeタグでjusttitle.xmlを読み込むことを忘れないでください
<?xml version="1.0" encoding="utf-8"?>
<LinearLayout
    xmlns:android="http://schemas.android.com/apk/res/android"
    android:layout_width="match_parent"
    android:layout_height="match_parent"
    >
    <include layout="@layout/justtitle"/>
</LinearLayout>Code language: HTML, XML (xml)
BasicActivityを追加し、onCreateをオーバーライド
元のActionBarを非表示にします
package com.foxdevelop.www.testcustom;
import android.os.Bundle;
import android.support.v7.app.ActionBar;
import android.support.v7.app.AppCompatActivity;
public class BasicActivity extends AppCompatActivity {
    @Override
    protected void onCreate(Bundle savedInstanceState) {
        super.onCreate(savedInstanceState);
        ActionBar actionBar = getSupportActionBar();
        if (actionBar!=null)
        {
            actionBar.hide();
        }
    }
}Code language: JavaScript (javascript)
カスタムレイアウトコントロールの利用
戻る機能を適切に実装するため
全てのアクティビティに戻る処理を個別に書くのは非効率です
そこでLinearLayoutを継承した独自レイアウト、TitleLayoutを作成します
名前はTitleLayoutとします
カスタムレイアウトのコンストラクタ内で、内部のボタンにクリックイベントリスナーを登録できます
public class TitleLayout extends LinearLayout {
    public TitleLayout(Context context, AttributeSet attributes) {
        super(context,attributes);
        // 使用するビューを指定
        LayoutInflater.from(context).inflate(R.layout.justtitle,this);
        // 戻るボタンにイベントを登録
        Button button1 = (Button)findViewById(R.id.button1);
        button1.setOnClickListener(new OnClickListener() {
            @Override
            public void onClick(View view) {
                ((Activity)getContext()).finish(); //戻る=現在のアクティビティを終了
            }
        });
        // メニューボタンにイベントを登録
        Button button = (Button)findViewById(R.id.button);
        button.setOnClickListener(new OnClickListener() {
            @Override
            public void onClick(View view) {
                Toast.makeText(getContext(),"メニューを表示",Toast.LENGTH_LONG).show();
            }
        });
    }
}Code language: JavaScript (javascript)
<?xml version="1.0" encoding="utf-8"?>
<LinearLayout
xmlns:android="http://schemas.android.com/apk/res/android"
android:layout_width="match_parent"
android:layout_height="match_parent">
<com.foxdevelop.www.testcustom.TitleLayout
android:layout_width="match_parent"
android:layout_height="wrap_content"/>
</LinearLayout>Code language: HTML, XML (xml)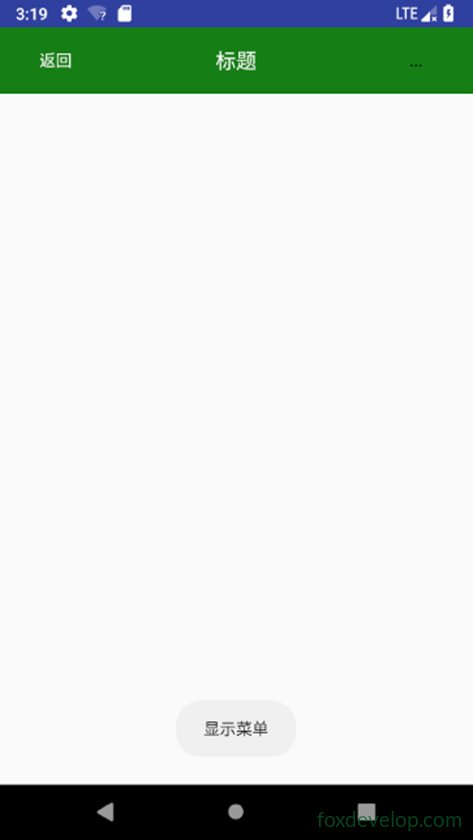
レイアウト