In our last lesson, we built our very first Flutter project. It’s a simple app with just one button that increases a number every time you tap it. Below is the folder structure of this project.
Project Directory Breakdown
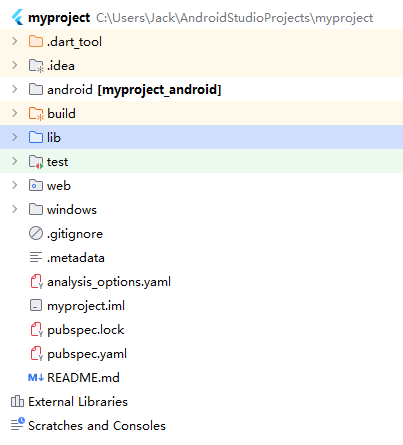
You’ll see a bunch of folders and files here, including android, web, windows, lib, test and more. So where do you actually write your source code? Android folder? Windows folder? Nope — it’s the lib folder. Open it up, and you’ll find a file called main.dart inside.
The lib folder will hold all your source code moving forward. You’ll write code in Dart, not Java or C++. Flutter uses the Dart programming language. Now you might wonder, why are there separate folders like android, web and windows sitting alongside lib?
The logic is straightforward. These platform folders are what let Flutter compile your single codebase into apps for every different operating system.
Flutter follows the framework concept of write one set of Dart code, run it across all platforms. The lib folder stores your shared cross-platform business logic. Meanwhile, folders such as android, windows, web, macos and linux contain native host projects for each individual platform. Their job is to embed the Flutter engine and run your Flutter app on their respective operating systems.
1. The android Folder
This is the native Android project.
It provides the runtime container for your Android app and hosts Flutter’s rendering engine. All low-level Android-specific configurations live here. Examples include app permissions, launcher icons, and application package names. This is also where you configure Android-only features and call native Android APIs — such as camera, Bluetooth, push notifications, and location services.
2. The windows Folder
This is the native project for Windows desktop applications.
It’s a raw C++ Win32 project responsible for creating native Windows windows and initializing the Skia rendering engine. Skia is Google’s graphics library that Flutter desktop relies on to draw windows and all UI controls.
All low-level Windows desktop settings are managed inside this directory: window dimensions, title bar styling, app icons, and system tray icons (the small icons shown in the bottom-right corner of Windows).
When you finish development, you can package your project as an EXE or MSIX installer and publish it to the Microsoft Store.
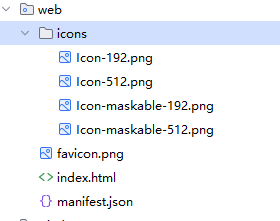
3. The web Folder
This folder holds a static web project built with HTML, JavaScript and CSS, and contains the main web entry file index.html. Your Dart source code gets compiled down into browser-compatible web assets here.
You configure web page titles, favicons, static assets and app routing in this folder. The build process outputs HTML, CSS and JS files that you can host on any web server and open directly in a browser.
Other Platform Folders
We don’t see ios, macos or linux folders here because we didn’t tick those platform options when creating the project. The underlying logic for each of these platforms works exactly the same way though.
ios: Native Xcode project for Apple iOS, used to build IPA files and release apps for iPhone devices.
macos: Native Cocoa project for macOS, used to build desktop clients for Mac computers.
linux: GTK-based native desktop project for Linux operating systems.
You can switch target platforms from the dropdown menu in the top-right corner of Android Studio to build app versions for different systems. You can also run builds straight from the command line. Behind the scenes, clicking the green play button to run your selected platform simply executes equivalent Flutter CLI commands.
# Launch Android build, uses configurations inside the android folder
flutter run -d android

# Launch Windows desktop build, loads the C++ project from windows folder
flutter run -d windows

# Launch web build, loads the HTML entry from web folder
flutter run -d chromeCode language: PHP (php)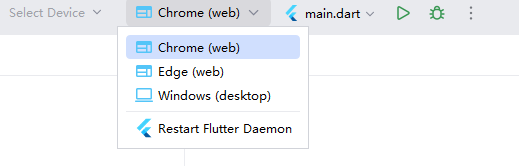
Navigate to runner/main.cpp inside the windows folder.
#include <flutter/dart_project.h>
#include <flutter/flutter_view_controller.h>
#include <windows.h>

#include "flutter_window.h"
#include "utils.h"

int APIENTRY wWinMain(_In_ HINSTANCE instance, _In_opt_ HINSTANCE prev,
                      _In_ wchar_t *command_line, _In_ int show_command) {
  // Attach to console when present (e.g., 'flutter run') or create a
  // new console when running with a debugger.
  if (!::AttachConsole(ATTACH_PARENT_PROCESS) && ::IsDebuggerPresent()) {
    CreateAndAttachConsole();
  }

  // Initialize COM, so that it is available for use in the library and/or
  // plugins.
  ::CoInitializeEx(nullptr, COINIT_APARTMENTTHREADED);

  flutter::DartProject project(L"data");

  std::vector<std::string> command_line_arguments =
      GetCommandLineArguments();

  project.set_dart_entrypoint_arguments(std::move(command_line_arguments));

  FlutterWindow window(project);
  Win32Window::Point origin(10, 10);
  Win32Window::Size size(1280, 720);
  if (!window.Create(L"myproject", origin, size)) {
    return EXIT_FAILURE;
  }
  window.SetQuitOnClose(true);

  ::MSG msg;
  while (::GetMessage(&msg, nullptr, 0, 0)) {
    ::TranslateMessage(&msg);
    ::DispatchMessage(&msg);
  }

  ::CoUninitialize();
  return EXIT_SUCCESS;
}
Code language: PHP (php)
When compiling for Windows Desktop, this main.cpp file acts as the true program entry point. The system runs main.cpp first, then loads your lib/main.dart Flutter code afterward.
Likewise, if you open the android folder, you’ll notice its internal structure matches standard Android projects built with Kotlin or Java.
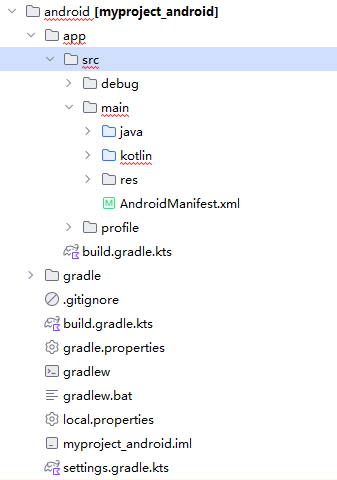
You’ll find familiar components including the src directory, AndroidManifest.xml, and MainActivity class — everything you recognize from native Android development. That’s no coincidence: building Android apps with Flutter still boots up from this native android folder under the hood.
Open the web folder, and you’ll also see index.html, the main entry file for web deployments.
Understanding Dart Files
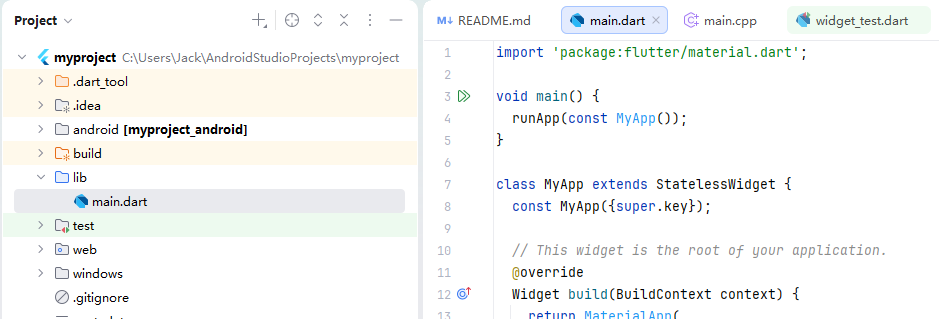
The main.dart file inside lib will be where you spend most of your development time. You can create subfolders and add additional Dart files within the lib directory to organize your codebase.
Let’s open main.dart and break it down.
// Import Material Design UI component library
import 'package:flutter/material.dart';

// Main program entry point
void main() {
  runApp(const MyApp());
}

// Root stateless application widget
class MyApp extends StatelessWidget {
  const MyApp({super.key});

  @override
  Widget build(BuildContext context) {
    return MaterialApp(
      title: 'Flutter Demo',
      // Global theme configuration
      theme: ThemeData(
        colorScheme: ColorScheme.fromSeed(seedColor: Colors.deepPurple),
      ),
      // Default home screen
      home: const MyHomePage(title: 'Flutter Demo Home Page'),
    );
  }
}

// Stateful widget for the main home screen
class MyHomePage extends StatefulWidget {
  const MyHomePage({super.key, required this.title});

  // Page title parameter passed in
  final String title;

  @override
  State<MyHomePage> createState() => _MyHomePageState();
}

// State class managing logic and data for the home screen
class _MyHomePageState extends State<MyHomePage> {
  // Counter numeric variable
  int _counter = 0;

  // Method to increment the counter value
  void _incrementCounter() {
    setState(() {
      _counter++;
    });
  }

  @override
  Widget build(BuildContext context) {
    // Base layout scaffold for the page
    return Scaffold(
      // Top app navigation bar
      appBar: AppBar(
        backgroundColor: Theme.of(context).colorScheme.inversePrimary,
        title: Text(widget.title),
      ),
      // Main page content area
      body: Center(
        child: Column(
          mainAxisAlignment: MainAxisAlignment.center,
          children: [
            const Text('You have pushed the button this many times:'),
            Text(
              '$_counter', // Render the counter number variable as text
              style: Theme.of(context).textTheme.headlineMedium, // Text styling rule
            ),
          ],
        ),
      ),
      // Floating action button in bottom-right corner
      // onPressed triggers increment logic, tooltip shows hover text, child defines icon
      floatingActionButton: FloatingActionButton(
        onPressed: _incrementCounter,
        tooltip: 'Increment',
        child: const Icon(Icons.add),
      ),
    );
  }
}Code language: JavaScript (javascript)
1. Program Entry Section
import 'package:flutter/material.dart';
void main() {
  runApp(const MyApp());
}
Code language: JavaScript (javascript)- Imports Google’s official Material Design library, a full set of pre-built UI widgets including buttons, page layouts and text components. Apple provides its own separate UI framework for iOS.
mainacts as the single entry point for all Dart applications. TherunApp()function initializes the app and mounts the rootMyAppwidget to the screen.
2. MyApp: Global Root Widget
This is a StatelessWidget, meaning it holds no mutable state. We’ll cover stateful vs stateless widgets in more detail later; for now just keep this basic concept in mind.
class MyApp extends StatelessWidget {
  const MyApp({super.key});

  // This widget serves as the root of your entire application
  @override
  Widget build(BuildContext context) {
    return MaterialApp(
      title: 'Flutter Demo',
      theme: ThemeData(
        colorScheme: ColorScheme.fromSeed(seedColor: Colors.deepPurple),
      ),
      home: const MyHomePage(title: 'Flutter Demo Home Page'),
    );
  }
}
Code language: JavaScript (javascript)- Global app settings: Sets your app display name, universal theme styling, and default landing page.
MaterialApp: The top-level wrapper for Material Design apps that handles routing, global themes and page titles centrally.- The
homeparameter definesMyHomePageas the screen users see when launching the app.
3. MyHomePage: Main Home Screen Widget
This is the default screen loaded when you open the app or window, and it’s a StatefulWidget. We’ll break down stateful widgets fully in later sections.
class MyHomePage extends StatefulWidget {
  const MyHomePage({super.key, required this.title});

  final String title;

  @override
  State<MyHomePage> createState() => _MyHomePageState();
}Code language: JavaScript (javascript)- We use a stateful widget here because the screen stores dynamic changing data — our counter number.
- The
titlestring value gets passed into the widget externally and accessed within the state class viawidget.title. - Every StatefulWidget requires a paired state class, in this case
_MyHomePageState, which stores all page variables and user interaction logic.
4. _MyHomePageState: State Logic Class
This companion state class manages all page logic, rendering output and UI updates.
class _MyHomePageState extends State<MyHomePage> {
  int _counter = 0;

  void _incrementCounter() {
    setState(() {
      _counter++;
    });
  }

  @override
  Widget build(BuildContext context) {

    return Scaffold(
      appBar: AppBar(

        backgroundColor: Theme.of(context).colorScheme.inversePrimary,

        title: Text(widget.title),
      ),
      body: Center(

        child: Column(

          mainAxisAlignment: MainAxisAlignment.center,
          children: [
            const Text('You have pushed the button this many times:'),
            Text(
              '$_counter',
              style: Theme.of(context).textTheme.headlineMedium,
            ),
          ],
        ),
      ),
      floatingActionButton: FloatingActionButton(
        onPressed: _incrementCounter,
        tooltip: 'Increment',
        child: const Icon(Icons.add),
      ),
    );
  }
}Code language: JavaScript (javascript)
int _counter = 0: Dynamic page variable storing our counter value._incrementCounter(): The function triggered when tapping the buttonsetState()tells Flutter our stored data has changed, triggering a full UI refresh.- Increases the counter value by one.
- The
build()method runs every time the UI refreshes, returning the full page layout structure.
5. Scaffold: Page Layout Template
Scaffold is the base layout template used inside our _MyHomePageState class.
appBar: The top header/title bar of the screen.body: The main content area of the pageCenteraligns all child widgets to the screen center;Columnarranges text elements vertically.
floatingActionButton: The circular plus icon button fixed in the bottom-right corner, linked to our counter increment function.
Full App Runtime Workflow
- App launches →
mainfunction executes → loads the rootMyAppwidget. MyApprenders theMaterialAppwrapper → loads the default home screenMyHomePage.- The page renders its top title bar, centered text content and floating add button.
- Tap the button →
_incrementCounterruns, callssetStateto redraw the UI → counter number updates on screen.