Apache Cordova is an open-source mobile development framework. Developers can leverage standard web technologies — HTML5, CSS3 and JavaScript — to build cross-platform applications. Apps run within platform-specific encapsulated containers, invoking device capabilities such as sensors, local storage and network status via standards-compliant API bindings.
One single codebase works across multiple platforms, and it is completely free and open source.
Apache Cordova may be the right choice for you if you fit any of the following scenarios:
- You are a mobile developer aiming to deploy one app to multiple platforms without rebuilding separately using platform-specific languages and toolchains;
- You are a web developer looking to package your web application and distribute it via major app stores;
- You are a mobile developer who needs to mix native components with a WebView (specialised browser window) to enable web code access to low-level device APIs, or you plan to build plugins to bridge communications between native code and the WebView.
A Cordova application consists of multiple components. The diagram below offers a high-level overview of the Cordova application architecture.
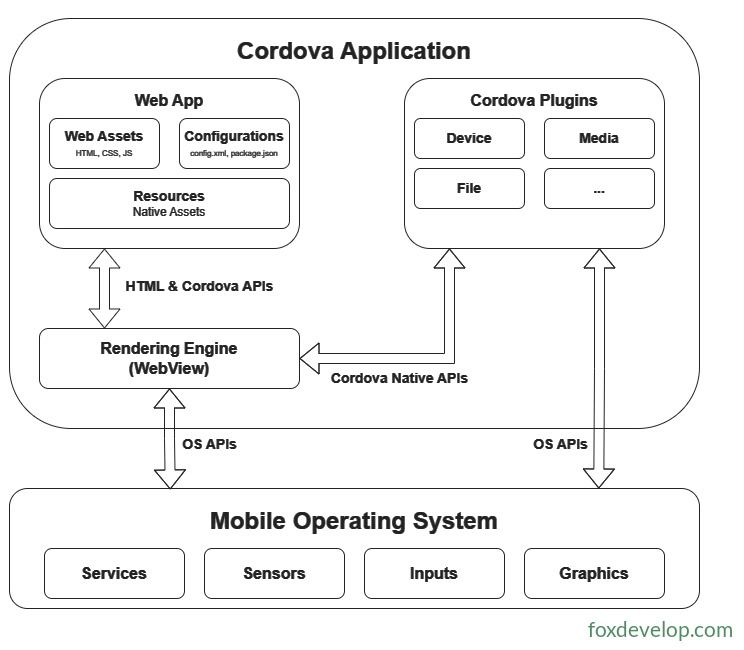
WebView
A Cordova-enabled WebView renders the full application interface. On certain platforms, it can also be embedded as a component inside hybrid apps and operate alongside native controls.
Web App
This is where your business logic resides. The application itself is implemented as web content, with the local index.html file serving as the default entry point. The page references required CSS, JavaScript, images, media assets and other files. The whole application runs inside the WebView within a native container, and can finally be packaged and published to various app stores.
There is one critical file inside the container: config.xml. This file stores basic app information and defines runtime settings, such as whether screen orientation switching is supported.
Plugins
Plugins form a core part of the Cordova ecosystem. They act as a communication bridge between Cordova and native code, wrapping standard device APIs so JavaScript can call native implementations.
The Apache Cordova project officially maintains a set of core plugins that provide interfaces to fundamental device features: battery status, camera, contacts and more.
Beyond official core plugins, numerous third-party plugins encapsulate extended functions that do not work universally across all platforms. You can search for Cordova plugins via plugin registries or npm. You may also develop custom plugins following the Plugin Development Guide. A typical use case: enabling communication between Cordova and self-built native components.
Note: New Cordova projects come with zero plugins pre-installed under the latest default rules. Both core and third-party plugins must be installed explicitly and manually.
Cordova does not supply UI controls or MV* frontend frameworks; it only provides a runtime environment to host web code. If you require UI components or frontend architecture frameworks, you will need to select and integrate them into your project yourself.
Two Development Workflows
Cordova provides two primary workflows for building mobile applications. Both can achieve your goals in many scenarios, yet each carries distinct advantages:
Cross-platform Workflow (CLI Command Line Tool)
Suitable for projects targeting many platforms with minimal platform-specific customisation. The primary tool is the cordova CLI. As a high-level utility, the CLI supports project builds for multiple platforms in one go and abstracts low-level scripting details: it copies shared web assets into each platform subdirectory, automatically configures platforms, executes build scripts to generate installers, and offers a unified command-line interface for plugin management.
Platform-specific Workflow
Best suited for development focused on a single platform, where deep low-level project modifications are required
Common use case: mixing custom native components and the Cordova WebView inside one application
Choose this workflow when you need to directly edit project files within the platform SDK.
This workflow relies on platform-specific low-level scripts paired with the standalone Plugman tool for plugin management. While multi-platform development is possible, it comes with higher overhead: there is no unified high-level management, so each platform requires separate builds and independent maintenance of plugin configurations.
Once you switch from CLI mode to platform SDK + low-level script mode, there is no way to revert back.
The CLI maintains a shared cross-platform source set and overwrites code inside platform directories every build. If you want to retain modifications made to files within platform directories, you must switch to low-level script mode. This mode ignores shared web source files and directly uses independent code located inside platform directories.
Installing Cordova
Your installation approach depends on which development workflow you pick:
We will demonstrate the cross-platform CLI workflow here.
The Cordova command-line tool (CLI) is distributed as an npm package.
Follow these steps to set up the cordova CLI:
- Download and install Node.js. Once installation finishes, you should be able to run
nodeandnpmdirectly inside your terminal. - (Optional) Download and install the Git client if you do not already have Git. After installation, execute the
gitcommand in your terminal. Cordova CLI and npm invoke Git when fetching resources via Git repository URLs. - Install the cordova module using the npm utility bundled with Node.js; npm will handle automatic downloads.
Install Node.js

Installing Node.js is straightforward. Grab the MSI installer for Windows, double-click to launch setup, and follow the default prompts. After installation completes
Open a CMD terminal and verify successful installation
Run the two commands below. Installation is confirmed only if both output version numbers (as shown in the screenshot)
node -v
npm -v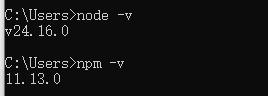
Once Node.js is installed successfully, proceed to install Cordova
macOS / Linux:
npm install -g cordovamacOS and Linux users: If you need to install tools into restricted directories such as /usr/local/share, you may need to prefix the npm command with sudo.
If you use version managers like nvm or nave, or the target directory has write permissions, sudo is unnecessary.
It is generally recommended to avoid running npm with sudo to prevent permission conflicts and broken package installations.
Use nvm (Node Version Manager) or nave to manage Node.js and npm; package installation usually works without sudo.
Windows:
C:\>npm install -g cordovaThe -g flag triggers global installation of cordova. Omitting this flag installs the package only inside the node_modules subfolder within your current working directory.
After installation, run cordova (without parameters) in your terminal. Proper display of help text means installation succeeded.
A successful installation log will display something like “added 217 packages in 14s”
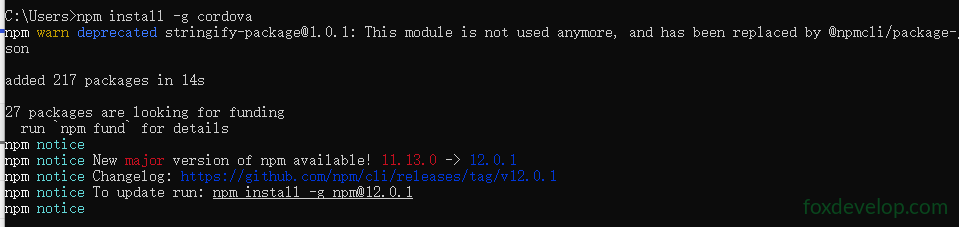
Verify installation status
cordova -vA valid version number output (e.g. 13.0.0) indicates everything is ready.

System Requirements & Version Support
| Cordova CLI Version | Minimum Supported Node.js Version |
|---|---|
| 13.x | >=20.17.0 |
| 12.x | >=16.13.0 |
| 11.x | >=12.0.0 |
| 10.x | >=10.0.0 |
| 9.x | >=6.0.0 |
Installation is complete. We can now begin formally learning Cordova.
Introduction and Installation