Vier grundlegende Layouts
Ein Layout ist ein Container zur Aufnahme vieler Steuerelemente. Es kann die Position der enthaltenen Steuerelemente nach bestimmten Regeln anpassen.
Damit lassen sich ansprechende Benutzeroberflächen erstellen.
Innerhalb eines Layouts können weitere Layouts verschachtelt werden.
Layout – Lineares Layout LinearLayout
Das lineare Layout ist sehr häufig im Einsatz
Wie der Name schon sagt, werden die enthaltenen Steuerelemente nacheinander entlang einer geraden Linie angeordnet.
Mit dem Attribut android:orientation legen Sie die Ausrichtung fest: vertical (vertikal) oder horizontal (horizontal).
Grundlegende Syntax
<?xml version="1.0" encoding="utf-8"?>
<LinearLayout
    xmlns:android="http://schemas.android.com/apk/res/android"
    android:orientation="vertical"
    android:layout_width="match_parent"
    android:layout_height="match_parent"
    >
</LinearLayout>Code-Sprache: HTML, XML (xml)
Probieren wir es nun aus
Wir erstellen ein Layout und passen die Hauptaktivität an, damit dieses Layout verwendet wird
<LinearLayout
    xmlns:android="http://schemas.android.com/apk/res/android"
    android:orientation="vertical"
    android:layout_width="match_parent"
    android:layout_height="match_parent"
    >
    <Button
        android:id="@+id/button1"
        android:layout_width="wrap_content"
        android:layout_height="wrap_content"
        android:text="1"
        />
    <Button
        android:id="@+id/button2"
        android:layout_width="wrap_content"
        android:layout_height="wrap_content"
        android:text="2"
        />
    <Button
        android:id="@+id/button3"
        android:layout_width="wrap_content"
        android:layout_height="wrap_content"
        android:text="3"
        />
</LinearLayout>Code-Sprache: HTML, XML (xml)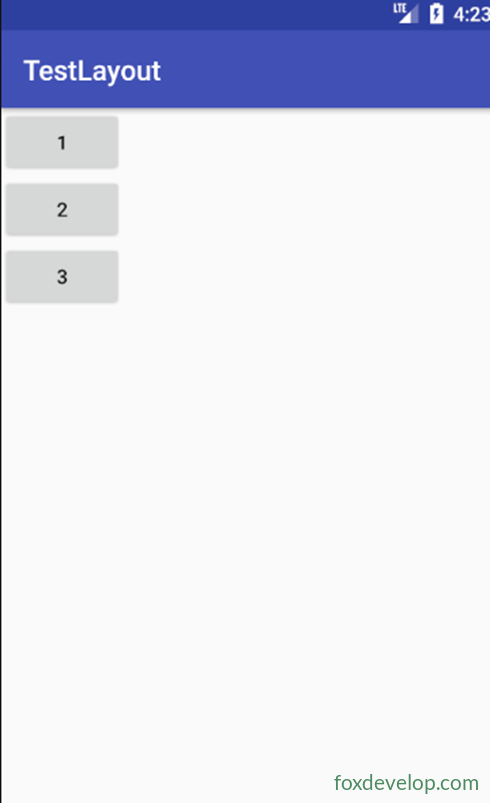
Die Hauptaktivität lädt dieses Layout
setContentView(R.layout.test_linear);
Wenn wir auf horizontale Anordnung wechseln
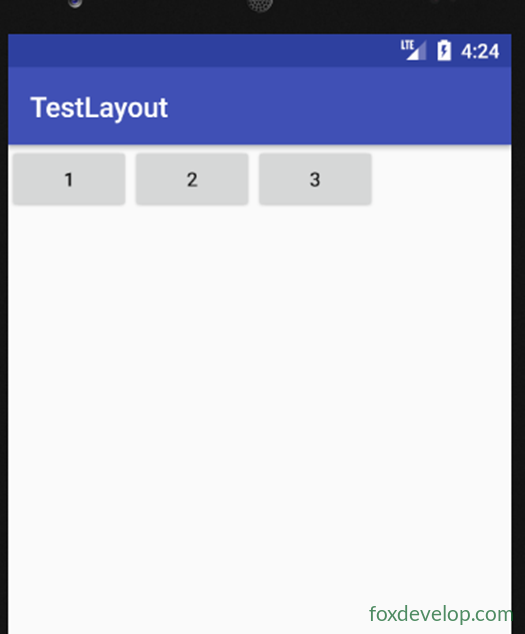
android:orientation=“horizontal“
Layout – Ausrichtung von Steuerelementen im LinearLayout
Über android:layout_gravity legen Sie die Ausrichtung des jeweiligen Steuerelements fest.
Wenn das LinearLayout jedoch horizontal angeordnet ist, wirkt sich nur die vertikale Ausrichtung aus. Denn in diesem Fall ist die horizontale Länge nicht festgelegt.
<?xml version="1.0" encoding="utf-8"?>
<LinearLayout
    xmlns:android="http://schemas.android.com/apk/res/android"
    android:orientation="horizontal"
    android:layout_width="match_parent"
    android:layout_height="match_parent"
    >
    <Button
        android:id="@+id/button1"
        android:layout_width="wrap_content"
        android:layout_height="wrap_content"
        android:layout_gravity="top"
        android:text="1"
        />
    <Button
        android:id="@+id/button2"
        android:layout_width="wrap_content"
        android:layout_height="wrap_content"
        android:text="2"
        android:layout_gravity="center"
        />
    <Button
        android:id="@+id/button3"
        android:layout_width="wrap_content"
        android:layout_height="wrap_content"
        android:text="3"
        android:layout_gravity="bottom"
        />
</LinearLayout>Code-Sprache: HTML, XML (xml)
Das heißt: Bei horizontaler Ausrichtung des Layouts funktionieren die Ausrichtungen oben, mittig und unten.
Layout – Anteil der Steuerelemente am Bildschirm im LinearLayout
Wenn Sie die Breite der untergeordneten Steuerelemente auf 0dp setzen
Dann können Sie mit
android:layout_weight=“n“ den Anteil festlegen, den das Steuerelement am Layout einnimmt.
Seite 108
Zusätzlich können Sie auch ein Element mit weight verwenden
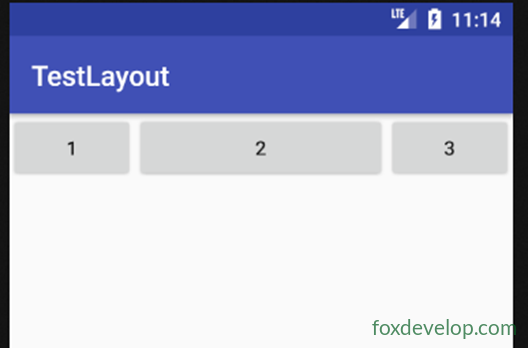
und ein weiteres ohne weight
Dann behält das zweite Element, hier der Button, seine ursprüngliche Breite. Diese Schreibweise eignet sich hervorragend
<?xml version="1.0" encoding="utf-8"?>
<LinearLayout xmlns:android="http://schemas.android.com/apk/res/android"
    android:orientation="horizontal" android:layout_width="match_parent"
    android:layout_height="match_parent">
    <Button
        android:id="@+id/button1"
        android:layout_width="0dp"
        android:layout_weight="1"
        android:layout_height="wrap_content"
        android:text="1"        />
    <Button
        android:id="@+id/button2"
        android:layout_width="0dp"
        android:layout_weight="2"
        android:layout_height="wrap_content"
        android:text="2"        />
    <Button
        android:id="@+id/button3"
        android:layout_width="0dp"
        android:layout_weight="1"
        android:layout_height="wrap_content"
        android:text="3"        />
</LinearLayout>Code-Sprache: HTML, XML (xml)
Buttons erhalten ihre Breite nach dem Inhalt, das Eingabefeld nutzt den verbleibenden Platz
<?xml version="1.0" encoding="utf-8"?>
<LinearLayout xmlns:android="http://schemas.android.com/apk/res/android"
    android:orientation="horizontal" android:layout_width="match_parent"
    android:layout_height="match_parent">
    <EditText
        android:layout_width="0dp"
        android:layout_weight="2"
        android:layout_height="wrap_content" />
    <Button
        android:id="@+id/button1"
        android:layout_width="wrap_content"
        android:layout_height="wrap_content"
        android:text="1"        />
</LinearLayout>Code-Sprache: HTML, XML (xml)
Layout – RelativeLayout (relatives Layout)
RelativeLayout, auch relatives Layout genannt
Es platziert Steuerelemente über relative Positionierung an beliebigen Stellen im Layout.
Darum gibt es beim RelativeLayout sehr viele Attribute.
Sie können für ein Steuerelement festlegen:
android:layout_alignParentLeft
android:layout_alignParentTop
android:layout_alignParentRight
android:layout_alignParentBottom
android:layout_centerInParent – diese fünf Attribute legen die Position fest: links, oben, rechts, unten, zentriert.
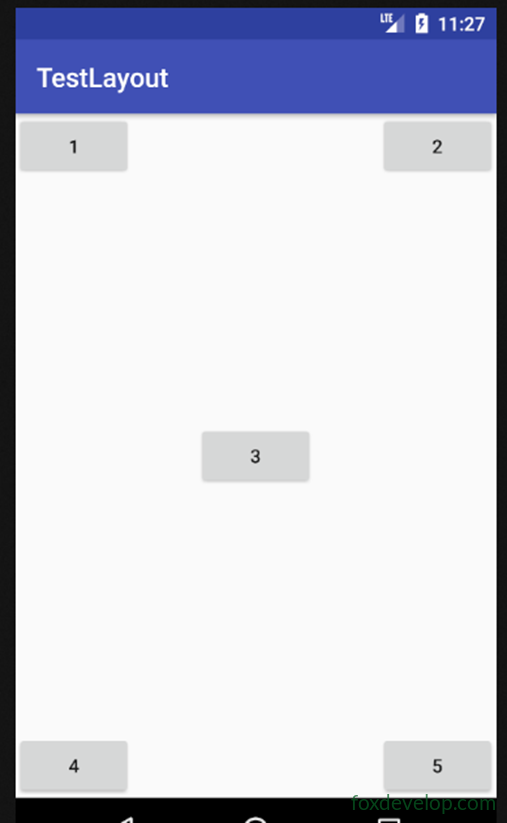
<?xml version="1.0" encoding="utf-8"?>
<RelativeLayout xmlns:android="http://schemas.android.com/apk/res/android"
    android:layout_width="match_parent" android:layout_height="match_parent">
    <Button
        android:id="@+id/button1"
        android:layout_width="wrap_content"
        android:layout_height="wrap_content"
        android:layout_alignParentLeft="true"
        android:layout_alignParentTop="true"
        android:text="1"        />
    <Button
        android:id="@+id/button2"
        android:layout_width="wrap_content"
        android:layout_height="wrap_content"
        android:layout_alignParentRight="true"
        android:layout_alignParentTop="true"
        android:text="2"        />
    <Button
        android:id="@+id/button3"
        android:layout_width="wrap_content"
        android:layout_height="wrap_content"
        android:layout_centerInParent="true"
        android:text="3"        />
    <Button
        android:id="@+id/button4"
        android:layout_width="wrap_content"
        android:layout_height="wrap_content"
        android:layout_alignParentLeft="true"
        android:layout_alignParentBottom="true"
        android:text="4"        />
    <Button
        android:id="@+id/button5"
        android:layout_width="wrap_content"
        android:layout_height="wrap_content"
        android:layout_alignParentRight="true"
        android:layout_alignParentBottom="true"
        android:text="5"        />
</RelativeLayout>Code-Sprache: HTML, XML (xml)
Position relativ zu anderen Steuerelementen festlegen
Mit android:layout_above=“@id/button3″
Platzieren Sie ein Steuerelement über einem anderen.
Mit layout_below setzen Sie ein Steuerelement unter ein anderes.
layout_toLeftOf bedeutet, das Steuerelement steht links von einem anderen Element.
layout_toRightOf bedeutet, das Steuerelement steht rechts von einem anderen Element.
Wichtig: Wenn ein Element sich auf ein anderes Steuerelement bezieht, muss das referenzierte Element vorher im XML definiert werden.
Wir platzieren button1 in die Mitte und schreiben es ganz nach oben in die XML-Datei. Alle anderen vier Buttons richten sich dann an ihm aus.
<?xml version="1.0" encoding="utf-8"?>
<RelativeLayout xmlns:android="http://schemas.android.com/apk/res/android"
    android:layout_width="match_parent" android:layout_height="match_parent">
    <Button
        android:id="@+id/button1"
        android:layout_width="wrap_content"
        android:layout_height="wrap_content"
        android:layout_centerInParent="true"
        android:text="1"        />
    <Button
        android:id="@+id/button2"
        android:layout_width="wrap_content"
        android:layout_height="wrap_content"
        android:layout_above="@id/button1"
        android:layout_toLeftOf="@id/button1"
        android:text="2"        />
    <Button
        android:id="@+id/button3"
        android:layout_width="wrap_content"
        android:layout_height="wrap_content"
        android:layout_above="@id/button1"
        android:layout_toRightOf="@id/button1"
        android:text="3"        />
    <Button
        android:id="@+id/button4"
        android:layout_width="wrap_content"
        android:layout_height="wrap_content"
        android:layout_below="@id/button1"
        android:layout_toRightOf="@id/button1"
        android:text="4"        />
    <Button
        android:id="@+id/button5"
        android:layout_width="wrap_content"
        android:layout_height="wrap_content"
        android:layout_below="@id/button1"
        android:layout_toLeftOf="@id/button1"
        android:text="5"        />
</RelativeLayout>Code-Sprache: HTML, XML (xml)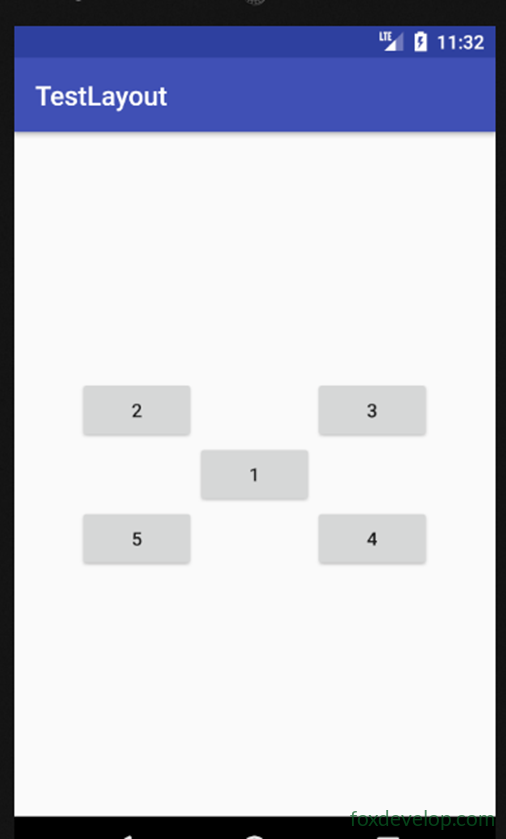
Layout – FrameLayout (Rahmenlayout)
Es ist einfacher als die beiden vorherigen Layouts
Es wird auch seltener verwendet.
Dieses Layout hat keine einfachen Positionsangaben. Alle Steuerelemente werden standardmäßig in der oberen linken Ecke platziert.
Probieren wir es aus: Wir fügen ein TextView und ein ImageView hinzu.
Mit dem Attribut layout_gravity können Sie die Ausrichtung im Layout festlegen.
<?xml version="1.0" encoding="utf-8"?>
<FrameLayout xmlns:android="http://schemas.android.com/apk/res/android"
    android:layout_width="match_parent" android:layout_height="match_parent">
    <ImageView
        android:layout_width="wrap_content"
        android:layout_height="wrap_content"
        android:src="@drawable/img1"    />
        />
    <Button
        android:layout_width="wrap_content"
        android:layout_height="wrap_content"
        android:text="foxdevelop.com"
        android:layout_gravity="right"
        />
</FrameLayout>Code-Sprache: HTML, XML (xml)
Erweitertes Layout – Prozentlayout
Die ersten drei Layouts gibt es seit Android 1.0.
Sie werden bis heute verwendet.
Nur das LinearLayout unterstützt layout_weight, um die Größe von Steuerelementen festzulegen. Die anderen beiden nicht.
Beispielsweise ist es schwer, mit RelativeLayout zwei Buttons gleich groß aufzuteilen.
Mit Android 7.0 kam aber das Prozentlayout hinzu.
Dieses Layout erweitert RelativeLayout und FrameLayout, indem es ihnen das Präfix Percent voranstellt.
Es ist also nur eine Erweiterung der vorherigen beiden Layouts.
Sie müssen die Abhängigkeit für das Prozentlayout in build.gradle hinzufügen.
Öffnen Sie die Datei app/build.gradle
Fügen Sie im Bereich dependencies Folgendes ein:
compile ‚com.android.support:percent:27.1.1‘
Nach der Änderung von build.gradle führt Gradle eine Synchronisation durch. Die Bibliothek für das Prozentlayout wird automatisch ins Projekt eingebunden, Sie müssen nichts weiter tun.
Dann ändern Sie das Layout zu
<android.support.percent.PercentFrameLayout
Dann setzen Sie für die untergeordneten Steuerelemente
app:layout_widthPercent=“50%“
app:layout_heightPercent=“50%“
Zusätzlich können Sie weiterhin das Attribut layout_gravity für die untergeordneten Steuerelemente verwenden.
Eigene Steuerelemente und Einbinden von Layout-Dateien
Vererbungshierarchie von Steuerelementen und Layouts
Alle Steuerelemente, die wir nutzen, erben direkt oder indirekt von View.
Alle Layouts erben direkt oder indirekt von ViewGroup.
View ist die grundlegende Android-UI-Komponente.
Sie zeichnet einen rechteckigen Bereich auf den Bildschirm und reagiert auf Ereignisse in diesem Bereich.
Layout einbinden
iOS-Apps sehen meist ähnlich aus: Links oben ein Zurück-Button, rechts oben der Titel.
Das wollen wir nachbauen.
Einen Button und ein TextView zu erstellen, fällt uns jetzt nicht schwer.
Wenn wir das aber auf jeder Seite neu schreiben, entsteht viel doppelter Code.
Das Problem lösen wir, indem wir Layouts einbinden.
Erstellen Sie eine neue Datei justtitle.xml
Wir erstellen ein neues Projekt TestCustom
Dann legen wir das Layout justtitle.xml an
Der Code lautet wie folgt
<?xml version="1.0" encoding="utf-8"?>
<LinearLayout
    xmlns:android="http://schemas.android.com/apk/res/android"
    android:layout_width="match_parent"
    android:layout_height="wrap_content"
    android:background="#137e11"
    >
    <Button
        android:id="@+id/button1"
        android:layout_width="wrap_content"
        android:layout_height="wrap_content"
        android:layout_gravity="center"
        android:layout_margin="5dp"
        android:text="Zurück"
        android:textColor="#fff"
        android:background="@null"
        />
    <TextView
        android:id="@+id/textview"
        android:layout_width="0dp"
        android:layout_weight="1"
        android:layout_height="wrap_content"
        android:gravity="center"
        android:layout_gravity="center"
        android:text="Titel"
        android:textSize="18dp"
        android:textColor="#fff"
        android:background="@null"
        android:layout_margin="5dp"
        />
    <Button
        android:id="@+id/button"
        android:layout_width="wrap_content"
        android:layout_height="wrap_content"
        android:layout_gravity="center"
        android:text="..."
        android:layout_margin="5dp"
        android:background="@null"
        />
</LinearLayout>Code-Sprache: HTML, XML (xml)
Jetzt passen wir die Ansicht der Hauptaktivität an, Code wie folgt
Verwenden Sie include, um unsere Datei justtitle.xml einzubinden
<?xml version="1.0" encoding="utf-8"?>
<LinearLayout
    xmlns:android="http://schemas.android.com/apk/res/android"
    android:layout_width="match_parent"
    android:layout_height="match_parent"
    >
    <include layout="@layout/justtitle"/>
</LinearLayout>Code-Sprache: HTML, XML (xml)
Erstellen Sie eine BasicActivity und überschreiben Sie onCreate
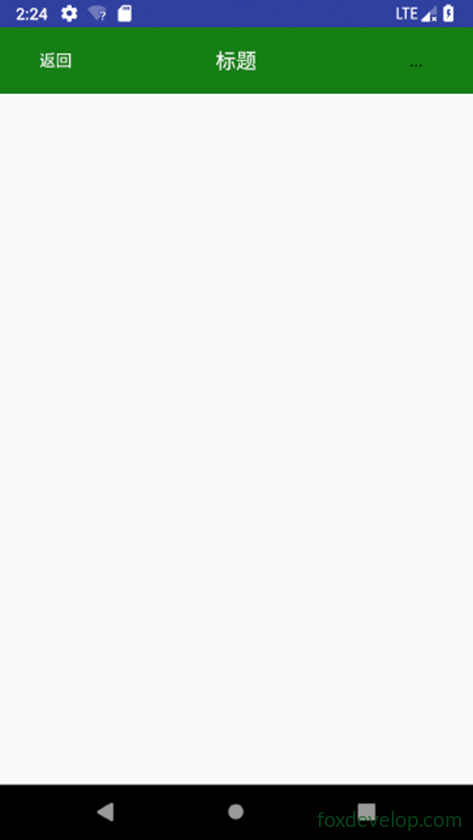
Dann verstecken wir die ursprüngliche ActionBar
package com.foxdevelop.www.testcustom;
import android.os.Bundle;
import android.support.v7.app.ActionBar;
import android.support.v7.app.AppCompatActivity;
public class BasicActivity extends AppCompatActivity {
    @Override
    protected void onCreate(Bundle savedInstanceState) {
        super.onCreate(savedInstanceState);
        ActionBar actionBar = getSupportActionBar();
        if (actionBar!=null)
        {
            actionBar.hide();
        }
    }
}Code-Sprache: JavaScript (javascript)
Verwendung eines eigenen Layout-Steuerelements
Um die Zurück-Funktion besser umzusetzen
Wollen wir nicht für jede Aktivität den Zurück-Code neu schreiben
Dafür erstellen wir ein eigenes Layout, das von LinearLayout erbt
Wir nennen es TitleLayout
Im Konstruktor des eigenen Layouts registrieren wir einen Klick-Listener für die Buttons des Layouts
public class TitleLayout extends LinearLayout {
    public TitleLayout(Context context, AttributeSet attributes) {
        super(context,attributes);
        //Zugehörige Ansicht laden
        LayoutInflater.from(context).inflate(R.layout.justtitle,this);
        //Klick-Listener für Zurück-Button registrieren
        Button button1 = (Button)findViewById(R.id.button1);
        button1.setOnClickListener(new OnClickListener() {
            @Override
            public void onClick(View view) {
                ((Activity)getContext()).finish(); //Zurück bedeutet, die aktuelle Aktivität beenden
            }
        });
        //Klick-Listener für Menü-Button registrieren
        Button button = (Button)findViewById(R.id.button);
        button.setOnClickListener(new OnClickListener() {
            @Override
            public void onClick(View view) {
                Toast.makeText(getContext(),"Menü anzeigen",Toast.LENGTH_LONG).show();
            }
        });
    }
}Code-Sprache: JavaScript (javascript)
<?xml version="1.0" encoding="utf-8"?>
<LinearLayout
xmlns:android="http://schemas.android.com/apk/res/android"
android:layout_width="match_parent"
android:layout_height="match_parent">
<com.foxdevelop.www.testcustom.TitleLayout
android:layout_width="match_parent"
android:layout_height="wrap_content"/>
</LinearLayout>Code-Sprache: HTML, XML (xml)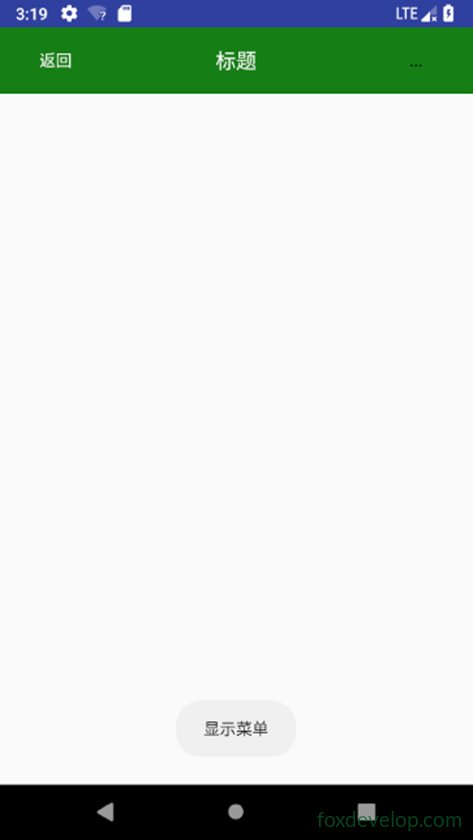
Layout