グリッド(Grid)レイアウトを学ぶため、3×3の九マス盤面を作成する
WPF開発経験のある方はGridコントロールに馴染みがあると思いますが、WinUIのGridも基本的な仕様はWPFとほぼ同じです。この授業ではGridを使って数字の九マスボタンを作成し、すべてのボタンに同一のクリックイベント処理関数を紐付けます。ボタンをクリックするとそのボタンのTag値を取得し、デバッグ用出力関数でターミナルに出力します。こちらはデモ用のデバッグ手法で、実際の開発ではTagの値からどのボタンが押されたか判定し、各種業務ロジックを実行できます。
最終的な動作例
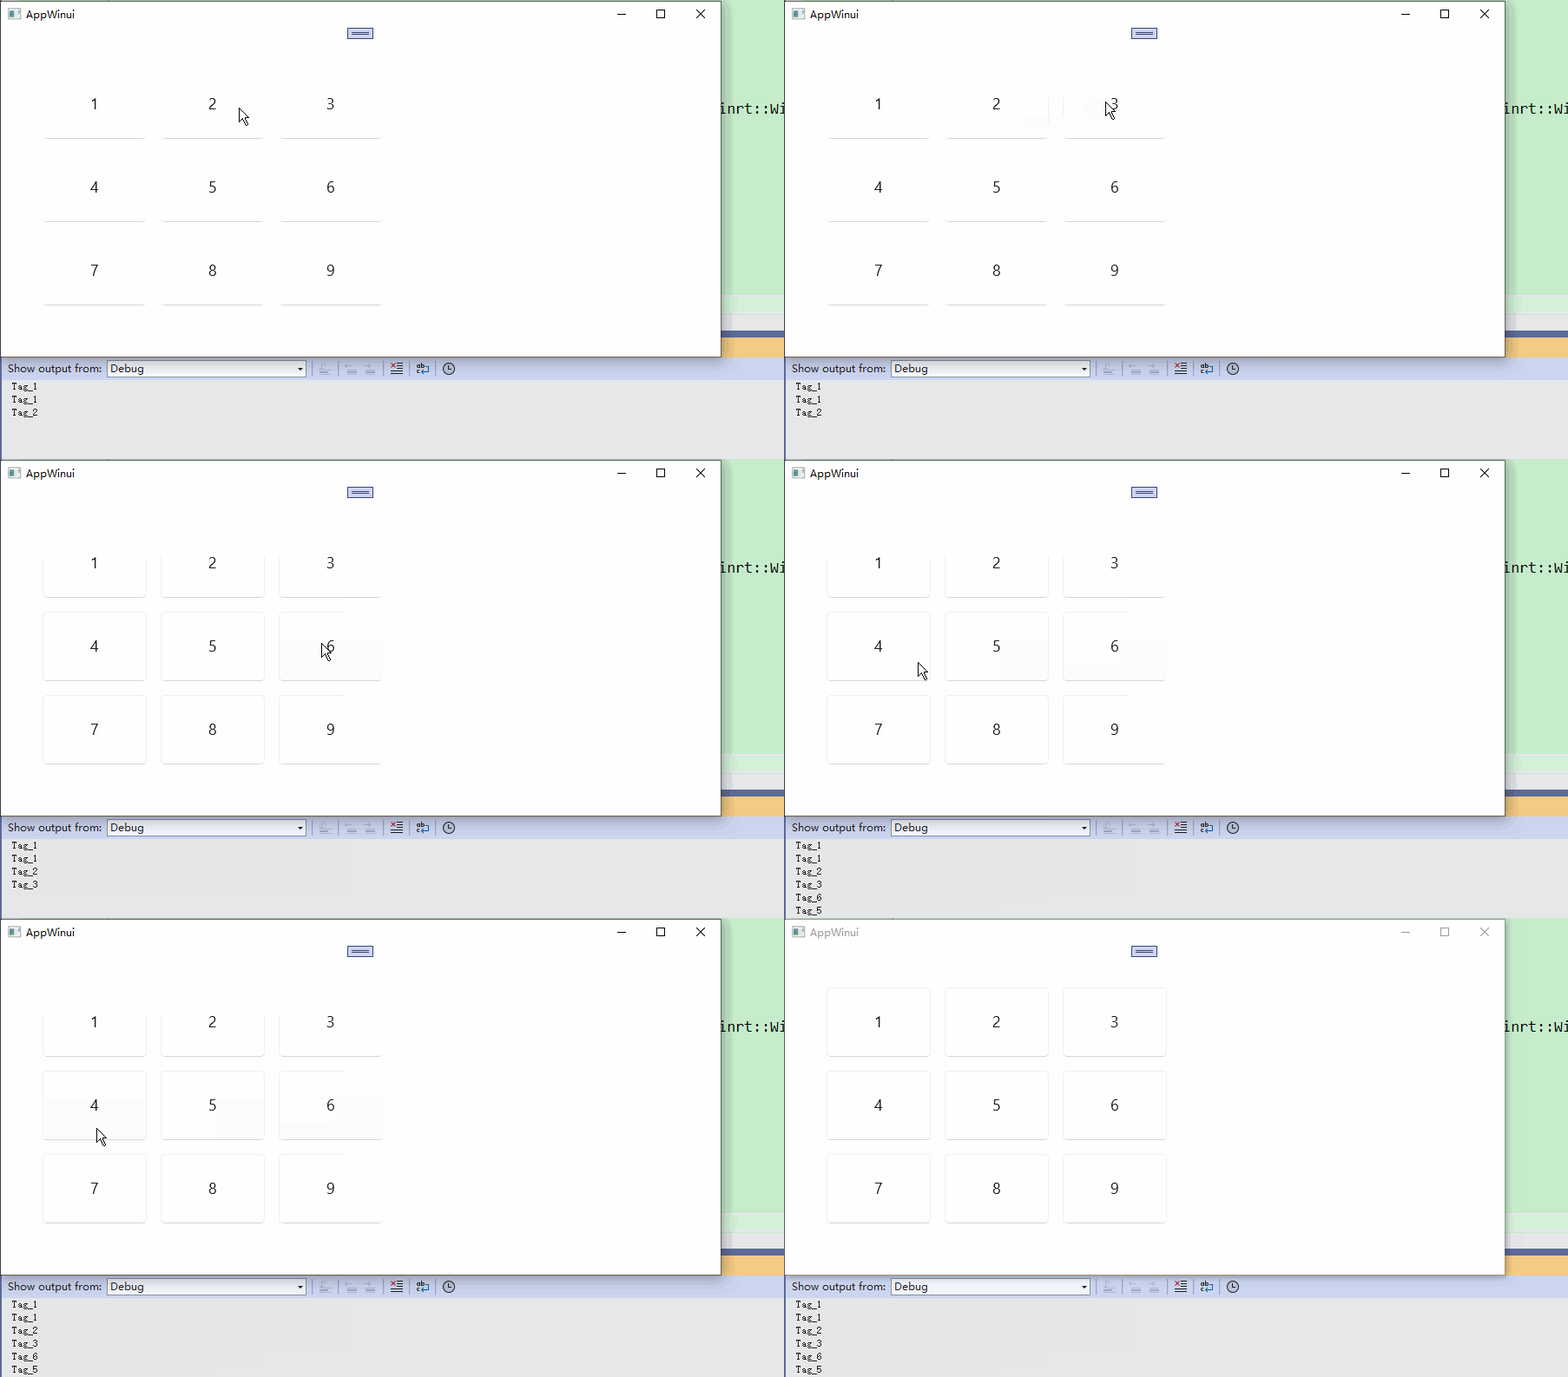
新規プロジェクトを作成し、中のGridを下記コードに書き換えます:
<Grid Padding="40">
    <!-- 3行3列の3×3グリッドレイアウト -->
    <Grid.RowDefinitions>
        <RowDefinition Height="Auto"/>
        <RowDefinition Height="Auto"/>
        <RowDefinition Height="Auto"/>
    </Grid.RowDefinitions>
    <Grid.ColumnDefinitions>
        <ColumnDefinition Width="Auto"/>
        <ColumnDefinition Width="Auto"/>
        <ColumnDefinition Width="Auto"/>
    </Grid.ColumnDefinitions>

    <!-- 1行目 -->
    <Button Grid.Row="0" Grid.Column="0" Content="1" Tag="Tag_1" Click="OnGridButtonClick" Width="120" Height="80" Margin="8" FontSize="18"/>
    <Button Grid.Row="0" Grid.Column="1" Content="2" Tag="Tag_2" Click="OnGridButtonClick" Width="120" Height="80" Margin="8" FontSize="18"/>
    <Button Grid.Row="0" Grid.Column="2" Content="3" Tag="Tag_3" Click="OnGridButtonClick" Width="120" Height="80" Margin="8" FontSize="18"/>

    <!-- 2行目 -->
    <Button Grid.Row="1" Grid.Column="0" Content="4" Tag="Tag_4" Click="OnGridButtonClick" Width="120" Height="80" Margin="8" FontSize="18"/>
    <Button Grid.Row="1" Grid.Column="1" Content="5" Tag="Tag_5" Click="OnGridButtonClick" Width="120" Height="80" Margin="8" FontSize="18"/>
    <Button Grid.Row="1" Grid.Column="2" Content="6" Tag="Tag_6" Click="OnGridButtonClick" Width="120" Height="80" Margin="8" FontSize="18"/>

    <!-- 3行目 -->
    <Button Grid.Row="2" Grid.Column="0" Content="7" Tag="Tag_7" Click="OnGridButtonClick" Width="120" Height="80" Margin="8" FontSize="18"/>
    <Button Grid.Row="2" Grid.Column="1" Content="8" Tag="Tag_8" Click="OnGridButtonClick" Width="120" Height="80" Margin="8" FontSize="18"/>
    <Button Grid.Row="2" Grid.Column="2" Content="9" Tag="Tag_9" Click="OnGridButtonClick" Width="120" Height="80" Margin="8" FontSize="18"/>
</Grid>Code language: HTML, XML (xml)
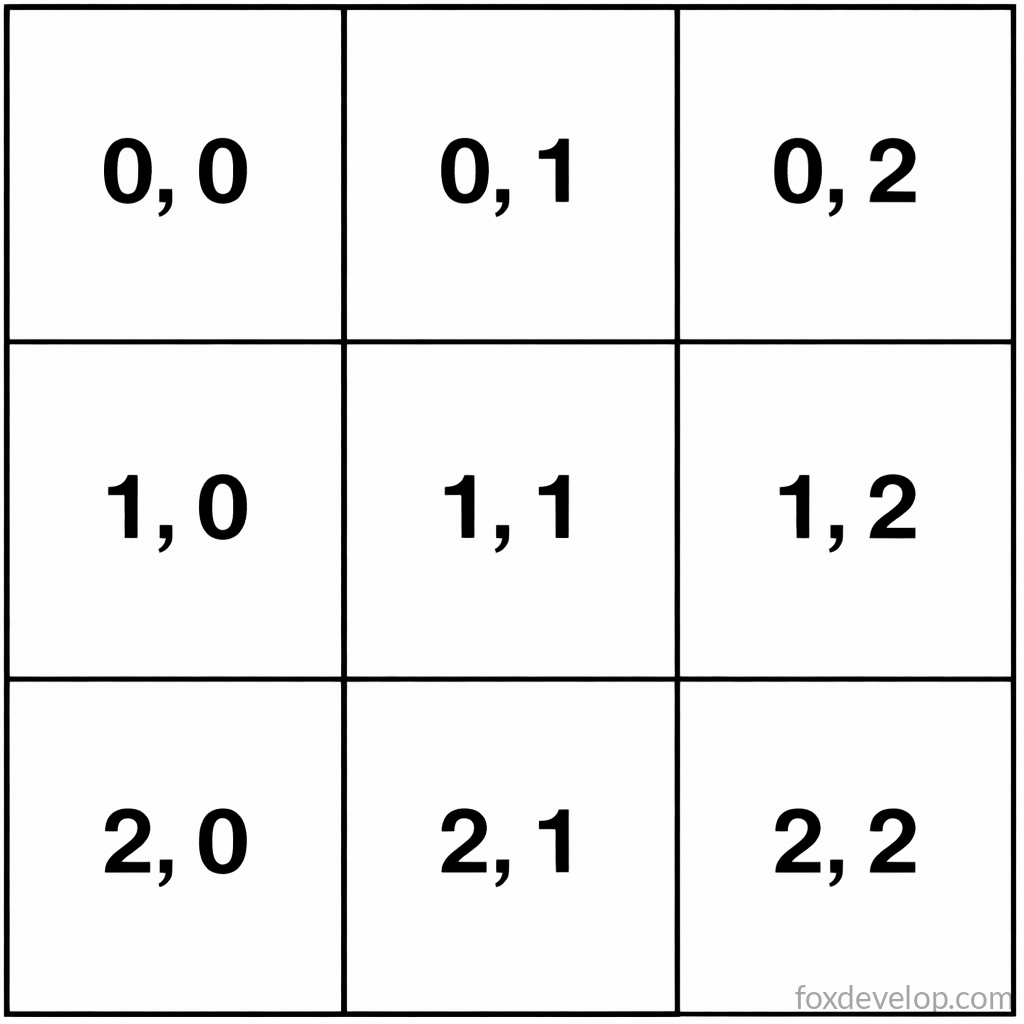
Gridはレイアウト用コントロールで、RowDefinitionsとColumnDefinitionsによって行列の数を定義できます。内部に配置する各コントロールはGrid.Row=”0″ Grid.Column=”0″という属性で配置するマスを指定します。今回の例は3行3列で、左上のマスは0行0列(添字は1ではなく0から開始)、右下のマスは2行2列となります。
各ボタンにClick=”OnGridButtonClick”を記述し、同一のイベント関数に紐付けています。XAML上のイベント名にカーソルを合わせF12キーを押すと、VSが自動的にバックエンドの処理関数を生成します。
生成されたバックエンド関数内では引数から押されたボタンを取得し、ボタンのTag値を読み取ることで、どのボタンがクリックされたか判別可能です。
    Button targetButton = sender.as<Button>();
    if (!targetButton) return;

    // カスタムTag文字列を取得
    hstring buttonTag = unbox_value<hstring>(targetButton.Tag());

    OutputDebugStringW(buttonTag.c_str());
    OutputDebugStringW(L"\n");
Code language: C++ (cpp)
ファイル上部に適切な名前空間をインクルードする必要があります。記載しないと各種クラスが認識されないため、完全なコードを下記に記載します。
#include "pch.h"
#include "MainWindow.xaml.h"
#if __has_include("MainWindow.g.cpp")
#include "MainWindow.g.cpp"
#endif

#include <winrt/Microsoft.UI.Xaml.Controls.h>
#include <winrt/Microsoft.UI.Xaml.h>

using namespace winrt;
using namespace Microsoft::UI::Xaml;
using namespace Microsoft::UI::Xaml::Controls;
using namespace Windows::Foundation;

// WinUIプロジェクト構造・テンプレート詳細は公式ガイドを参照:http://aka.ms/winui-project-info.

namespace winrt::AppWinui::implementation
{
    int32_t MainWindow::MyProperty()
    {
        throw hresult_not_implemented();
    }

    void MainWindow::MyProperty(int32_t /* value */)
    {
        throw hresult_not_implemented();
    }
}

void winrt::AppWinui::implementation::MainWindow::OnGridButtonClick(
winrt::Windows::Foundation::IInspectable const& sender, winrt::Microsoft::UI::Xaml::RoutedEventArgs const& e)
{
    Button targetButton = sender.as<Button>();
    if (!targetButton) return;

    // カスタムTag文字列を取得
    hstring buttonTag = unbox_value<hstring>(targetButton.Tag());

    OutputDebugStringW(buttonTag.c_str());
	OutputDebugStringW(L"\n");
}
Code language: C++ (cpp)
OutputDebugStringWはWindows標準のデバッグ出力関数で、VSの出力ウィンドウに文字を出力し、実行中の情報を確認するためのデバッグに活用できます。