透過九宮格範例學習Grid版面配置
有WPF開發經驗的開發者對Grid控制項不會陌生,WinUI當中的Grid用法和WPF大致相同。這一堂課我們用Grid做出數字九宮格按鈕,所有按鈕綁定同一個點擊事件函式;點擊按鈕時讀取該按鈕的Tag屬性,透過偵錯函式將Tag字串輸出到偵錯視窗。這裡僅作為偵錯示範,實務專案中你可以依據按鈕的Tag判斷使用者點擊哪一顆按鈕,再執行對應邏輯。
最終執行效果
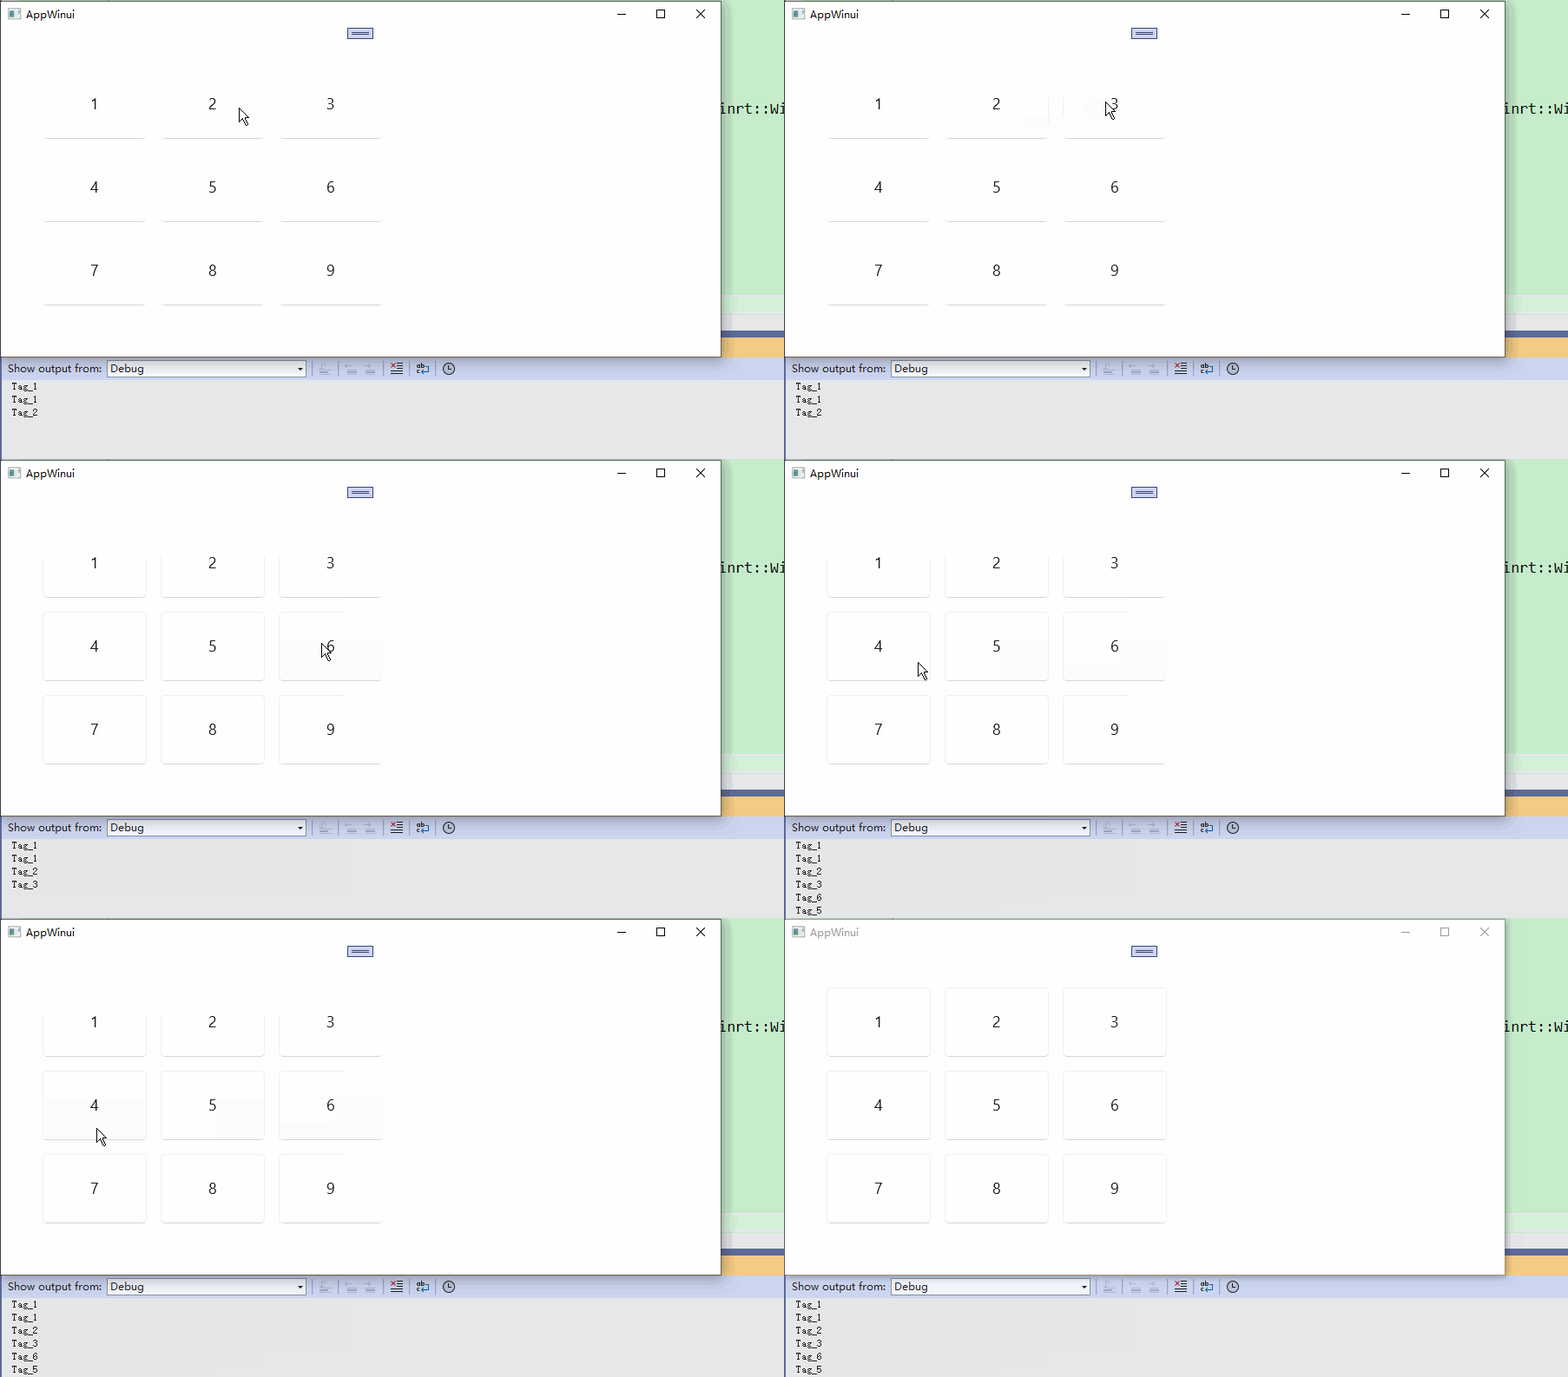
建立全新WinUI專案,將根節點Grid替換為下方程式碼:
<Grid Padding="40">
    <!-- 3 Rows, 3 Columns 3x3 Grid Layout -->
    <Grid.RowDefinitions>
        <RowDefinition Height="Auto"/>
        <RowDefinition Height="Auto"/>
        <RowDefinition Height="Auto"/>
    </Grid.RowDefinitions>
    <Grid.ColumnDefinitions>
        <ColumnDefinition Width="Auto"/>
        <ColumnDefinition Width="Auto"/>
        <ColumnDefinition Width="Auto"/>
    </Grid.ColumnDefinitions>

    <!-- Row 1 -->
    <Button Grid.Row="0" Grid.Column="0" Content="1" Tag="Tag_1" Click="OnGridButtonClick" Width="120" Height="80" Margin="8" FontSize="18"/>
    <Button Grid.Row="0" Grid.Column="1" Content="2" Tag="Tag_2" Click="OnGridButtonClick" Width="120" Height="80" Margin="8" FontSize="18"/>
    <Button Grid.Row="0" Grid.Column="2" Content="3" Tag="Tag_3" Click="OnGridButtonClick" Width="120" Height="80" Margin="8" FontSize="18"/>

    <!-- Row 2 -->
    <Button Grid.Row="1" Grid.Column="0" Content="4" Tag="Tag_4" Click="OnGridButtonClick" Width="120" Height="80" Margin="8" FontSize="18"/>
    <Button Grid.Row="1" Grid.Column="1" Content="5" Tag="Tag_5" Click="OnGridButtonClick" Width="120" Height="80" Margin="8" FontSize="18"/>
    <Button Grid.Row="1" Grid.Column="2" Content="6" Tag="Tag_6" Click="OnGridButtonClick" Width="120" Height="80" Margin="8" FontSize="18"/>

    <!-- Row 3 -->
    <Button Grid.Row="2" Grid.Column="0" Content="7" Tag="Tag_7" Click="OnGridButtonClick" Width="120" Height="80" Margin="8" FontSize="18"/>
    <Button Grid.Row="2" Grid.Column="1" Content="8" Tag="Tag_8" Click="OnGridButtonClick" Width="120" Height="80" Margin="8" FontSize="18"/>
    <Button Grid.Row="2" Grid.Column="2" Content="9" Tag="Tag_9" Click="OnGridButtonClick" Width="120" Height="80" Margin="8" FontSize="18"/>
</Grid>Code language: HTML, XML (xml)
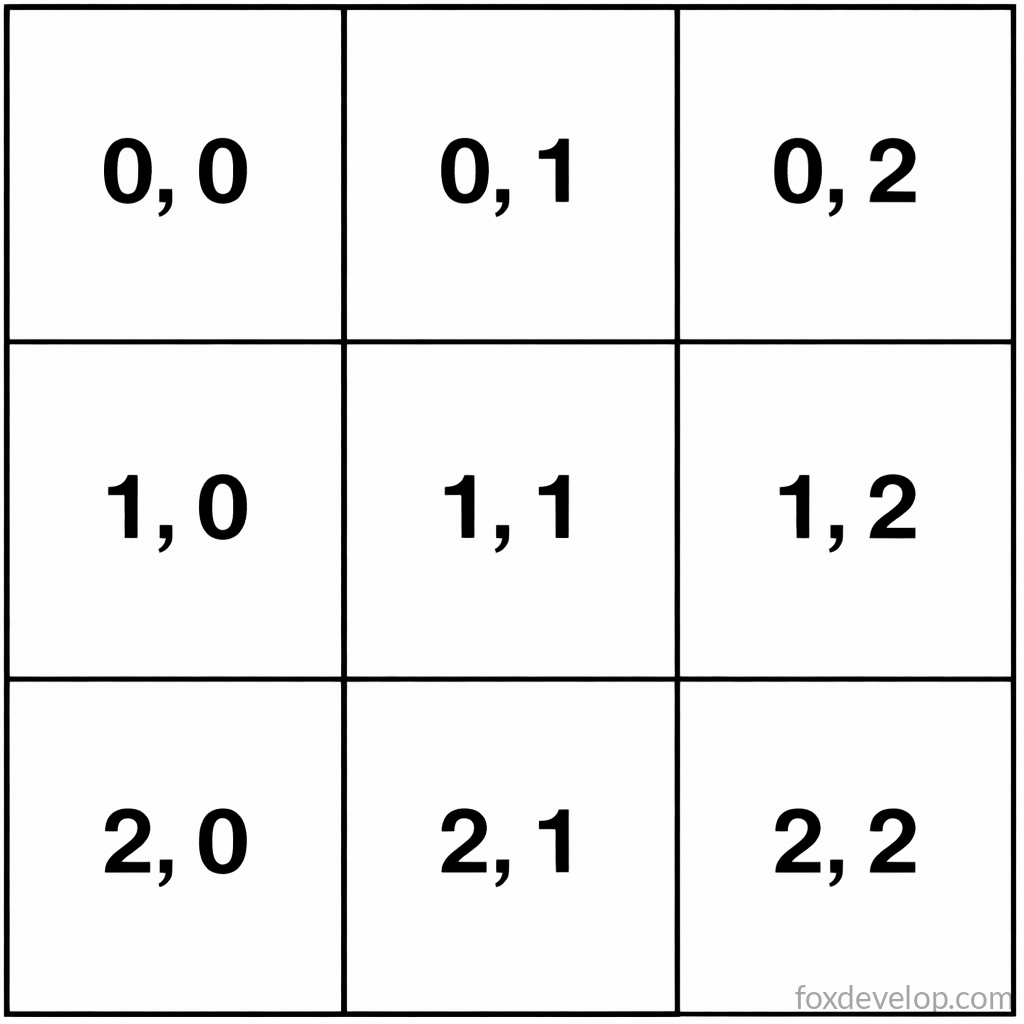
Grid是版面配置容器,透過RowDefinitions與ColumnDefinitions定義行列數量。子控制項使用Grid.Row、Grid.Column附加屬性指定格子位置。本範例為3×3九宮格,左上角格子為第0列第0欄(索引從0開始而非1),右下角格子為第2列第2欄。
所有按鈕透過Click=”OnGridButtonClick”綁定同一個點擊事件,將游標移至XAML內的事件名稱按下F12,VS會自動產生對應後端函式。
在自動產生的後端事件函式中,將sender轉型為Button,即可讀取該按鈕的Tag屬性,藉此判斷使用者點擊哪一顆按鈕。
    Button targetButton = sender.as<Button>();
    if (!targetButton) return;

    // Get custom tag string
    hstring buttonTag = unbox_value<hstring>(targetButton.Tag());

    OutputDebugStringW(buttonTag.c_str());
    OutputDebugStringW(L"\n");
Code language: C++ (cpp)
檔案開頭需匯入對應命名空間,否則無法辨識控制項型別,下方為完整.cpp程式碼:
#include "pch.h"
#include "MainWindow.xaml.h"
#if __has_include("MainWindow.g.cpp")
#include "MainWindow.g.cpp"
#endif

#include <winrt/Microsoft.UI.Xaml.Controls.h>
#include <winrt/Microsoft.UI.Xaml.h>

using namespace winrt;
using namespace Microsoft::UI::Xaml;
using namespace Microsoft::UI::Xaml::Controls;
using namespace Windows::Foundation;

// To learn more about WinUI, the WinUI project structure,
// and more about our project templates, see: http://aka.ms/winui-project-info.

namespace winrt::AppWinui::implementation
{
    int32_t MainWindow::MyProperty()
    {
        throw hresult_not_implemented();
    }

    void MainWindow::MyProperty(int32_t /* value */)
    {
        throw hresult_not_implemented();
    }
}

void winrt::AppWinui::implementation::MainWindow::OnGridButtonClick(
winrt::Windows::Foundation::IInspectable const& sender, winrt::Microsoft::UI::Xaml::RoutedEventArgs const& e)
{
    Button targetButton = sender.as<Button>();
    if (!targetButton) return;

    // Get custom tag string
    hstring buttonTag = unbox_value<hstring>(targetButton.Tag());

    OutputDebugStringW(buttonTag.c_str());
	OutputDebugStringW(L"\n");
}
Code language: C++ (cpp)
OutputDebugStringW是Windows原生偵錯輸出函式,可將文字列印至VS偵錯輸出視窗,開發時常用來印出執行資訊除錯。
Previous: 點擊左側導覽列即可切換不同頁面
Next: WinUI 3 C++ 控制項篇-基礎文字控制項