卡片式布局-CardView
CardView是用于实现卡片式布局效果的重要控件, 由appcompat-v7库提供。 实际上, CardView也是一个FrameLayout, 只是额外提供了圆角和阴影等效果, 看上去会有立体的感觉。
<android.support.v7.widget.CardView
    android:layout_width="match_parent"
    android:layout_height="wrap_content"
    app:cardCornerRadius="4dp"
    app:elevation="5dp">
    <TextView
        android:id="@+id/info_text"
        android:layout_width="match_parent"
        android:layout_height="wrap_content"/>
</android.support.v7.widget.CardView>Code language: HTML, XML (xml)
这里定义了一个CardView布局, 可以通过app:cardCornerRadius属性指定卡片圆角的弧度, 数值越大, 圆角的弧度也越大。 另外还可以通过app:elevation 属性指定卡片的高度, 高度值越大, 投影范围也越大, 但是投影效果越淡, 高度值越小, 投影范围也越小, 但是投影效果越浓, 这一点和FloatingActionButton是一致的。
然后我们在CardView布局中放置了一个TextView, 那么这个TextView就会显示在一张卡片当中了, CardView的用法就是这么简单。
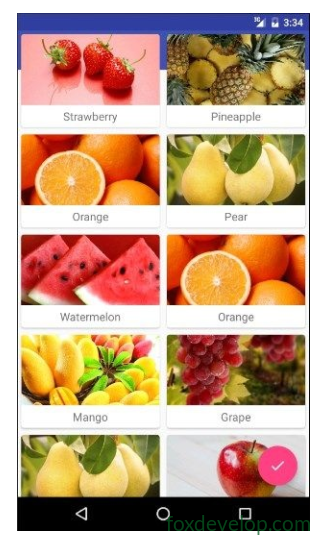
使用RecyclerView来填充MaterialTest项目的主界面部分。 还记得之前实现过的水果列表效果吗? 这次我们将升级一下, 实现一个高配版的水果列表效果。
然后由于我们还需要用到RecyclerView、 CardView这几个控件, 因此必须在app/build.gradle文件中声明这些库的依赖才行:
dependencies {
    compile fileTree(dir: 'libs', include: ['*.jar'])
    compile 'com.android.support:appcompat-v7:24.2.1'
    testCompile 'junit:junit:4.12'
    compile 'com.android.support:design:24.2.1'
    compile 'de.hdodenhof:circleimageview:2.1.0'
    compile 'com.android.support:recyclerview-v7:24.2.1'
    compile 'com.android.support:cardview-v7:24.2.1'
    compile 'com.github.bumptech.glide:glide:3.7.0'
}Code language: PHP (php)
注意上述声明的最后一行, 这里添加了一个Glide库的依赖。 Glide是一个超级强大的图片加载库, 它不仅可以用于加载本地图片, 还可以加载网络图片、 GIF图片、 甚至是本地视频。 最重要的是, Glide的用法非常简单, 只需一行代码就能轻松实现复杂的图片加载功能, 因此这里我们准备用它来加载水果图片。Glide的项目主页地址是: https://github.com/bumptech/glide
修改activity_main.xml中的代码:
<android.support.v4.widget.DrawerLayout
    xmlns:android="http://schemas.android.com/apk/res/android"
    xmlns:app="http://schemas.android.com/apk/res-auto"
    android:id="@+id/drawer_layout"
    android:layout_width="match_parent"
    android:layout_height="match_parent">
    <android.support.design.widget.CoordinatorLayout
        android:layout_width="match_parent"
        android:layout_height="match_parent">
        <android.support.v7.widget.Toolbar
            android:id="@+id/toolbar"
            android:layout_width="match_parent"
            android:layout_height="?attr/actionBarSize"
            android:background="?attr/colorPrimary"
            android:theme="@style/ThemeOverlay.AppCompat.Dark.ActionBar"
            app:popupTheme="@style/ThemeOverlay.AppCompat.Light" />
        <android.support.v7.widget.RecyclerView
            android:id="@+id/recycler_view"
            android:layout_width="match_parent"
            android:layout_height="match_parent" />
    </android.support.design.widget.CoordinatorLayout>
</android.support.v4.widget.DrawerLayout>Code language: HTML, XML (xml)
这里我们在CoordinatorLayout中添加了一个RecyclerView, 给它指定一个id, 然后将宽度和高度都设置为match_parent, 这样RecyclerView也就占满了整个布局空间。
Fruit类:
public class Fruit {
    private String name;
    private int imageId;
    public Fruit(String name, int imageId) {
        this.name = name;
        this.imageId = imageId;
    }

    public String getName() {
        return name;
    }

    public int getImageId() {
        return imageId;
    }
}Code language: PHP (php)
Fruit 类中只有两个字段, name 表示水果的名字, imageId 表示水果对应图片的资源id。然后需要为RecyclerView的子项指定一个我们自定义的布局, 在layout目录下新建fruit_item.xml, 代码如下所示:
<android.support.v7.widget.CardView
    xmlns:android="http://schemas.android.com/apk/res/android"
    xmlns:app="http://schemas.android.com/apk/res-auto"
    android:layout_width="match_parent"
    android:layout_height="wrap_content"
    android:layout_margin="5dp"
    app:cardCornerRadius="4dp">
    <LinearLayout
        android:orientation="vertical"
        android:layout_width="match_parent"
        android:layout_height="wrap_content">
        <ImageView
            android:id="@+id/fruit_image"
            android:layout_width="match_parent"
            android:layout_height="100dp"
            android:scaleType="centerCrop" />
        <TextView
            android:id="@+id/fruit_name"
            android:layout_width="wrap_content"
            android:layout_height="wrap_content"
            android:layout_gravity="center_horizontal"
            android:layout_margin="5dp"
            android:textSize="16sp" />
    </LinearLayout>
</android.support.v7.widget.CardView>Code language: HTML, XML (xml)
这里使用了CardView来作为子项的最外层布局, 从而使得RecyclerView中的每个元素都是在卡片当中的。 CardView由于是一个FrameLayout, 因此它没有什么方便的定位方式, 这里我们只好在CardView中再嵌套一个LinearLayout, 然后在LinearLayout中放置具体的内容。
接下来需要为RecyclerView准备一个适配器, 新建FruitAdapter 类, 让这个适配器继承自RecyclerView.Adapter, 并将泛型指定为FruitAdapter.ViewHolder, 代码如下所示:
public class FruitAdapter extends RecyclerView.Adapter<FruitAdapter.ViewHolder> {
    private Context mContext;
    private List<Fruit> mFruitList;
    static class ViewHolder extends RecyclerView.ViewHolder {
        CardView cardView;
        ImageView fruitImage;
        TextView fruitName;
        public ViewHolder(View view) {super(view);
            cardView = (CardView) view;
            fruitImage = (ImageView) view.findViewById(R.id.fruit_image);
            fruitName = (TextView) view.findViewById(R.id.fruit_name);
        }
    }

    public FruitAdapter(List<Fruit> fruitList) {
        mFruitList = fruitList;
    }

    @Override
    public ViewHolder onCreateViewHolder(ViewGroup parent, int viewType) {
        if (mContext == null) {
            mContext = parent.getContext();
        }

        View view = LayoutInflater.from(mContext).inflate(R.layout.fruit_item,
                parent, false);
        return new ViewHolder(view);
    }

    @Override
    public void onBindViewHolder(ViewHolder holder, int position) {
        Fruit fruit = mFruitList.get(position);
        holder.fruitName.setText(fruit.getName());
        Glide.with(mContext).load(fruit.getImageId()).into(holder.fruitImage);
    }

    @Override
    public int getItemCount() {
        return mFruitList.size();
    }
}Code language: PHP (php)
上述代码相信你一定很熟悉, 和我们在第3章中编写的FruitAdapter几乎一模一样。 唯一需要注意的是, 在onBindViewHolder() 方法中我们使用了Glide来加载水果图片。
那么这里就顺便来看一下Glide的用法吧, 其实并没有太多好讲的, 因为Glide的用法实在是太简单了。 首先调用Glide.with() 方法并传入一个Context 、 Activity 或Fragment 参数,然后调用load() 方法去加载图片, 可以是一个URL地址, 也可以是一个本地路径, 或者是一个资源id, 最后调用into() 方法将图片设置到具体某一个ImageView中就可以了:
Glide.with(mContext).load(fruit.getImageId()).into(holder.fruitImage);Code language: CSS (css)那么我们为什么要使用Glide而不是传统的设置图片方式呢? 因为这次我从网上找的这些水果图片像素都非常高, 如果不进行压缩就直接展示的话, 很容易就会引起内存溢出。 而使用Glide就完全不需要担心这回事, 因为Glide在内部做了许多非常复杂的逻辑操作, 其中就包括了图片压缩, 我们只需要安心按照Glide的标准用法去加载图片就可以了。
最后修改MainActivity中的代码:
public class MainActivity extends AppCompatActivity {

    private DrawerLayout mDrawerLayout;
    private Fruit[] fruits = {new Fruit("Apple", R.drawable.apple), new Fruit("Banana",R.drawable.banana),
            new Fruit("Orange", R.drawable.orange), new Fruit("Watermelon", R.drawable.watermelon),
            new Fruit("Pear", R.drawable.pear), new Fruit("Grape", R.drawable.grape),
            new Fruit("Pineapple", R.drawable.pineapple), new Fruit("Strawberry",R.drawable.strawberry),
            new Fruit("Cherry", R.drawable.cherry), new Fruit("Mango", R.drawable.mango)};

    private List<Fruit> fruitList = new ArrayList<>();
    private FruitAdapter adapter;

    @Override
    protected void onCreate(Bundle savedInstanceState) {
        super.onCreate(savedInstanceState);
        setContentView(R.layout.activity_main);
        ...
        initFruits();
        RecyclerView recyclerView = (RecyclerView) findViewById(R.id.recycler_view);
        GridLayoutManager layoutManager = new GridLayoutManager(this, 2);
        recyclerView.setLayoutManager(layoutManager);
        adapter = new FruitAdapter(fruitList);
        recyclerView.setAdapter(adapter);
    }

    private void initFruits() {
        fruitList.clear();
        for (int i = 0; i < 50; i++) {
            Random random = new Random();
            int index = random.nextInt(fruits.length);
            fruitList.add(fruits[index]);
        }
    }
}Code language: PHP (php)