在 Android 开发中,为了使用 Toolbar 等 Material Design 控件及向后兼容特性,通常需要引入支持库(V7包,即 appcompat-v7)。
1. 通过代码配置依赖
在项目的 build.gradle(Module: app)文件的 dependencies 闭包中添加依赖:
dependencies {
    implementation fileTree(dir: 'libs', include: ['*.jar'])
    implementation 'com.android.support:appcompat-v7:28.0.0'
    implementation 'com.android.support.constraint:constraint-layout:1.1.3'
    testImplementation 'junit:junit:4.12'
    androidTestImplementation 'androidx.test.ext:junit:1.1.1'
    androidTestImplementation 'androidx.test.espresso:espresso-core:3.1.1'
}Code language: PHP (php)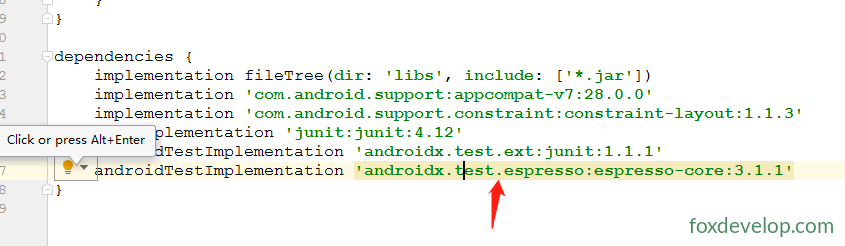
2. 通过图形化界面添加
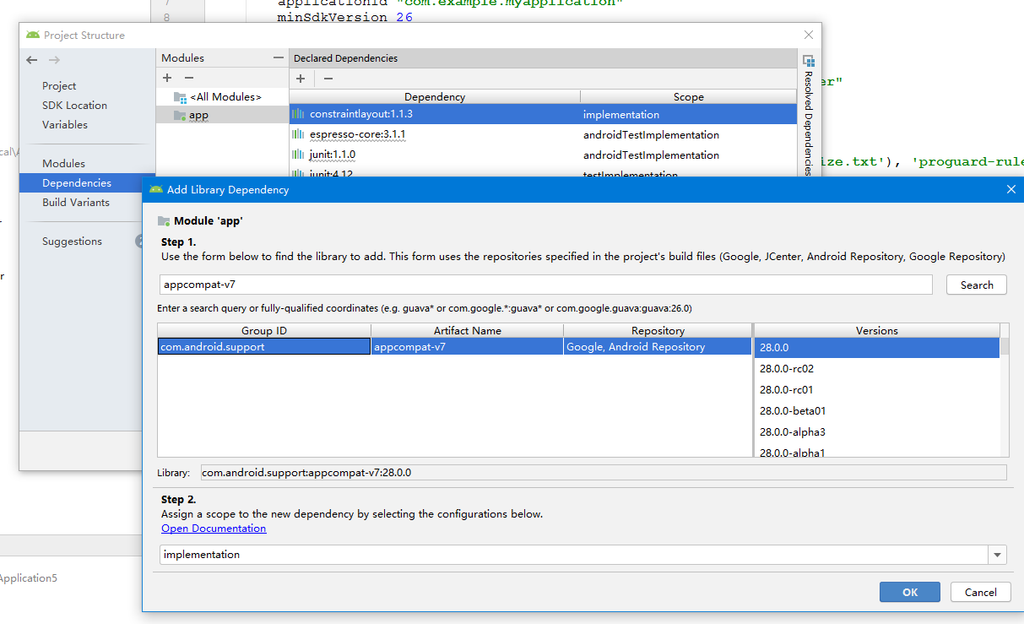
打开 Project Structure 对话框(快捷键或菜单栏 File -> Project Structure),按以下步骤操作:
- 左侧选择 Modules -> Dependencies。
- 点击 + 号或 Add Library Dependency。
- 在搜索框输入
appcompat-v7,系统会列出匹配项(如com.android.support:appcompat-v7)。 - 选择需要的版本(如
28.0.0,图中提供了28.0.0-rc02、28.0.0等选项)。 - 确认依赖坐标显示为
com.android.support:appcompat-v7:28.0.0。 - 在 Scope 下拉框中选择 implementation(实现/编译作用域)。
- 点击 OK 保存并应用,Gradle 会自动同步下载依赖。
3. 配套代码与主题修改
引入 V7 包后,需将主题修改为无 ActionBar 样式(以使用 Toolbar 替代),并修改布局与代码:
- 主题修改(
res/values/styles.xml):
<style name="AppTheme" parent="Theme.AppCompat.Light.NoActionBar">
    <item name="colorPrimary">@color/colorPrimary</item>
    <item name="colorPrimaryDark">@color/colorPrimaryDark</item>
    <item name="colorAccent">@color/colorAccent</item>
</style>Code language: HTML, XML (xml)- 布局引入 Toolbar(
activity_main.xml):
<android.support.v7.widget.Toolbar
    android:id="@+id/toolbar"
    android:layout_width="match_parent"
    android:layout_height="?attr/actionBarSize"
    android:background="?attr/colorPrimary"
    android:theme="@style/ThemeOverlay.AppCompat.Dark.ActionBar"
app:popupTheme="@style/ThemeOverlay.AppCompat.Light" />Code language: HTML, XML (xml)- 代码中绑定:
Toolbar toolbar = (Toolbar) findViewById(R.id.toolbar);
setSupportActionBar(toolbar);
Previous: MaterialDesign设计-Toolbar
Next: 菜单标题文字