可折叠式标题栏-CollapsingToolbarLayout
虽说我们现在的标题栏是使用Toolbar来编写的, 不过它看上去和传统的ActionBar其实没什么两样, 只不过可以响应RecyclerView的滚动事件来进行隐藏和显示。 而Material Design中并没有限定标题栏必须是长这个样子的, 事实上, 我们可以根据自己的喜好随意定制标题栏的样式。
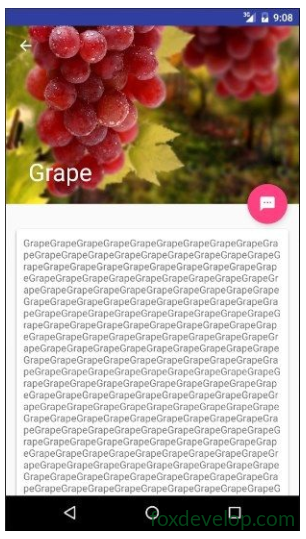
顾名思义, CollapsingToolbarLayout是一个作用于Toolbar基础之上的布局, 它也是由DesignSupport库提供的。 CollapsingToolbarLayout可以让Toolbar的效果变得更加丰富, 不仅仅是展示一个标题栏, 而是能够实现非常华丽的效果。
不过, CollapsingToolbarLayout是不能独立存在的, 它在设计的时候就被限定只能作为AppBarLayout的直接子布局来使用。 而AppBarLayout又必须是CoordinatorLayout的子布局, 因此本节中我们要实现的功能其实需要综合运用前面所学的各种知识。
首先我们需要一个额外的活动来作为水果的详情展示界面,右击com.example.materialtest包→New→Activity→Empty Activity, 创建一个FruitActivity, 并将布局名指定成activity_fruit.xml,然后我们开始编写水果详情展示界面的布局。
由于整个布局文件比较复杂, 这里我准备采用分段编写的方式。 activity_fruit.xml中的内容主要分为两部分, 一个是水果标题栏, 一个是水果内容详情, 我们来一步步实现。
接下来, 我们在CollapsingToolbarLayout中定义标题栏的具体内容, 如下所示:
<android.support.design.widget.CoordinatorLayout
    xmlns:android="http://schemas.android.com/apk/res/android"
    xmlns:app="http://schemas.android.com/apk/res-auto"
    android:layout_width="match_parent"
    android:layout_height="match_parent">
    <android.support.design.widget.AppBarLayout
        android:id="@+id/appBar"
        android:layout_width="match_parent"
        android:layout_height="250dp">
        <android.support.design.widget.CollapsingToolbarLayout
            android:id="@+id/collapsing_toolbar"
            android:layout_width="match_parent"
            android:layout_height="match_parent"
            android:theme="@style/ThemeOverlay.AppCompat.Dark.ActionBar"
            app:contentScrim="?attr/colorPrimary"
            app:layout_scrollFlags="scroll|exitUntilCollapsed">
            <ImageView
                android:id="@+id/fruit_image_view"
                android:layout_width="match_parent"
                android:layout_height="match_parent"
                android:scaleType="centerCrop"
                app:layout_collapseMode="parallax" />
            <android.support.v7.widget.Toolbar
                android:id="@+id/toolbar"
                android:layout_width="match_parent"
                android:layout_height="?attr/actionBarSize"
                app:layout_collapseMode="pin" />
        </android.support.design.widget.CollapsingToolbarLayout>
    </android.support.design.widget.AppBarLayout>
</android.support.design.widget.CoordinatorLayout>Code language: HTML, XML (xml)
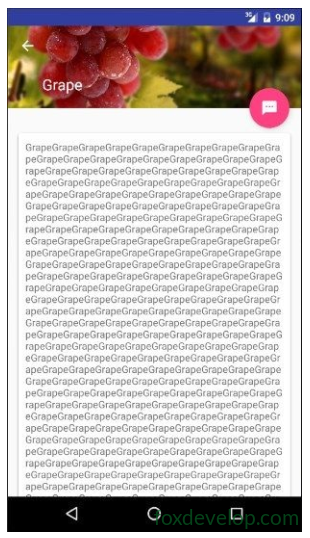
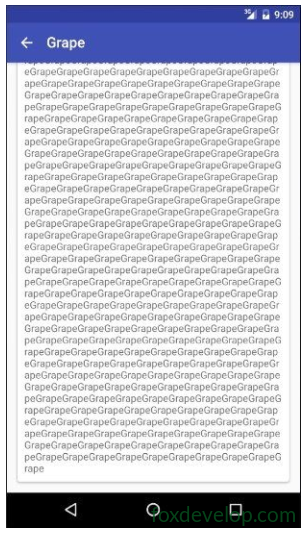
app:contentScrim 属性用于指定CollapsingToolbarLayout在趋于折叠状态以及折叠之后的背景色, 其实CollapsingToolbarLayout在折叠之后就是一个普通的Toolbar, 那么背景色肯定应该是colorPrimary了, 具体的效果我们待会儿就能看到。 app:layout_scrollFlags 属性我们也是见过的, 只不过之前是给Toolbar指定的, 现在也移到外面来了。 其中, scroll表示CollapsingToolbarLayout会随着水果内容详情的滚动一起滚动, exitUntilCollapsed 表示当CollapsingToolbarLayout随着滚动完成折叠之后就保留在界面上, 不再移出屏幕。
我们在CollapsingToolbarLayout中定义了一个ImageView和一个Toolbar, 也就是说, 这个高级版的标题栏将是由普通的标题栏加上图片组合而成的。 这里定义的大多数属性我们都是见过的, 就不再解释了, 只有一个app:layout_collapseMode 比较陌生。 它用于指定当前控件在CollapsingToolbarLayout折叠过程中的折叠模式, 其中Toolbar指定成pin, 表示在折叠的过程中位置始终保持不变, ImageView指定成parallax, 表示会在折叠的过程中产生一定的错位偏移, 这种模式的视觉效果会非常好。
这样我们就将水果标题栏的界面编写完成了, 下面开始编写水果内容详情部分。 继续修改activity_fruit.xml中的代码, 如下所示:
<android.support.design.widget.CoordinatorLayout
    xmlns:android="http://schemas.android.com/apk/res/android"
    xmlns:app="http://schemas.android.com/apk/res-auto"
    android:layout_width="match_parent"
    android:layout_height="match_parent">
    <android.support.design.widget.AppBarLayout
        android:id="@+id/appBar"
        android:layout_width="match_parent"
        android:layout_height="250dp">
        ...
    </android.support.design.widget.AppBarLayout>
    <android.support.v4.widget.NestedScrollView
        android:layout_width="match_parent"
        android:layout_height="match_parent"
        app:layout_behavior="@string/appbar_scrolling_view_behavior">
    </android.support.v4.widget.NestedScrollView>
</android.support.design.widget.CoordinatorLayout>Code language: HTML, XML (xml)
水果内容详情的最外层布局使用了一个NestedScrollView, 注意它和AppBarLayout是平级的。 我们之前在9.2.1小节学过ScrollView的用法, 它允许使用滚动的方式来查看屏幕以外的数据, 而NestedScrollView在此基础之上还增加了嵌套响应滚动事件的功能。 由于CoordinatorLayout本身已经可以响应滚动事件了, 因此我们在它的内部就需要使用NestedScrollView或RecyclerView这样的布局。 另外, 这里还通过app:layout_behavior 属性指定了一个布局行为, 这和之前在RecyclerView中的用法是一模一样的。
不管是ScrollView还是NestedScrollView, 它们的内部都只允许存在一个直接子布局。 因此, 如果我们想要在里面放入很多东西的话, 通常都会先嵌套一个LinearLayout, 然后再在LinearLayout中放入具体的内容就可以了, 如下所示:
<android.support.v4.widget.NestedScrollView
    android:layout_width="match_parent"
    android:layout_height="match_parent"
    app:layout_behavior="@string/appbar_scrolling_view_behavior">
    <LinearLayout
        android:orientation="vertical"
        android:layout_width="match_parent"
        android:layout_height="wrap_content">
    </LinearLayout>
</android.support.v4.widget.NestedScrollView>Code language: HTML, XML (xml)
接下来在LinearLayout中放入具体的内容, 这里我准备使用一个TextView来显示水果的内容详情, 并将TextView放在一个卡片式布局当中, 如下所示:
<android.support.v4.widget.NestedScrollView
    android:layout_width="match_parent"
    android:layout_height="match_parent"
    app:layout_behavior="@string/appbar_scrolling_view_behavior">
    <LinearLayout
        android:layout_width="match_parent"
        android:layout_height="match_parent"
        android:orientation="vertical">
        <android.support.v7.widget.CardView
            android:layout_width="match_parent"
            android:layout_height="wrap_content"
            android:layout_marginBottom="15dp"
            android:layout_marginLeft="15dp"
            android:layout_marginRight="15dp"
            android:layout_marginTop="35dp"
            app:cardCornerRadius="4dp">
            <TextView
                android:id="@+id/fruit_content_text"
                android:layout_width="wrap_content"
                android:layout_height="wrap_content"
                android:layout_margin="10dp" />
        </android.support.v7.widget.CardView>
    </LinearLayout>
</android.support.v4.widget.NestedScrollView>Code language: HTML, XML (xml)
界面完成了之后, 接下来我们开始编写功能逻辑, 修改FruitActivity中的代码, 如下所示:
public class FruitActivity extends AppCompatActivity {
    public static final String FRUIT_NAME = "fruit_name";
    public static final String FRUIT_IMAGE_ID = "fruit_image_id";

    @Override
    protected void onCreate(Bundle savedInstanceState) {
        super.onCreate(savedInstanceState);
        setContentView(R.layout.activity_fruit);
        Intent intent = getIntent();
        String fruitName = intent.getStringExtra(FRUIT_NAME);
        int fruitImageId = intent.getIntExtra(FRUIT_IMAGE_ID, 0);
        Toolbar toolbar = (Toolbar) findViewById(R.id.toolbar);
        CollapsingToolbarLayout collapsingToolbar = (CollapsingToolbarLayout)
                findViewById(R.id.collapsing_toolbar);
        ImageView fruitImageView = (ImageView) findViewById(R.id.fruit_image_view);
        TextView fruitContentText = (TextView) findViewById(R.id.fruit_content_text);
        setSupportActionBar(toolbar);
        ActionBar actionBar = getSupportActionBar();
        if (actionBar != null) {
            actionBar.setDisplayHomeAsUpEnabled(true);
        }
        collapsingToolbar.setTitle(fruitName);
        Glide.with(this).load(fruitImageId).into(fruitImageView);
        String fruitContent = generateFruitContent(fruitName);
        fruitContentText.setText(fruitContent);
    }

    private String generateFruitContent(String fruitName) {
        StringBuilder fruitContent = new StringBuilder();
        for (int i = 0; i < 500; i++) {
            fruitContent.append(fruitName);
        }
        return fruitContent.toString();
    }

    @Override
    public boolean onOptionsItemSelected(MenuItem item) {
        switch (item.getItemId()) {
            case android.R.id.home:
                finish();
                return true;
        }
        return super.onOptionsItemSelected(item);
    }
}Code language: JavaScript (javascript)
所有工作都完成了吗? 其实还差最关键的一步, 就是处理RecyclerView的点击事件, 不然的话我们根本就无法打开FruitActivity。 修改FruitAdapter中的代码, 如下所示:
public class FruitAdapter extends RecyclerView.Adapter<FruitAdapter.ViewHolder> {

    ...
    @Override
    public ViewHolder onCreateViewHolder(ViewGroup parent, int viewType) {
        if (mContext == null) {
            mContext = parent.getContext();
        }
        View view = LayoutInflater.from(mContext).inflate(R.layout.fruit_item,
                parent, false);
        final ViewHolder holder = new ViewHolder(view);
        holder.cardView.setOnClickListener(new View.OnClickListener() {
            @Override
            public void onClick(View v) {
                int position = holder.getAdapterPosition();
                Fruit fruit = mFruitList.get(position);
                Intent intent = new Intent(mContext, FruitActivity.class);
                intent.putExtra(FruitActivity.FRUIT_NAME, fruit.getName());
                intent.putExtra(FruitActivity.FRUIT_IMAGE_ID, fruit.getImageId());
                mContext.startActivity(intent);
            }
        });
        return holder;
    }
    ...
}Code language: JavaScript (javascript)