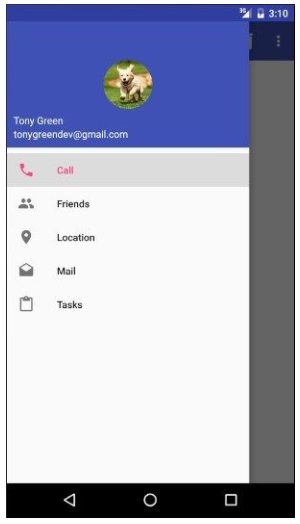
滑动菜单-NavigationView
目前我们已经成功实现了滑动菜单功能, 其中滑动功能已经做得非常好了, 但是菜单却还很丑, 毕竟菜单页面仅仅使用了一个TextView, 非常单调。 有对比才会有落差, 我们看一下Google+的滑动菜单页面是长什么样的。
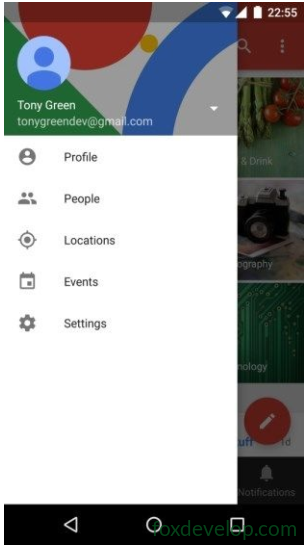
事实上, 你可以在滑动菜单页面定制任意的布局, 不过谷歌给我们提供了一种更好的方法——使用NavigationView。 NavigationView是Design Support库中提供的一个控件, 它不仅是严格按照Material Design的要求来进行设计的, 而且还可以将滑动菜单页面的实现变得非常简单。
首先, 既然这个控件是Design Support库中提供的, 那么我们就需要将这个库引入到项目中才行。 打开app/build.gradle文件, 在dependencies闭包中添加如下内容:
dependencies {
    compile fileTree(dir: 'libs', include: ['*.jar'])
    compile 'com.android.support:appcompat-v7:24.2.1'
    testCompile 'junit:junit:4.12'
    compile 'com.android.support:design:24.2.1'
    compile 'de.hdodenhof:circleimageview:2.1.0'
}Code language: PHP (php)
这里添加了两行依赖关系, 第一行就是Design Support库, 第二行是一个开源项目CircleImageView, 它可以用来轻松实现图片圆形化的功能, 我们待会就会用到它。CircleImageView 的项目主页地址是: https://github.com/hdodenhof/CircleImageView
在开始使用NavigationView之前, 我们还需要提前准备好两个东西: menu和headerLayout。menu是用来在NavigationView中显示具体的菜单项的, headerLayout则是用来在NavigationView中显示头部布局的。
我们先来准备menu, 这里我事先找了几张图片来作为按钮的图标, 并将它们放在了drawable-xxhdpi目录下。 然后右击menu文件夹→New→Menu resource file, 创建一个nav_menu.xml文件,并编写如下代码:
<menu xmlns:android="http://schemas.android.com/apk/res/android">
    <group android:checkableBehavior="single">
        <item
        android:id="@+id/nav_call"
        android:icon="@drawable/nav_call"
        android:title="Call" />
        <item
            android:id="@+id/nav_friends"
            android:icon="@drawable/nav_friends"
            android:title="Friends" />
        <item
            android:id="@+id/nav_location"
            android:icon="@drawable/nav_location"
            android:title="Location" />
        <item
            android:id="@+id/nav_mail"
            android:icon="@drawable/nav_mail"
            android:title="Mail" />
        <item
            android:id="@+id/nav_task"
            android:icon="@drawable/nav_task"
            android:title="Tasks" />
    </group>
</menu>Code language: HTML, XML (xml)我们首先在<menu> 中嵌套了一个<group> 标签, 然后将group的checkableBehavior 属性指定为single 。 group表示一个组, checkableBehavior 指定为single 表示组中的所有菜单项只能单选。
接下来应该准备headerLayout了, 这是一个可以随意定制的布局, 不过我并不想将它做得太复杂。 这里简单起见, 我们就在headerLayout中放置头像、 用户名、 邮箱地址这3项内容吧。
说到头像, 那我们还需要再准备一张图片, 这里我找了一张宠物图片, 并把它放在了drawable-xxhdpi目录下。 另外这张图片最好是一张正方形图片, 因为待会我们会把它圆形化。 然后右击layout文件夹→New→Layout resource file, 创建一个nav_header.xml文件。 修改其中的代码, 如下所示:
<RelativeLayout xmlns:android="http://schemas.android.com/apk/res/android"
    android:layout_width="match_parent"
    android:layout_height="180dp"
    android:padding="10dp"
    android:background="?attr/colorPrimary">
    <de.hdodenhof.circleimageview.CircleImageView
        android:id="@+id/icon_image"
        android:layout_width="70dp"
        android:layout_height="70dp"
        android:src="@drawable/nav_icon"
        android:layout_centerInParent="true" />
    <TextView
        android:id="@+id/mail"
        android:layout_width="wrap_content"
        android:layout_height="wrap_content"
        android:layout_alignParentBottom="true"
        android:text="tonygreendev@gmail.com"
        android:textColor="#FFF"
        android:textSize="14sp" />
    <TextView
        android:id="@+id/username"
        android:layout_width="wrap_content"
        android:layout_height="wrap_content"
        android:layout_above="@id/mail"
        android:text="Tony Green"
        android:textColor="#FFF"
        android:textSize="14sp" />
</RelativeLayout>Code language: HTML, XML (xml)
现在menu和headerLayout都准备好了, 我们终于可以使用NavigationView了。 修改activity_main.xml中的代码, 如下所示:
<android.support.v4.widget.DrawerLayout
    xmlns:android="http://schemas.android.com/apk/res/android"
    xmlns:app="http://schemas.android.com/apk/res-auto"
    android:id="@+id/drawer_layout"
    android:layout_width="match_parent"
    android:layout_height="match_parent">
    <FrameLayout
        android:layout_width="match_parent"
        android:layout_height="match_parent">
        <android.support.v7.widget.Toolbar
            android:id="@+id/toolbar"
            android:layout_width="match_parent"
            android:layout_height="?attr/actionBarSize"
            android:background="?attr/colorPrimary"
            android:theme="@style/ThemeOverlay.AppCompat.Dark.ActionBar"
            app:popupTheme="@style/ThemeOverlay.AppCompat.Light" />
    </FrameLayout>
    <android.support.design.widget.NavigationView
        android:id="@+id/nav_view"
        android:layout_width="match_parent"
        android:layout_height="match_parent"
        android:layout_gravity="start"
        app:menu="@menu/nav_menu"
        app:headerLayout="@layout/nav_header"/>
</android.support.v4.widget.DrawerLayout>Code language: HTML, XML (xml)
NavigationView虽然定义完成了, 但是我们还要去处理菜单项的点击事件才行。 修改MainActivity中的代码, 如下所示:
private DrawerLayout mDrawerLayout;

@Override
protected void onCreate(Bundle savedInstanceState) {
    super.onCreate(savedInstanceState);
    setContentView(R.layout.activity_main);
    Toolbar toolbar = (Toolbar) findViewById(R.id.toolbar);
    setSupportActionBar(toolbar);
    mDrawerLayout = (DrawerLayout) findViewById(R.id.drawer_layout);
    NavigationView navView = (NavigationView) findViewById(R.id.nav_view);
    ActionBar actionBar = getSupportActionBar();
    if (actionBar != null) {
        actionBar.setDisplayHomeAsUpEnabled(true);
        actionBar.setHomeAsUpIndicator(R.drawable.ic_menu);
    }
    navView.setCheckedItem(R.id.nav_call);
    navView.setNavigationItemSelectedListener(new NavigationView.OnNavigationItemSelectedListener() {
        @Override
        public boolean onNavigationItemSelected(MenuItem item) {
            mDrawerLayout.closeDrawers();
            return true;
        }
    });
}Code language: PHP (php)
代码还是比较简单的, 这里首先获取到了NavigationView的实例, 然后调用它的setCheckedItem() 方法将Call菜单项设置为默认选中。 接着调用了setNavigationItemSelectedListener() 方法来设置一个菜单项选中事件的监听器, 当用户点击了任意菜单项时, 就会回调到onNavigationItemSelected() 方法中。 我们可以在这个方法中写相应的逻辑处理, 不过这里我并没有附加任何逻辑, 只是调用了DrawerLayout的closeDrawers() 方法将滑动菜单关闭, 这也是合情合理的做法。