01 – Understanding Fragment
Course Introduction
This lesson requires you to have a basic understanding of Android.
Without that foundation, it will be difficult to follow along.
Fragment is translated as “fragment” or “piece”.
Actually, “piece” is more accurate.
It is a UI fragment embedded within an Activity.
It allows applications to make better and more efficient use of large screen space.
That’s why it’s especially well-suited for tablets.
It is very similar to an Activity: it has its own layout and its own lifecycle.
You can think of it as a mini Activity.
When developing a news application,
on a phone screen, you might design it like this:
a list Activity, and tapping an item opens a news detail Activity.
But on a tablet, doing the same would leave large empty areas, which isn’t ideal.
A better design is to split the list and detail into two fragments within a single Activity.
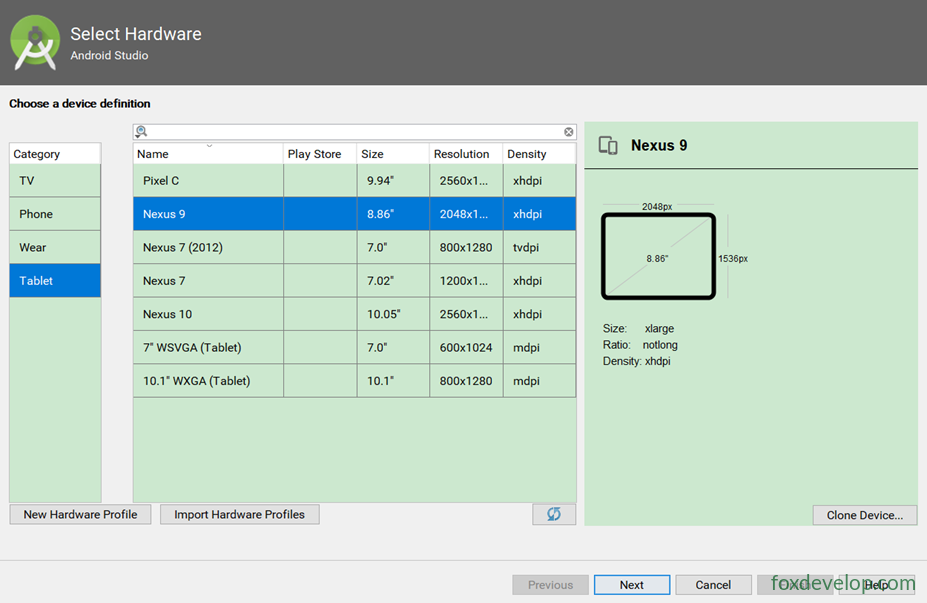
Creating a tablet emulator
To better test our tablet app, we need to create a tablet emulator.
02 – First Example with Fragment
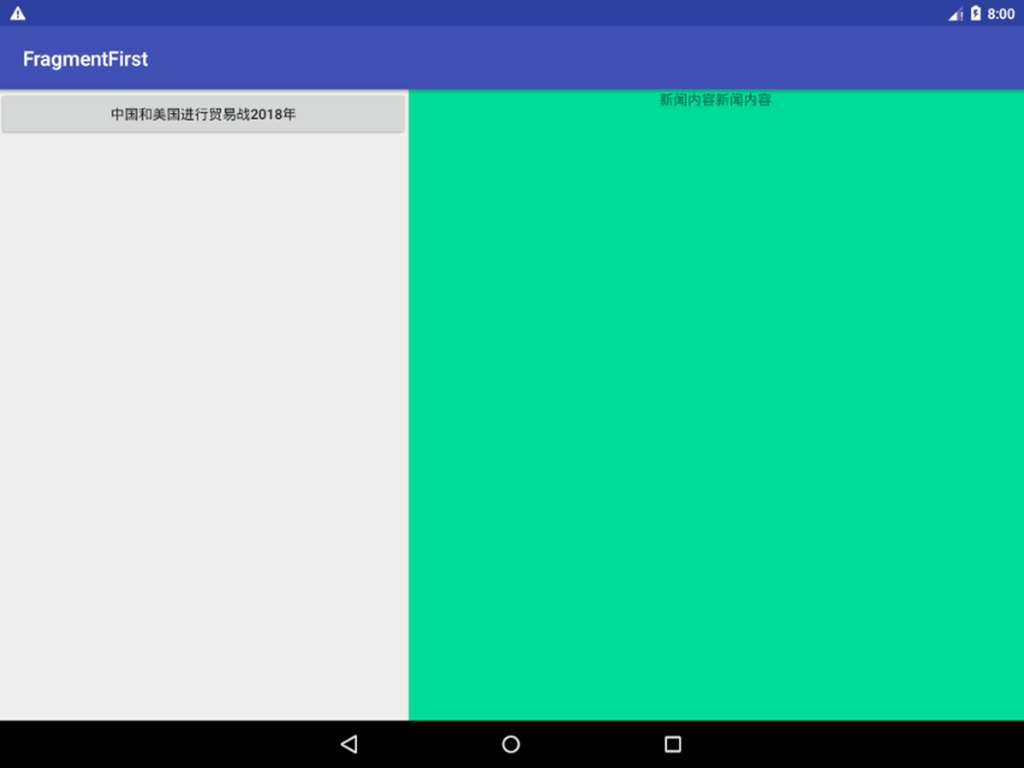
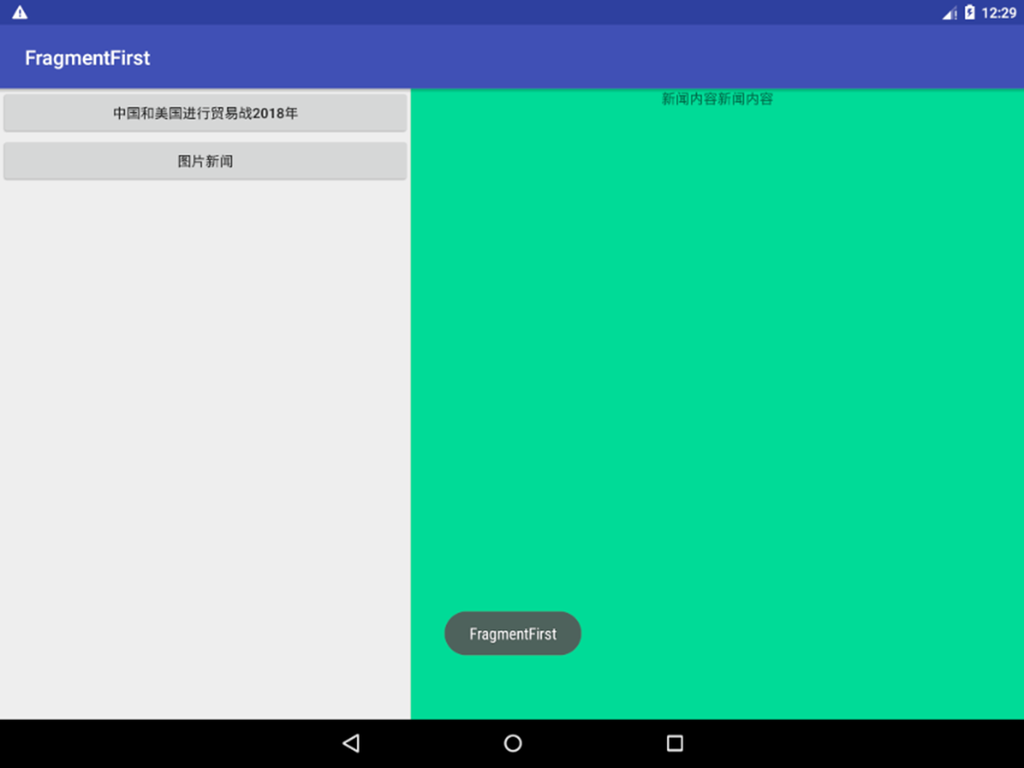
Add two fragments to an Activity and let them split the space equally.
Create a new project named FragmentFirst.
Add two layouts: one for the left fragment
newlist.xml
and one for the right fragment, newdetail.xml.
Left Fragment
<?xml version="1.0" encoding="utf-8"?>
<LinearLayout xmlns:android="http://schemas.android.com/apk/res/android"
    android:orientation="vertical" android:layout_width="match_parent"
    android:layout_height="match_parent">
    <Button
        android:id="@+id/buttondialog"
        android:layout_width="match_parent"
        android:layout_height="wrap_content"
        android:text="China–US Trade War 2018" />
</LinearLayout>Code language: HTML, XML (xml)
Right Fragment
<?xml version="1.0" encoding="utf-8"?>
<LinearLayout xmlns:android="http://schemas.android.com/apk/res/android"
    android:orientation="vertical" android:layout_width="match_parent"
    android:layout_height="match_parent"
    android:background="#0ddb97"
    >
    <TextView
        android:layout_width="wrap_content"
        android:layout_height="wrap_content"
        android:layout_gravity="center_horizontal"
        android:text="News content news content" />
</LinearLayout>Code language: HTML, XML (xml)
Add Fragment Class
Add a NewListFragment.
Inherit from android.support.v4.app.Fragment.
Then override the onCreateView method to let this fragment use the newlist layout.
public class NewListFragment extends Fragment {
    @Nullable
    @Override
    public View onCreateView(@NonNull LayoutInflater inflater, @Nullable ViewGroup container,
                             @Nullable Bundle savedInstanceState) {
        View view = inflater.inflate(R.layout.newlist,container,false);
        return view;
    }
}Code language: PHP (php)
Add the news detail fragment in the same way.
NewDetailFragment also inherits from
android.support.v4.app.Fragment.
public class NewDetailFragment extends Fragment {
    @Nullable
    @Override
    public View onCreateView(@NonNull LayoutInflater inflater, @Nullable ViewGroup container, @Nullable Bundle savedInstanceState) {
        View view = inflater.inflate(R.layout.newdetail,container,false);
        return view;
    }
}Code language: PHP (php)
Using Fragments in Main Activity Layout
Use the android:name=”com.foxdevelop.” attribute to specify which fragment to use.
When adding a fragment in the main layout, the id is required.
<?xml version="1.0" encoding="utf-8"?>
<LinearLayout xmlns:android="http://schemas.android.com/apk/res/android"
    android:orientation="horizontal" android:layout_width="match_parent"
    android:layout_height="match_parent">
    <fragment
        android:id="@+id/newlist_fragment"
        android:layout_width="0dp"
        android:layout_height="match_parent"
        android:layout_weight="2"
        android:name="com.foxdevelop.www.fragmentfirst.NewListFragment"
        />
    <fragment
        android:id="@+id/newdetail_fragment"
        android:layout_width="0dp"
        android:layout_height="match_parent"
        android:layout_weight="3"
        android:name="com.foxdevelop.www.fragmentfirst.NewDetailFragment"
        />
</LinearLayout>Code language: HTML, XML (xml)
03 – Adding Fragments Dynamically
The real power of fragments is that they can be dynamically added to an Activity while the app is running.
By dynamically adding fragments based on the situation, we can create much more flexible interfaces.
For example, in our news app, some articles are image news, some are text news, and some are video news. We can load different fragment layouts depending on the news type.
Let’s add a new_picture layout.
<?xml version="1.0" encoding="utf-8"?>
<LinearLayout xmlns:android="http://schemas.android.com/apk/res/android"
    android:orientation="vertical" android:layout_width="match_parent"
    android:layout_height="match_parent">
    <ImageView
        android:layout_width="match_parent"
        android:layout_height="match_parent"
        android:src="@drawable/birdsee"
        />
</LinearLayout>Code language: HTML, XML (xml)
To distinguish it, it simply displays an image.
Add Image Fragment Class
public class NewImageFragment extends Fragment {
    @Nullable
    @Override
    public View onCreateView(@NonNull LayoutInflater inflater, @Nullable ViewGroup container,
                             @Nullable Bundle savedInstanceState) {
        View view = inflater.inflate(R.layout.new_picture,container,false);
        return view;
    }
}Code language: PHP (php)
Use FrameLayout in Main Layout
Here we use a FrameLayout.
<?xml version="1.0" encoding="utf-8"?>
<LinearLayout xmlns:android="http://schemas.android.com/apk/res/android"
    android:orientation="horizontal" android:layout_width="match_parent"
    android:layout_height="match_parent">
    <fragment
        android:id="@+id/newlist_fragment"
        android:layout_width="0dp"
        android:layout_height="match_parent"
        android:layout_weight="2"
        android:name="com.foxdevelop.www.fragmentfirst.NewListFragment"
        />

    <FrameLayout
        android:id="@+id/framelayout"
        android:layout_width="0dp"
        android:layout_height="match_parent"
        android:layout_weight="3"
        ></FrameLayout>
</LinearLayout>Code language: HTML, XML (xml)
Add Two Buttons to the Left
<?xml version="1.0" encoding="utf-8"?>
<LinearLayout xmlns:android="http://schemas.android.com/apk/res/android"
    android:orientation="vertical" android:layout_width="match_parent"
    android:layout_height="match_parent">
    <Button
        android:id="@+id/buttondialog"
        android:layout_width="match_parent"
        android:layout_height="wrap_content"
        android:text="China–US Trade War 2018" />
    <Button
        android:id="@+id/buttonpicture"
        android:layout_width="match_parent"
        android:layout_height="wrap_content"
        android:text="Image News" />
</LinearLayout>Code language: HTML, XML (xml)
Set Button Events in Main Activity
By setting click events on the buttons, we can dynamically load different fragments based on which button is pressed.
package com.foxdevelop.www.fragmentfirst;

import android.support.v4.app.Fragment;
import android.support.v4.app.FragmentManager;
import android.support.v7.app.AppCompatActivity;
import android.os.Bundle;
import android.view.View;
import android.widget.Button;

public class MainActivity extends AppCompatActivity implements View.OnClickListener {

    @Override
    protected void onCreate(Bundle savedInstanceState) {
        super.onCreate(savedInstanceState);
        setContentView(R.layout.activity_main);
        // Bind events to the two buttons
        Button b1 = (Button)findViewById(R.id.buttonarticle);
        b1.setOnClickListener(this);
        Button b2 = (Button)findViewById(R.id.buttonpicture);
        b1.setOnClickListener(this);
    }

    @Override
    public void onClick(View view) {
        // Load different fragments based on the button clicked
        switch (view.getId())
        {
            case R.id.buttonarticle:
                setFragement(new NewDetailFragment());
                break;
            case R.id.buttonpicture:
                setFragement(new NewImageFragment());
                break;
            default:
                break;
        }
    }

    // This method sets the fragment for the FrameLayout
    public void setFragement(Fragment fragement) {
        FragmentManager fragementManager = getSupportFragmentManager();
        // Start a transaction
        android.support.v4.app.FragmentTransaction fragmentTransaction = fragementManager.beginTransaction();
        fragmentTransaction.replace(R.id.framelayout,fragement);// Set the FrameLayout to use the passed fragment
        fragmentTransaction.commit();
    }
}Code language: JavaScript (javascript)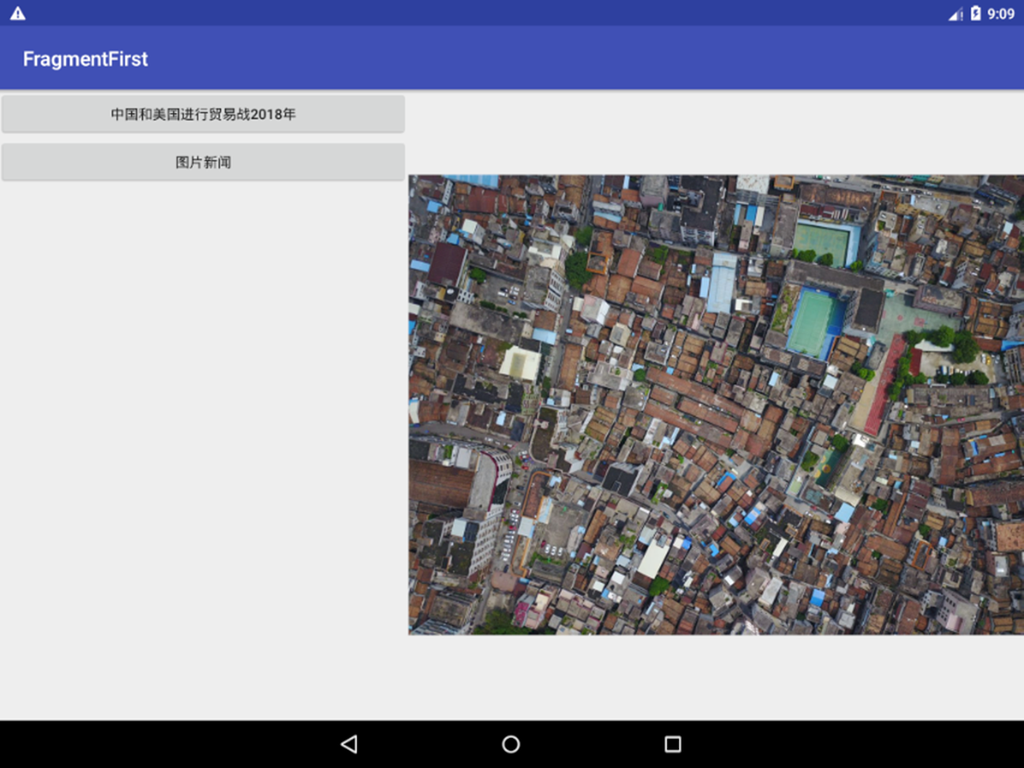
04 – Using the Back Stack with Fragments
We covered what the back stack is in the basic course.
In the previous example, when we press the back button, the app exits the main activity and then the whole program. That’s not what we want. We want the back button to return to the previous fragment.
To make fragments support the back stack is actually quite simple.
Just add the transaction to the back stack.
// This method sets the fragment for the FrameLayout
public void setFragement(Fragment fragement) {
    FragmentManager fragementManager = getSupportFragmentManager();
    // Start a transaction
    android.support.v4.app.FragmentTransaction fragmentTransaction = fragementManager.beginTransaction();
    fragmentTransaction.replace(R.id.framelayout,fragement);// Set the FrameLayout to use the passed fragment
    fragmentTransaction.addToBackStack(null);// Add the transaction to the back stack
    fragmentTransaction.commit();
}Code language: JavaScript (javascript)
05 – Communication Between Fragment and Activity
Fragments are embedded in Activities, but in reality, they are not that tightly coupled.
Our Fragment and Activity actually exist as independent classes.
There is no built-in way for them to communicate directly.
To make communication easier,
FragmentManager provides a method similar to findViewById, used to get a fragment instance from the layout.
getFragmentManager android.support.v4.app.Fragment
needs to be cast. This wasn’t mentioned in the book.
If you imported the android.support.v4.app.Fragment package (i.e., the v4 package)
import android.support.v4.app.Fragment;
then when obtaining the FragmentManager, you should use
FragmentManager fm = getSupportFragmentManager();
The corresponding fragment must also import the matching package!
// Get fragment instance in Activity's onCreate method
NewListFragment newListFragment = (NewListFragment)getSupportFragmentManager().findFragmentById(R.id.newlist_fragment);
Toast.makeText(this, newListFragment.getId()+"xxxx",Toast.LENGTH_LONG).show();Code language: JavaScript (javascript)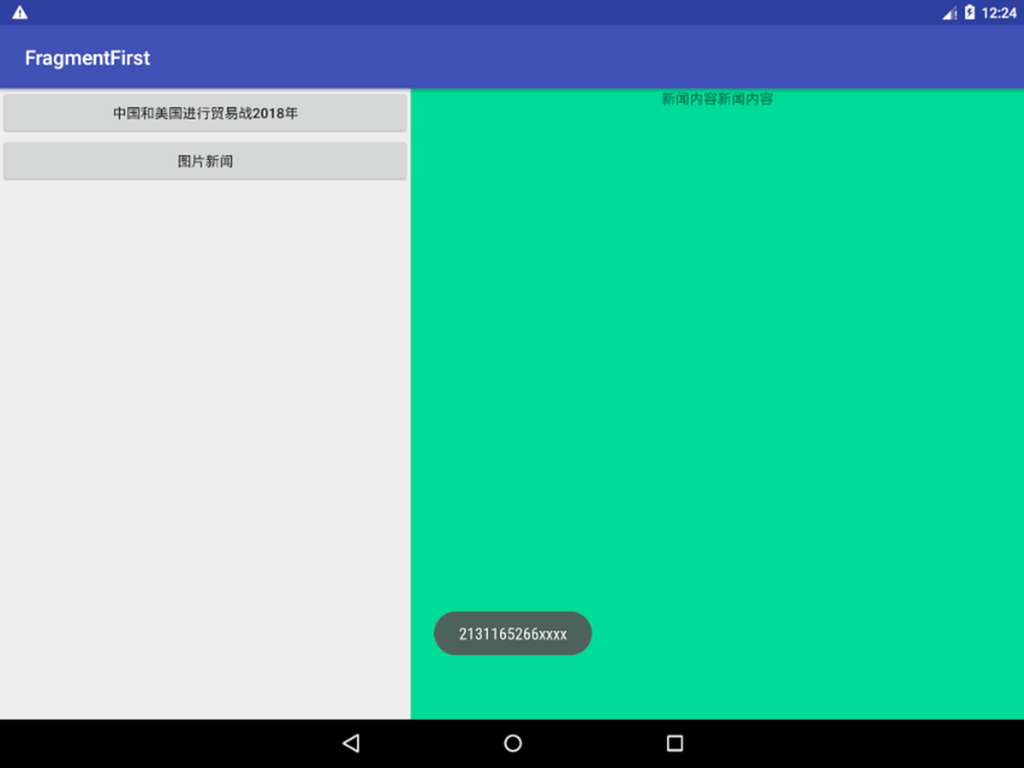
Getting Activity from Fragment
// Get Activity from fragment
MainActivity mainActivity = (MainActivity) getActivity();
Toast.makeText(getContext(), mainActivity.getTitle(),Toast.LENGTH_LONG).show();Code language: JavaScript (javascript)
You can call the getActivity() method.
06 – Fragment Lifecycle
The fragment lifecycle is basically the same as an Activity’s.
Fragments also have four states.
Running, Paused, Stopped, Destroyed.
1. Running state: The fragment is visible, and the Activity it belongs to is in the running state, so the fragment is also active.
2. Paused state
When another Activity that doesn’t fill the entire screen is added to the top of the stack, the visible fragment managed by it enters the paused state.
3. Stopped state
When an Activity enters the stopped state, its associated fragments also enter the stopped state. Alternatively, if you use FragmentTransaction’s remove or replace method to remove a fragment from an Activity, and you called addToBackStack before committing the transaction, it will also enter the stopped state.
In short, a fragment in the stopped state is not visible to the user and may be recycled by the system at any time.
4. Destroyed state
Fragments always depend on Activities. So when an Activity is destroyed, its related fragments also enter the destroyed state. Alternatively, if you use FragmentTransaction’s remove or replace method to remove a fragment from an Activity, and you did NOT call addToBackStack before committing, it will also enter the destroyed state.
Just like Activities, Fragment also provides a series of callback methods to cover every part of its lifecycle. Almost everything an Activity has, a Fragment has too.
At the same time, Fragment also provides some additional callback methods.
Fragment